

At some point, we’ve all slipped up and forgotten about an important event – whether it was a friend’s birthday, a family member’s first day at a new job, or maybe even our own anniversary!
Scheduling an email in advance means that, even if an important date does somehow manage to slip your mind, then at least you’ve fired off a quick note just to let the other person know you’ve been thinking about them.
But scheduling emails doesn’t just come in handy for wishing your favourite aunt a happy birthday, it can also help boost your productivity. For example, you might want to start the working day by writing and scheduling all the emails you know need to go out during the course of that particular day, leaving you free to focus on more important tasks (until the replies start rolling in, at least!) Scheduling emails in advance can also keep things ticking over when you’re away from your computer for an extended period of time, for example when you’re on holiday.
There’s lots of benefits to scheduling emails, so it’s pretty frustrating that this feature is nowhere to be found in Mac’s built-in Mail app. By default, the only way you can send an email is to hit Mail’s ‘Send’ button. Even if you take the time to write an email in advance, you’ll still need to hop back to Mail and press ‘Send’ when you actually want that email to go out.
Mail may not have a built-in scheduler, but all is not lost as you can add this feature to Mail yourself, either by enlisting the help of a third party app or by creating an Automator workflow. In this article, I’ll be exploring both methods.
Before we begin there is one catch you need to be aware of: if your Mac is turned off, asleep, disconnected from the Internet, or the Mail app is closed, then your Mac won’t be able to send scheduled emails. Just something to bear in mind before you schedule that ‘Happy Birthday’ message to go out at midnight!
Creating an Email Scheduler with Automator
Automator is ideal if you want to schedule emails but don’t want to download a third party app, or if you don’t see yourself scheduling enough emails to warrant having an app dedicated to the task.
To create an Automator workflow that can send emails at a time and date chosen by you:
- Launch the Automator app by navigating to your Mac’s ‘Applications’ folder, selecting ‘Utilities’ and double-clicking Automator.
- In the ‘Choose a type for your document’ window, select ‘Application,’ followed by ‘Choose.’
- Make sure the ‘Actions’ tab is selected, then select the ‘Mail’ item.

4. Find the ‘New Mail Message’ action, then drag it into the editor section of the Automator window, and drop it into your workflow.

5. You can now create your email. Enter the recipient’s address, as well as anyone you want to CC or BCC, the email’s subject, and its content.
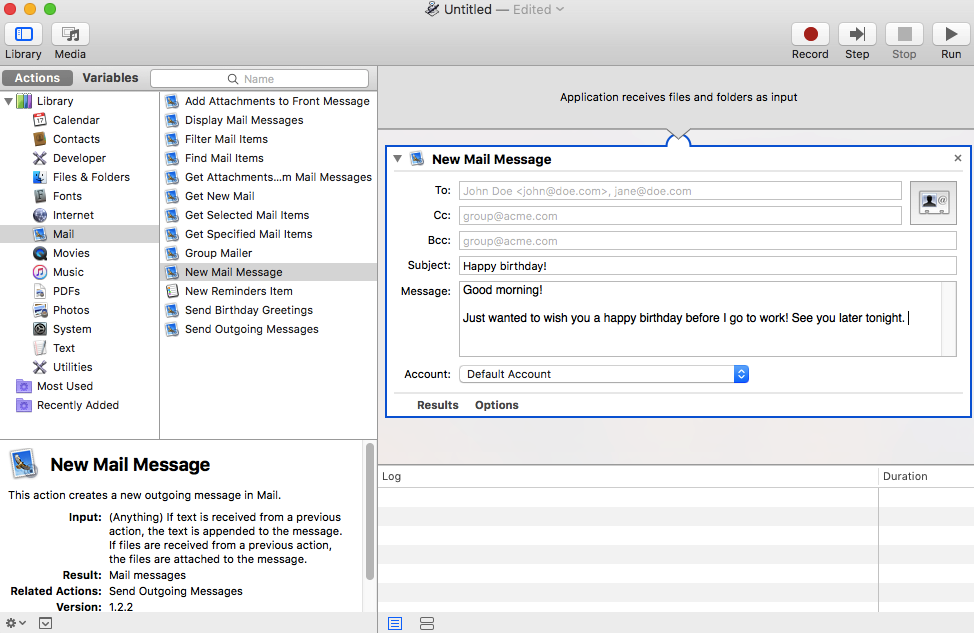
6. If you have multiple email accounts, then open the ‘Account’ dropdown and choose the account you want to send this message from.
7. Want to schedule multiple emails to go out at the same time? Then drag another ‘New Mail Message’ action into your workflow, and complete all the required fields.
8. Find the ‘Send Outgoing Messages’ action in Automator’s left-hand menu and drag it into your workflow.
9. You’re now ready to save your application, so select ‘File’ from the menu bar, followed by ‘Save…’
10. Give your app a name (I’m going to use ‘Email Scheduler’) and double-check that the ‘File Format’ is set to ‘Application.’ Click ‘Save.’
Your email-scheduling app is now ready to use, but you still haven’t specified when this email should be sent. To specify a date and time, you’ll need to use your Mac’s Calendar app, so launch this app and let’s get started:
- Find the date when you want this email to be delivered, and double-click that box to create a ‘New Event.’

2. The ‘New Event’ box already includes a default time – give this placeholder a click to open a new section where you can specify a time of your choosing.

3. Next, hover over the ‘Alert’ section until a dropdown appears. Open this dropdown and select ‘Custom…’

4. Open the first dropdown menu and select ‘Open file.’
5. Open the second dropdown and select ‘Other…’
6. Select the Email Scheduler app you created earlier.
7. Open the third dropdown menu and select ‘At time of event.’

8. Save your changes by clicking ‘OK.’
And that’s it! Your email will now be sent at the time you specified in the Calendar.
This may seem like a lot of work, particularly if you just want to schedule a single email, but once you’ve created this Email Scheduler app you can use it to schedule subsequent emails, just by tweaking its workflow.
To edit the Email Scheduler workflow, you’ll need to open it in Automator. So either:
- Launch Automator and then, when it prompts you to create a new document, give the ‘Open an Existing Document….’ button a click. Select your ‘Email Scheduler’ app.

- Select ‘File’ from Automator’s menu bar, followed by ‘Open…’ Once again, select your ‘Email Scheduler’ app.
Automator will then load Email Scheduler’s workflow, ready for you to edit. Update the ‘New Mail Message’ action with a new recipient, subject, and new body content, and save your changes. Then, all you need to do is launch the Calendar app and specify when you want this email to go out.
Using a Third Party App
If you’re going to be scheduling emails on a regular basis, or you’re unfamiliar with Automator, then it may make sense to use a third party app instead.
One popular email scheduling app is MailButler. Rather than functioning as a standalone app, MailButler plugs into Mail, essentially adding a ‘Schedule email’ button to the standard Mail interface.
You can download the Essential edition of MailButler for free, although purchasing the Professional or Business version does give you access to some additional features.
To setup MailButler, install it and then launch the MailButler app. At this point, you’ll be prompted to restart the Mail app so MailButler can install its extensions, so go ahead and click ‘Restart Mail now.’
Once Mail restarts, create a MailButler account and click ‘Register.’ After a few moments, you should receive a confirmation email (if you don’t, then check your ‘Spam’ folder), open it and click the ‘Confirm Email Address’ link.
Flick back to your Mail app and enter the email address and password associated with your MailButler account, and then you’re ready to start using MailButler’s features, including scheduling emails.
To schedule an email, simply compose a new message as normal, but instead of clicking Mail’s regular ‘Send’ button, click the new icon directly to its right – it looks like the regular ‘Send’ icon, but with the addition of a little clock icon.
![]()
Clicking this ‘Schedule’ button will launch a panel where you can specify exactly when this email should be sent.
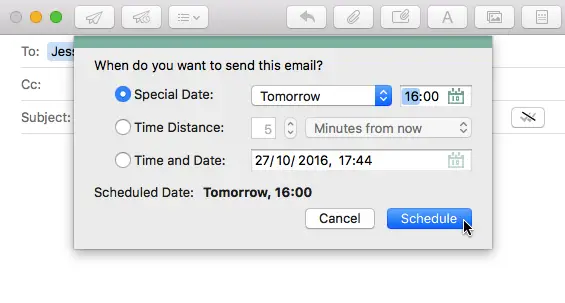
Choose from the following:
- Special Date. Schedule the email to go out later today, tomorrow, or the next business day.
- Time Distance. Schedule the email to go out after a specific number of minutes, hours or days have passed.
- Time and Date. Schedule the email to go out at any date or time chosen by you.
Then, the only thing left to do is hit that ‘Schedule’ button and your email will be stashed in Mail’s ‘Outbox’ until your chosen time and date, at which point MailButler will kick in and send the email for you.
If you need to make some changes to a scheduled email, then navigate to Mail’s ‘Outbox’ folder and open the email in question. This launches Mail’s standard ‘Compose email’ window where you make whatever edits you need, and can even reschedule the email by clicking the ‘Schedule’ button and then changing the date and time.
To cancel a scheduled email, find the email in your ‘Outbox’ and delete it.
Sending Messages when your Mac is Asleep
Although technically MailButler can’t send scheduled messages while your Mac is asleep, it can send scheduled messages while your Mac is napping.
Power Nap is a system feature that aims to keep your Mac in the loop even when it’s been asleep for an extended period of time. When your Mac is taking a Power Nap, it wakes up every few hours to perform a range of tasks, for example during these periods the Calendar app will check for new invites, Mail will pick up any incoming messages, and your Notes, Reminders and Photos apps will sync with any changes you’ve made on your other Apple devices.
During these periods, MailButler will also be able to send any emails that should have gone out while your Mac was sound asleep. The timing may not be perfect, but your scheduled messages will typically still go out within a few hours of your original schedule.
You’ll find a list of all the Macs that support the Power Nap feature at the official Apple docs.
If your Mac is included on this list, then you can enable Power Nap by:
- Selecting the ‘Apple’ logo from the menu bar.
- Selecting ‘System Preferences…’
- Clicking ‘Energy Saver.’
- To enable Power Nap while your device is plugged into a power source, select the ‘Power Adapter’ tab, followed by the ‘Enable Power Nap while plugged into a power adapter’ checkbox.

5. To enable Power Nap when your device is unplugged, select the ‘Battery’ tab and enable ‘Power Nap while on battery power.’
Note, even with Power Nap enabled MailButler can only send emails if the Mail app is open and connected to the Internet, so make sure both of these conditions are met before you let your Mac drift off to sleep.
Never forget to reply to an email again
Have you ever received an important email and thought “I’ll reply to this as soon as I have a moment,” and then completely forgotten about it? Usually, this occurs because the email arrives in your inbox at the worst possible moment, perhaps when you’re rushing off to a meeting or when you’ve had a particularly hectic day and you promise yourself you’ll reply to the email first thing in the morning.
But, there’s a quick and easy trick to ensure that you never forget to reply to an important email again – and that’s to use Mac’s aptly-named Reminders app to schedule a reminder. At the designated time a notification will appear, reminding you that you need to reply to that important email.
To create a reminder:
- Launch the Mail app and open the email you need to reply to.
- Open your Mac’s ‘Applications’ folder, and launch the ‘Reminders’ app.
- Drag this email into your ‘Reminders’ app and drop it into the list. A ‘Show in Mail…’ link should appear as a new list item.

4. Hover over the ‘Show in Mail’ link until an ‘i’ appears. Give this ‘i’ a click to open a box where you can schedule your reminder.
5. Select ‘On a Day,’ enter the time and date when you want to receive this reminder, and then click ‘Done.’
When the appointed time arrives, a notification will appear reminding you that you still have an important email to write. Even better, if you click this notification it’ll launch the Mail app with the email in question already open, just waiting for you to pen your reply.
Before you go
After spending over 20 years working with Macs, both old and new, theres a tool I think would be useful to every Mac owner who is experiencing performance issues.
CleanMyMac is highest rated all-round cleaning app for the Mac, it can quickly diagnose and solve a whole plethora of common (but sometimes tedious to fix) issues at the click of a button. It also just happens to resolve many of the issues covered in the speed up section of this site, so Download CleanMyMac to get your Mac back up to speed today.


This is great, thanks. I’m trying to figure out something else, though, namely how to *check* for email only during specific times. Basically, I don’t want to get time-sensitive emails (or any emails) at night, when I’m bathing kids, making lunches, and so on. Or trying to go to sleep. But lack the willpower to not go click on it. So I just want mail to not look for new stuff from, say 900pm-700am. Any ideas? Thanks!