

Most of us have experienced the pain of losing an important file.
Maybe you hit the ‘Delete’ key at the wrong moment or a file has become corrupted, or perhaps the problem is more severe, for example maybe you formatted your hard drive without realising that this deletes all your data!
Regardless of whether you need to recover a single song from iTunes, or your Mac has completely crashed, taking all your irreplaceable family photos along with it – don’t panic! Just because you can’t currently access a file doesn’t mean that file is lost forever.
In this article I show you how to undelete deleted files, starting with some simple fixes that you can use to recover any file or folder. Towards the end of this article, I’ll also share some additional tricks that you can use to recover images that you’ve deleted from the macOS Photos app, and music that you deleted from iTunes.
Restore a Time Machine Backup
If you’re in the habit of creating regular Time Machine backups, then you can recover lost files and folders by restoring a backup that pre-dates the item vanishing from your machine. Restoring a Time Machine backup can also be useful if you need to recover an earlier version of a file, for example if you’ve edited an image only to realise that you preferred the original!
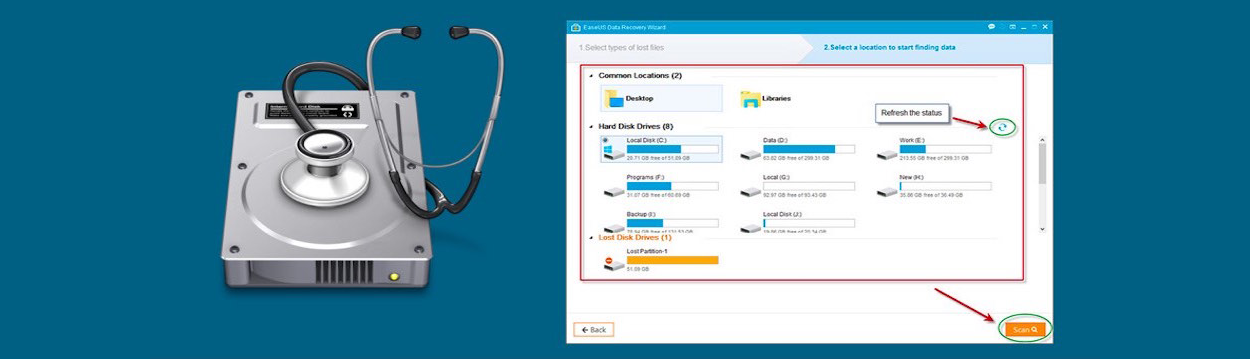
Scan your hard drive, with EaseUS
EaseUS Data Recovery Wizard is a third party tool that can recover deleted, formatted or otherwise inaccessible data.
EaseUS is priced at £83.99, but a free trial is available, which is perfect for trying the application or if you need to recover a deleted file now but don’t have the spare cash to invest in a license just yet.
- Head over to the EaseUS website and download the free trial.
- Launch the EaseUS .dmg file and follow the onscreen instructions to install.
- Once this application has been installed, launch it and enter your admin password when prompted.
- In the main EaseUS user interface, select the drive where the lost or inaccessible files were located, and then click ‘Scan.’
- Once the scan is complete, EaseUS will display a list of all the items that it could potentially recover.
- To restore a file, select its accompanying checkbox and then click ‘Recover Now.’
Recovering deleted images in Photos
Whenever you delete an image from macOS’ Photos app, you have up to 40 days to recover that photo, so it’s always worth checking whether the missing image is still hanging around in Photos’ ‘Recently Deleted’ folder.
- Launch the Photos application.
- In the left-hand menu, select ‘Recently Deleted.’ This folder contains all your recently-deleted images, complete with a countdown to the day when each image will be completely removed from Photos. Just be aware that if your Mac is running out of space, then images may be deleted before the countdown has elapsed.

Select the item that you want to restore and then click the ‘Recover’ button. This image will now be available in the location where it was originally stored.
What if the image isn’t in Recently Deleted?
If you can’t find the image in the ‘Recently Deleted’ folder, or you never actually imported the image into Photos, then you may need to use a third party tool.
Disk Drill is one application that was designed specifically to help you recover lost photos, by scanning for images that it could potentially restore.
- Download Disk Drill 3. I’m using the free version, but a Pro version is available for $89.
- Install Disk Drill, and then launch it.
- Work you way through the introductory screens, and then click ‘Get Started’ to open the main Disk Drill interface.
- Disk Drill will start its scan automatically, but you can use the various dropdowns to edit a scan that’s already underway, for example restricting your search to files that were deleted within the last day.
A scan can take Disk Drill several hours, so you might want to leave it running in the background, or even overnight.
Once Disk Drill starts returning items, you can preview each file by clicking its accompanying ‘eye’ icon.
When you find a file that you want to restore:
- Select the file.
- Open the ‘Choose folder…’ dropdown and specify the location where this file should be restored to.
- Click ‘Recover.’

Disk Drill is straightforward to use, with one exception: High Sierra users will need to disable System Integrity Protection (SIP) before Disk Dill can recover any content.
To disable SIP:
- Boot into Recovery by restarting your Mac while holding the ‘Command + R’ keys.
- Open the ‘Utilities’ menu.
- Select ‘Terminal’ and then enter the following command:
csrutil disable
- Exit recovery mode and restart your Mac as normal.
- You should now be able to run Disk Drill without any problems.
SIP helps to protect your MacBook from malware, so you should only ever disable SIP on a temporary basis. As soon as you’ve finished running Disk Drill, reinstate SIP by booting back into Recovery Mode, selecting ‘Utilities > Terminal’ and then entering the following command:
csrutil enable
Recovering deleted music in iTunes
Deleting a song from iTunes will remove that song from the iTunes user interface, but if you downloaded the file (rather than streaming it over your Internet connection) then it’s possible this file may still be present on your Mac.
- Open a new Finder window.
- Select ‘Go > Home’ from the Finder menu bar.
- Navigate to ‘Music > iTunes > iTunes Media > Music.’
If the track is still physically present on your Mac, then you can import it back into iTunes:
- Launch the iTunes app.
- Select ‘File > Add to Library…’ from the iTunes menu bar.
- Navigate to ‘Music > iTunes > iTunes Media > Music.’
- Select the track that you want to restore, and then click ‘Open.’
If this file isn’t present in the iTunes folder, then you’ll have to go to the original source, which may mean re-downloading the track from the iTunes store, or ripping it from a CD.
Before you go
After spending over 20 years working with Macs, both old and new, theres a tool I think would be useful to every Mac owner who is experiencing performance issues.
CleanMyMac is highest rated all-round cleaning app for the Mac, it can quickly diagnose and solve a whole plethora of common (but sometimes tedious to fix) issues at the click of a button. It also just happens to resolve many of the issues covered in the speed up section of this site, so Download CleanMyMac to get your Mac back up to speed today.


Add Comment