


Most of the time, you don’t need to worry about your Mac’s temperature. Your laptop’s built-in fans will go faster when your Mac starts to get hot, and slow down once the temperature returns to normal, all with zero interference from you.
However, there are some benefits to manually adjusting your fan settings.
Whenever your Mac’s temperature starts to rise, macOS automatically throttles your CPU to give the temperature a chance to return to normal. By configuring your fans to kick in at lower temperatures you can push your Mac harder, without macOS stepping in and throttling your CPU. This performance boost comes at a cost, as your fans will be noticeably louder, which may be difficult for some users to deal with, or could even be embarrassing if you’re using your Mac around other people, such as in an office or cafe.
Alternatively, if you find the sound of the fans grating, then you can turn them down a notch. As ever, there’s a downside: your system will get hotter, quicker, so macOS is more likely to throttle your CPU and make your Mac run noticeably slower, even when you’re not doing anything particularly strenuous.
In this article, I’ll show you how to manually configure your fan settings, using the free Macs Fan Control application.
Don’t damage your Mac!
Regardless of whether you’re cranking your fans up or down, it’s important to monitor the temperature of your CPU and other components, to make sure your manual tweaks aren’t damaging your system.
Running your fans at maximum speed for a significant period of time can damage your Mac, and if you push the CPU too hard then it’s possible your Mac may start to overheat, even with the fans at full blast.
At the other end of the scale, if you tell macOS to wait too long before activating the fans, then your Mac may be nice and quiet but it may also be internally burning up!
When adjusting your fan settings, it’s best to err on the side of caution and perhaps consider making small changes, slowly, just to make sure there’s no negative side effects.
Manually increase, or decrease your fan settings
In this tutorial we’ll be using the free, third party Macs Fan Control app, so the first step is getting this application setup:
- Download the latest version of the Macs Fan Control app.
- Unzip the resulting ZIP file.
- If Macs Fan Control is going to work correctly, then it must be located in your “Applications” folder, so grab the app and drag it to your “Applications” folder.
- Launch the Macs Fan Control app, and enter your admin password when prompted.
This application will now list all of your Mac’s fans and their current temperatures, and will display two buttons for each fan:
- Auto. This is the fan’s default settings.
- Custom. This allows you to set a specific target temperature or RPM (revolutions per minute) which is the number of revolutions your Mac’s hard drive will complete in a single minute.

To override a fan’s settings, select its accompanying “Custom” button. In the subsequent window, you can:
- Manually set a constant fan speed, by selecting “Constant RPM value” and then using the accompanying slider to increase or decrease the RPM.
- Set a specific temperature, at which point the fan will start to run faster. You can also set the temperature where the fan will hit its maximum speed.
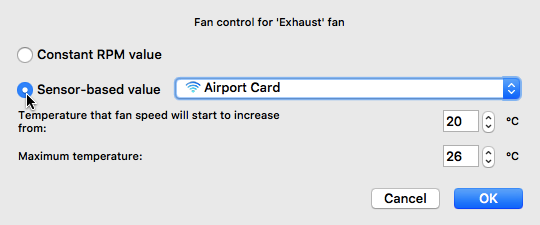
- When you’re happy with your changes, click “OK.”
You should immediately hear a change in your fan speed. Spend some time performing various tasks, to see whether your changes have the desired effect – and to check whether you can put up with the extra noise or heat coming from your machine!
While testing your changes, you can use the Macs Fan Control app to monitor the temperature of various components, to make sure you’re not causing any damage to your system. In particular, you should keep a close eye on the CPU Core temperatures, as these are most likely to be affected by changes to your fan settings.
If at any point you’re concerned about your Mac’s internal temperature, then you should immediately restore the default fan settings:
- In the Macs Control app, select the fan in question.
- Select its accompanying “Auto” button.
If you’re happy with your changes, and want to continue using them even after rebooting your Mac, then:
- Click the “Macs Fan Control” icon in your Mac’s menu bar.
- Select “Preferences…”
- In the subsequent window, make sure the “General” tab is selected.
- Select “Autostart minimised with system.”
- Click “Close.”
Worried about overheating? Easily monitor your Mac’s temperature
The Macs Fan Control app displays live information about the temperature of all your Mac’s core components. If you make any changes to your fan settings, then you could keep this app running in the background and use it to keep track of your Mac’s temperature – but this requires you to keep switching back to the app!
If you want an easier way to track your Mac’s temperature, then you can add this information to the menu bar. Unfortunately, Macs Fan Control can only display the temperature of a single component, but this can still give you an indication of your Mac’s general temperature, or help you keep a closer eye on a component that you know is particularly susceptible to overheating.

To add a temperature readout to your Mac’s menu bar:
- Select the “Macs Fan Control” icon from your Mac’s menu.
- Select “Preferences…”
- In the subsequent window, select the “Menubar display” tab.
- Open the “Sensor” dropdown and choose the sensor that you want to monitor; a temperature readout for that sensor should now appear in your Mac’s menu bar.
Before you go
After spending over 20 years working with Macs, both old and new, theres a tool I think would be useful to every Mac owner who is experiencing performance issues.
CleanMyMac is highest rated all-round cleaning app for the Mac, it can quickly diagnose and solve a whole plethora of common (but sometimes tedious to fix) issues at the click of a button. It also just happens to resolve many of the issues covered in the speed up section of this site, so Download CleanMyMac to get your Mac back up to speed today.


Add Comment