


Have you ever stopped to think about just how much Apple manage to pack into your Mac’s toolbar?
No matter what app or part of the file system you’re currently viewing, the toolbar ensures you always have instant access to a wide range of essential system features, tools and information. Then, as you navigate through your various apps, this toolbar updates automatically so you always have easy access to the functionality you’re most likely to need, based on the app you’re currently viewing.
But there’s one feature that many Mac users feel is missing from the toolbar: a calendar icon.
macOS’ toolbar may display the date and time, but clicking this section of the toolbar simply opens a dropdown containing a few different ways that you can tweak the date and time display – it doesn’t actually integrate with macOS’ Calendar app in any way. Wouldn’t it be more useful, if clicking this part of the toolbar actually revealed a calendar dropdown?
In this article I’m going to show you how to add a calendar icon to your Mac’s toolbar, using the third party Itsycal application. Once you have Itsycal up and running, you’ll be able to check your schedule, as well as add, remove and edit all of your appointments, simply by giving this toolbar icon a click.
Getting Started with Itsycal
- Head over to the Itsycal website and download the latest version.
- Unzip the Itsycal zip file.
- Itsycal can only function from your Mac’s ‘Applications’ folder, so make sure you drag your newly-unzipped Itsycal file to this location before proceeding.
- Double-click to launch Itsycal. At this point you’ll be asked to grant Itsycal access to your Calendar app. This integration is how Ityscal is able to display information about your upcoming appointments, so unless you have a specific reason not to, you’ll generally want to grant Itsycal access by clicking ‘OK.
Itsycal will then add a calendar icon to your Mac’s menu bar; clicking this icon will reveal a little calendar popup.
![]()
You can select any day by clicking it, and can change the month using the two arrow icons. To jump back to the current day at any point, simply click the little circle icon inbetween the two arrows.
If you prefer to navigate using keyboard shortcuts instead, then Itsycal supports the following:
- J – Down.
- K – Up.
- H – Left.
- L – Right.
- Right arrow key – Jump forward one month.
- Left arrow key – Jump back one month.
- Up arrow key – Jump forward one year.
- Down arrow key – Jump back one year.
Assuming that you’ve granted Itsycal access to your Calendar, all of your appointments for the currently-selected day will appear at the bottom of the calendar popup. You can add new events to your schedule, by clicking the little ‘+’ icon.
If you change your mind and want to to revoke Itsycal’s access to your Calendar app:
- Navigate to ‘System Preferences > Security & Privacy.’
- Click the little padlock icon in the bottom-left corner and enter your admin password.
- Select the ‘Privacy’ tab.
- In the left-hand menu, select ‘Calendars.’
- Find Itsycal and deselect its accompanying checkbox.
Replace the Clock with Itsycal
While the Itsycal icon does provide you with an easy way of accessing calendar information, in its default state the Itsycal icon displays very similar information to your Mac’s time and date icon.
If you prefer a minimalistic look for your toolbar, then you may want to consider removing macOS’ default clock icon and making a few tweaks to Itsycal, so that its menu bar icon displays date and time information instead:
- Remove macOS’ default clock icon, by navigating to ‘System Preferences > Date & Time.’
- Select the ‘Clock’ tab.
- Deselect the ‘Show date and time in menu bar’ checkbox.
- Open the Itsycal popup, and click the cog icon in its bottom-right corner.
- Select ‘Preferences…’
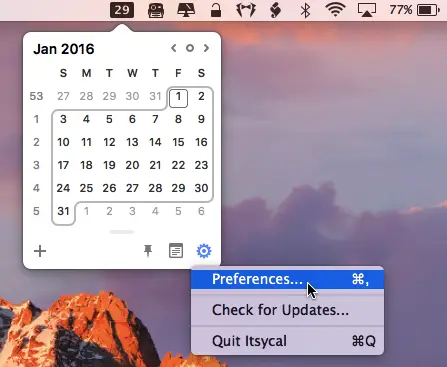
- Select the ‘Appearance’ tab.
At this point, you’ll need to enter a code that tells Itsycal what date and time information you want it to display in the toolbar, and the order it should display this information in:
- y. Display the year.
- M. Display the month.
- w. Display the week of the year.
- W. Display the week of the month.
- d. Display the day of the month.
- E. Display the day of the week.
- a. Display whether it’s AM or PM.
- h. Display the hour in [1-12] format.
- H. Display the hour in [0-23] format.
- m. Display the minute.
- s. Display the second.
Here’s some common date and time combos you may want to copy/paste into Itsycal:
- H:mm. This would display the hour and minute, for example 1:01.
- MMM d h:mm. This would display the month, the date, and the time, for example Aug 29, 1:01.
- yyyy-MM-dd. This would display the year, month and date, in the following format: 2017-08-29.
- E, MMM d h:mm a. This would give you Tue, Aug 29 1:01PM.
- EEEE H:mm. This would give you Tuesday 13:01.
Once you’ve entered the code you want to use, the ‘Hide icon’ checkbox will become available – select this checkbox.
Before you go
After spending over 20 years working with Macs, both old and new, theres a tool I think would be useful to every Mac owner who is experiencing performance issues.
CleanMyMac is highest rated all-round cleaning app for the Mac, it can quickly diagnose and solve a whole plethora of common (but sometimes tedious to fix) issues at the click of a button. It also just happens to resolve many of the issues covered in the speed up section of this site, so Download CleanMyMac to get your Mac back up to speed today.


Add Comment