Thinking of selling your Mac? Or maybe you’re planning to do a good deed and pass your old Mac along to a friend or family member?
Regardless of whether you’re gifting or selling your Mac, no one’s going to be thrilled to find that their new computer is packed with someone else’s content and data, and you definitely don’t want to sell your Mac to a stranger while it’s still logged into your iCloud account – or even worse, your PayPal!
Even if you’re not planning on getting rid of your Mac, there may still be times when you want to wipe your computer. Maybe your Mac is clogged with years’ of content and you’ve decided it’ll be far easier to just start from scratch rather than trying to sort this mess out manually; or perhaps you’ve tried to customise your Mac and it’s gone terribly wrong, and you need a quick way of restoring its original settings.
In this article, I’m going to show you how to revert your Mac to a pristine, fresh-out-the-box state. I’ll show you how to remove all your login information, deauthorise your iTunes and, finally, how to restore factory settings by wiping your hard drive and installing a fresh copy of macOS.
Before we begin: Backup your Mac
Before you remove anything from your Mac, you’ll need to make sure you’ve backed up all the files, documents and any other content you want to keep.
If you only need to backup a handful of items, then you may want to just move this content to an external storage device, such as a USB stick, or copy it to an online hosting service such as DropBox, iCloud or Google Docs. However, if you have lots of content that you want to hang onto, then it may be easier to simply clone the entire contents of your hard drive to an external drive.
When you clone your hard drive, not only are you copying all its application and user files, but you’re also copying the entire operating system, essentially creating a perfect copy of your Mac that you can access at any time. This is a good way of ensuring that you won’t lose anything when you wipe your Mac’s hard drive. You can even create a clone and then hang onto it until you’re certain that you didn’t forget to copy anything important to your new Mac.
A cloned drive can also be a great way of setting up a new Mac, as you can use it as a bootable copy that you attach to your new machine and then use to boot into your original Mac, effectively turning your new computer into a perfect copy of your old one.
There’s various apps that you can use to clone your Mac, but for this tutorial I’m going to use SuperDuper.
To create your clone, you’ll need an external hard drive that’s at least the same size as your Mac’s main drive. You’ll also need to configure this drive:
- Plug the external drive into your Mac.
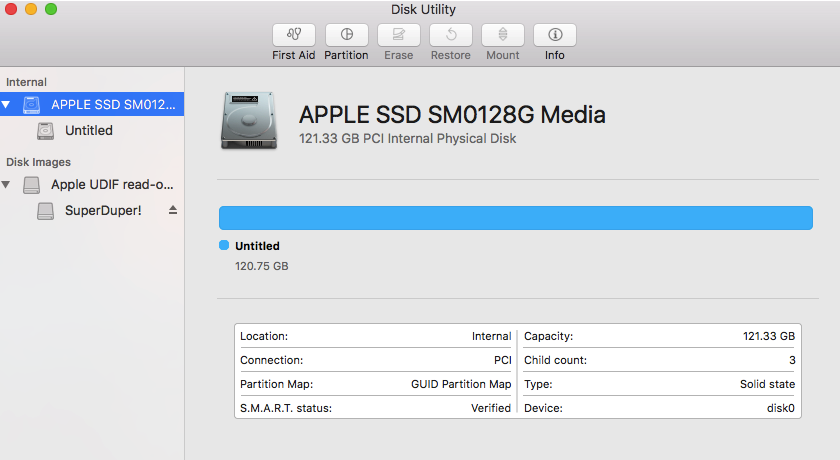
- Open a ‘Finder’ window and navigate to Applications/Utilities. Launch the Disk Utility app.
- Select your backup drive from Disk Utility’s left-hand menu.

- Select the ‘Partition’ tab.
- Give the drive a descriptive name and select Mac OS Extended (Journaled) from the ‘Format’ dropdown.
- Click ‘Apply.’
To clone your Mac:
- Download and install the SuperDuper app.
- Launch SuperDuper.
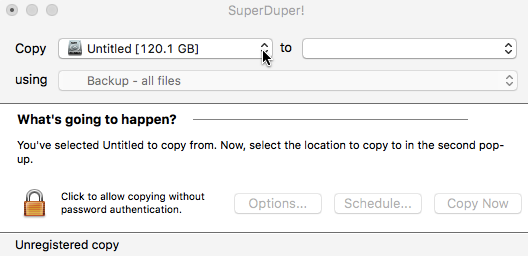
- Open its ‘Copy’ dropdown and select your main hard drive.

- Open SuperDuper’s ‘To’ dropdown and select your backup drive.
- Open the ‘Using’ dropdown and select ‘Backup – all files.’
- Click ‘Copy Now.’
You now have a complete clone of your Mac’s hard drive that you can access from any Mac. Restoring individual items from this clone is easy – simply attach the external hard drive and drag the item(s) in question to their new home.
Alternatively, you can restore the entire contents of your cloned drive, effectively transforming your new Mac into a carbon copy of your old one:
- Download and install SuperDuper on your new Mac.
- Launch SuperDuper.
- Open the ‘Copy’ dropdown and select your backup drive.
- Open the ‘To’ dropdown and select your main hard drive.
- Open the ‘Using’ dropdown and select ‘Restore – all files.’
- Click ‘Copy Now.’
- Restart your Mac, then while it’s restarting hold down the ‘Option’ key to boot into the Startup Manager.
- Select your newly-restored main hard drive, and that’s it! Once your Mac restarts, it’ll be as though you’re accessing your previous Mac.
Whether you decide to clone your entire Mac, or simply copy your most important files to DropBox, once you’ve backed up the content that matters to you, it’s time to start clearing out your Mac.
Deauthorise your computer
When you deauthorise a Mac, that Mac will no longer have access to any of the content you purchased from iTunes, iBooks or the App Store. Chances are that even if you’re gifting your Mac to another person you won’t want to pass along all your songs, movies and other purchases as well, so you’ll generally want to deauthorise your computer. Plus, when you purchase content through iTunes, you can only access that content on a maximum of five devices, so why waste content on a computer that you no longer have access to?
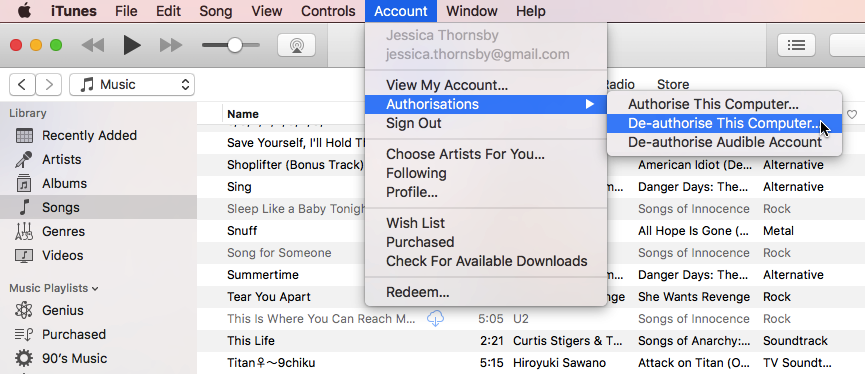
To deauthorise your Mac, open iTunes and select ‘Account > Authorizations > Deauthorize This Computer.’

Enter your username and password when prompted, and click ‘Deauthorise.’
You should also deauthorize any serialized apps, such as Microsoft Office or Adobe Photoshop, so you don’t find yourself unable to access a program you’ve paid good money for, simply because the serial number is still tied to your previous Mac. For information on how to deactivate a particular third-party app, check out that app’s support documentation or website.
Delete your iCloud account
Next, make sure you delete your iCloud account from your Mac, along with all the content that’s linked to that account:
- Open your ‘System preferences…’ and select ‘iCloud.’
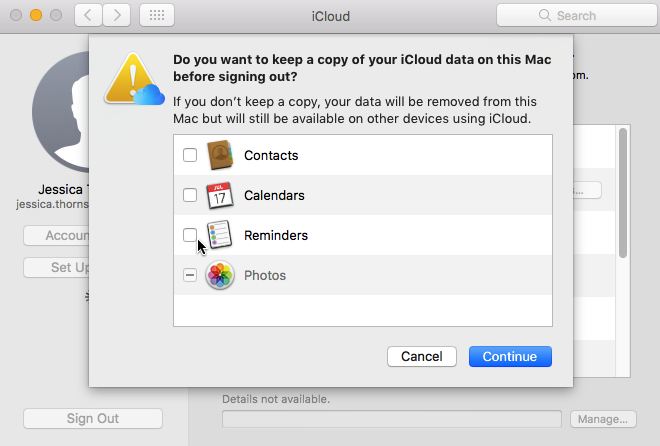
- Click the ‘Sign out’ button.
- At this point you’ll be presented with a list of all the apps that are associated with your iCloud account. Deselect all these apps, then click ‘Continue.’

- Your Mac will keep prompting you to keep a copy of all the data and content associated with each app – click ‘Delete from Mac’ each time to make sure nothing is left behind. Note, none of this content will be deleted from the cloud, and you’ll still be able to access it at any time, by logging into your iCloud account.
Sign out of Messages
If you’ve been using the Messages app, then make sure you sign out of it.
Launch the Messages app, then select ‘Messages > Preferences.’ Select the ‘Accounts’ tab, then select your account from the left-hand menu, followed by ‘Sign Out.’
…..and sign out of everything else!
Make sure you sign out of all the other apps and programs you’ve installed, particularly anything that has a license associated with it. Although we’ll be wiping the hard drive in the next step, it’s always better to be safe than sorry!
Erase and reinstall macOS
Once you’re confident that you’ve backed up all your important data and content, and you’ve signed out of everything that might connect you to your old Mac, the final step is wiping your hard drive and installing a fresh copy of macOS. Note, this step will permanently erase everything on your hard drive, so you’ll lose access to anything that you haven’t backed up.
Before you begin, make sure you Mac is connected to the Internet, as you’ll need an active Internet connection in order to download a fresh copy of the operating system. You should also make sure your Mac is connected to a power source, because the last thing you want is to run out of juice halfway through wiping your hard drive, or reinstalling macOS.
To wipe your hard drive:
- Boot into Recovery Mode by restarting your Mac while holding down the ‘Command’ and ‘R’ keys. Release these keys when you see the Apple logo.
- Once you’re in Recovery Mode, select ‘Disk Utility,’ followed by ‘Continue.’
- Select your startup disk.
- Select the ‘Erase’ tab.
- Select ‘Mac OS Extended (Journaled)’ from the dropdown menu.
- Select ‘Erase.’
- After this process is complete, select ‘Disk Utility’ from the menu bar, followed by ‘Quit Disk Utility.’
After reformatting your hard drive, you’re ready to install a clean copy of the operating system. Select ‘Reinstall macOS’ from the ‘macOS Utilities’ window, then click ‘Continue’ and follow the onscreen instructions to download and install a blank copy of macOS.
Once the installation is complete, your Mac will launch into the Setup Assistant. If you’re passing your Mac along to a new user, then you should leave the setup process for them to complete, so press the ‘Command’ and ‘Q’ keys to shut down your Mac.
Clean your Mac
At this point you may be wondering: but haven’t I already cleaned my Mac?
After completing all these steps, the interior of your Mac will be clean, but what about the exterior? Computers get dirty, especially the keyboard, and most of us don’t clean our computers as often as we should.
Whether you’re selling or gifting your Mac to a new owner, no one is going to appreciate being handed a grubby computer, so consider this your reminder to spend a bit of time making sure the exterior of your Mac is every bit as clean as your newly-wiped hard drive.


Thanks thanks for the step buy step explanations that are detailed enough for almost all to understand. I am sure I will need your help in the future. Your work is appreciated Chris.