


Did you know that every time you perform a search via the Finder, you’re using the Spotlight search index?
By default, the results of a Finder search will be exactly the same as the results of a Spotlight search. However, there’s a number of ways that you can customise a Finder search, that simply aren’t possible with a Spotlight search.
Step aside Spotlight! In this article, I’ll show you how to build complex, customised searches, using the humble Finder search bar.

Restrict your search to the current folder
By default, every time you perform a Spotlight search, you’re searching your entire Mac. This is perfect if you have absolutely no idea where an item is located, but a search that encompasses your entire filesystem is always going to take longer than a focused search. If you have a rough idea where an item is located, then searching your entire Mac is unnecessary – and a complete waste of time.
One time-saving alternative, is to restrict your searches to the current folder only. For example, if you want to launch an application, then it makes sense to restrict your search to the “Applications” folder, and if you want to browse the PDF you just downloaded, then chances are that PDF is located in your “Downloads” folder. In both of these scenarios, you should be able to get your results much faster, by navigating to the folder in question and then searching the current folder only.
To instruct Finder to limit its searches to the current folder:
- Launch the Finder application.
- In the menu bar, select “Finder > Preferences…”
- Select the “Advanced” tab.
- Open the “When performing a search” dropdown, and choose “Search the Current Folder.”
- Close the “Preferences” window.
If you change your mind and want Finder to resume searching your entire Mac, then simply repeat the above steps, but this time select “Search This Mac” from the dropdown menu.
Restore your Mac’s missing “Search For” feature
In macOS Lion, Apple removed the “Search For” feature from Finder. By default, it’s no longer possible to restrict your Finder searches to items that you accessed recently (Today, Yesterday, Past Week) or items of a certain type (Images, Movies, or Documents).
“Search For” may no longer be available as part of macOS, but it is possible to create a similar effect, using Smart Folders.
Let’s create a Smart Folder that’ll help us restrict our searches to items that we accessed today:
- Launch the Finder application.
- Select “File > New Smart Folder” from the menu bar. A new window will open.
- Click the little “+” button to add a new set of search criteria.
- Open the first dropdown menu and choose “Last opened date.”
- Open the second dropdown menu and choose “today.” The window should now update to show all the applications, files and folders that you opened today.
- Click the “Save” button.
- In the subsequent popup, give this Smart Folder a descriptive name, such as “Today.”
- Make sure the “Add To Sidebar” checkbox is selected, and then click “Save.”
Now, you can view all the items you accessed today, simply by selecting “Today” from the Finder sidebar.

If you’ve followed our advice and configured Finder to restrict its searches to the current folder, then you can easily restrict a search to just the items that you accessed within the past 24 hours:
- Select “Today” from the Finder sidebar.
- Enter your search criteria, as normal.
To recreate the rest of the “Search For” items, simply repeat the above steps, but when building your Smart Folder search criteria, select the following options:
Yesterday
- Last opened date.
- Yesterday.
Past Week
- Last opened date.
- Within last.
- 7 days.
All Images
- Kind.
- Image.
All Movies
- Kind.
- Movie.
All Documents
- Kind.
- Document.
Show Spotlight search results in the Finder
Sometimes, a simple Spotlight search can return a tonne of results. Scrolling through a long list of items in Spotlight isn’t the easiest thing in the world, so in this scenario you might prefer to transfer your search results to the Finder, so you have more room to explore them properly:
- Scroll to the very bottom of the Spotlight search pane.
- Find the “Show all in Finder…” item, and give it a click.
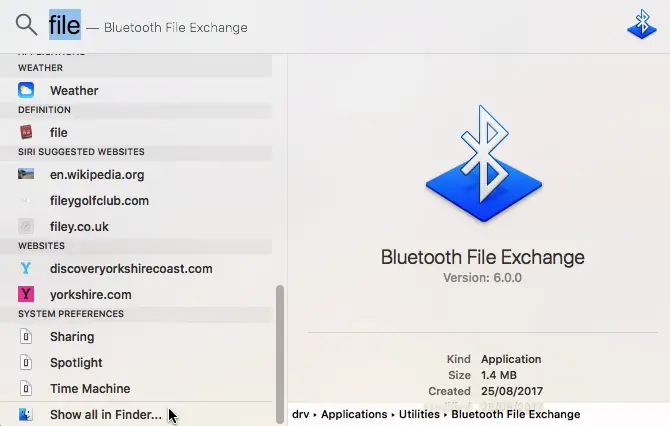
A new Finder window should open and display all of your Spotlight search results.
Before you go
After spending over 20 years working with Macs, both old and new, theres a tool I think would be useful to every Mac owner who is experiencing performance issues.
CleanMyMac is highest rated all-round cleaning app for the Mac, it can quickly diagnose and solve a whole plethora of common (but sometimes tedious to fix) issues at the click of a button. It also just happens to resolve many of the issues covered in the speed up section of this site, so Download CleanMyMac to get your Mac back up to speed today.


Add Comment