


Screen sharing is where you temporarily give someone else the ability to view and control your Mac’s screen, and vice versa.
Screen sharing can be useful in a number of scenarios, but it’s particularly useful if you’re experiencing problems with your Mac, as it allows an engineer to remotely access your Mac, so they can experience the problem for themselves and perhaps even fix your Mac, without even being in the same room as you.
Taking control of someone else’s Mac can also be handy if you need to show a friend, family member or colleague how to perform a certain task on their computer, as it allows them to sit back and watch as you demonstrate exactly how it’s done.
In this article, I’m going to show you how to setup your Mac to support screen sharing, so your Mac is ready to receive incoming screen sharing requests. If you prefer to be the one in the driver’s seat, then I’ll also be showing you how to request permission to view and control the screen of any other Mac on your network.
Enable Screen Sharing
To setup your Mac to support screen sharing:
- Click the ‘Apple’ logo in your Mac’s menu bar.
- Select ‘System preferences > Sharing.’
- Select the ‘Screen Sharing’ checkbox. Note that if ‘Remote Management’ is selected, you’ll need to deselect it before you can enable ‘Screen sharing.’
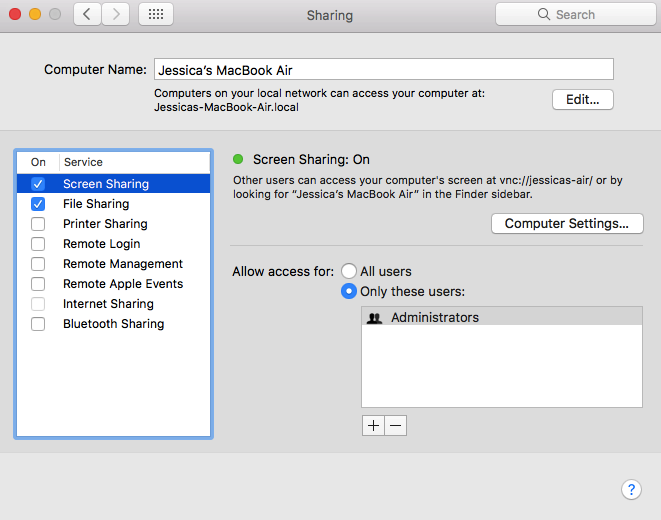
Although screen sharing is now enabled, while you have the ‘Sharing’ menu open it’s highly recommended that you spend some time exploring the sharing security settings.
Depending on who you share your screen with, giving someone permission to view and control your Mac can be a risky business, so macOS provides a number of settings to help you ensure people don’t abuse their screen sharing privileges.
If multiple people use your Mac, then you may want to prevent certain users from being able to share your screen with other people:
- All users. If you select this option, then screen sharing will be available to every user account across your Mac, with the exception of guest users and sharing-only users.
- Only these users. Select this option if you only want certain users to have access to the screen sharing feature. You can then click the little ‘+’ to assign screen sharing privileges to a new user or group.
Next, click the ‘Computer Settings’ button. In the subsequent popup, you can enable or disable the following options:
- Anyone may request permission to control screen. If you enable this feature, then any computer will be able to request permission to view and control your Mac. You can then approve or deny each incoming request.
- VNC viewers may control screen with password. This feature allows users to view and control your Mac’s screen using a VNC viewer app, such as VNC Viewer. If you enable this feature, then you’ll be prompted to create a password that users will need to enter before they can access your Mac via their VNC Viewer. Bear in mind that anyone who has this password can take control of your Mac, so make sure you choose an extremely secure password and that you change it frequently.
Viewing another user’s screen
Screen sharing is initiated by the person who wants to view your Mac, so once you’ve enabled screen sharing, you simply need to approve or deny incoming requests.
If you want to view another user’s screen, then as long as you’re both on the same network, you simply need to perform the following steps:
- Open a ‘Finder’ window.
- The left-hand menu should contain a ‘Sharing’ section that lists all the nearby Macs that macOS has detected.
- Double-click the Mac you want to connect to.
- Select ‘Share Screen.’
- Once your session starts, the Mac’s screen will appear in a new window.


Add Comment