

In this day and age, Internet security is more important than ever. Additionally, many people that travel abroad are frustrated to find that they can’t access their favourite websites and video services (such as the BBC iPlayer or 4oD), due to restrictions based on the user’s location imposed by the content owners or government regulations.
In these situations, a Virtual Private Network (VPN) may be the most convenient and simple solution to provide enhanced security and allow access to the web as if they were at home.
What is a VPN?
Just what is a VPN and what does it do? Put simply, a VPN allows all your Internet traffic to be encrypted and sent directly to the VPN servers (usually in the country that you choose) and then forwarded to the websites and video services that you want to use – thus making it appear as if your computer is actually in another country. For example, suppose you’re on holiday in Spain and want to watch BBC iPlayer but it’s blocked when you try and watch – with a VPN you can appear as if you’re in the UK and therefore watch as normal.
A VPN is also very secure, as it encrypts your web traffic (such as email, web browsing and banking transactions) so that not even your Internet Service Provider can easily intercept and decipher it. This provides an additional layer of security and can help to protect your identity, location and browsing habits from prying eyes, and even hackers.
Using a VPN is usually very straightforward – most of them involve a very simple setup procedure on your Mac (which has VPN options built right in) or via an app that takes the hassle out of configuring it manually. Note however, that most VPNs are not free; they typically cost a small amount each month. It’s advisable to shop around to find the best deal before you sign up.
Manually Setup a VPN
In this example, we used Express VPN (see https://www.expressvpn.com) to access UK-only content from Asia.
Before you begin, make sure you get all the account details the VPN company provides you with – information such as a username, password, protocol settings, and the server address to connect to.
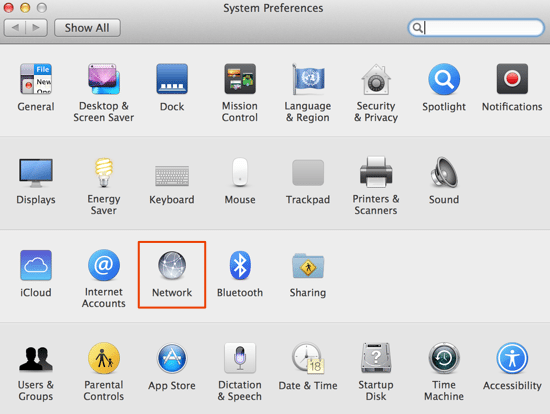
Step 1 – Open System Preferences
Click on the System Preferences icon in your Dock or just use Spotlight to find it. Then select the Network icon as shown below.
Step 2 – Add a New VPN Connection
In the network window that should be currently open, click on the little ‘+‘ icon to add a new VPN connection. A popup window then appears (shown in the image below) which prompts you to enter more details – such as the Interface, VPN Type, and Service Name.
For Interface, choose VPN from the drop down list.
For VPN Type, use the appropriate one specified by your VPN provider (there’s a choice of L2TP over IPSec, PPTP, and Cisco IPSec). Note that some of these protocols might be blocked by your ISP; in that case, you’ll need to check whether your VPN supports any of the other options – of course it’s a good idea to do a little research first to check if your ISP imposes any restrictions.
The Service Name field can be anything you like – this is just the local name that you’ll see on your Mac and has nothing to do with any VPN connection settings as such.
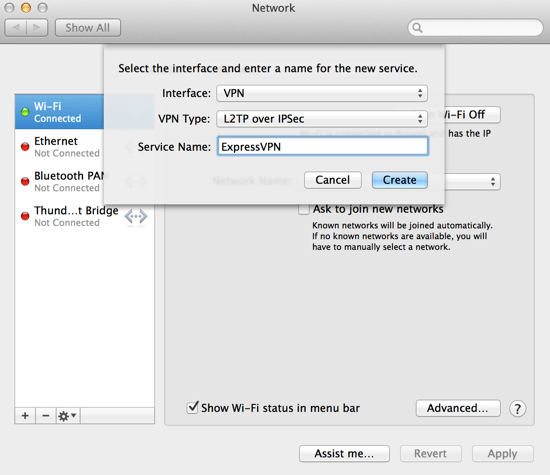
When you’ve entered the relevant details as above, select the Create button to actually create the connection. The VPN now appears in the list shown on the left with a red status icon (to indicate it’s not yet been configured) as shown below.
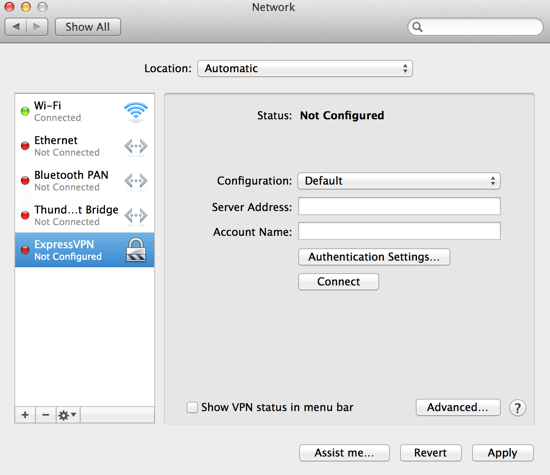
Step 3 – Configuration
You’ll notice the VPN in the list of interfaces – it should appear at the bottom of the list, though it’s possible to drag it up/down to change the order. In this case however, just leave it where it is.
If it’s not already selected, click the VPN connection in the list to enter the configuration details:
The Configuration drop down can be left with the default settings.
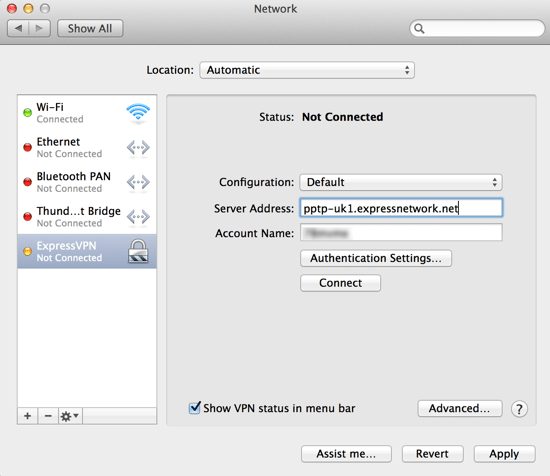
In the Server Address field, enter the server address provided by the VPN company. For example, suppose you asked for a UK server address, you should enter that one. If you’re trying to access content that is only available in the USA for example, you should choose a suitable US-based server. Your VPN provider should provide guidance on which servers to use, and normally has a huge selection for you to choose from.
In the Account Name field, enter the user name provided.
Also check the Show VPN status in menu bar option so you can easily access the VPN and check it’s status from the menu bar.
Step 4 – Authentication
Next, click on Authentication Settings and enter the password you were provided with. This is the most common method, however there are other options (such as RSA SecurID) – just make sure that you check the option according to your particular VPN.
Once the information has been entered correctly, click OK to dismiss the popup and return to the previous screen.

Step 5 – Advanced Settings
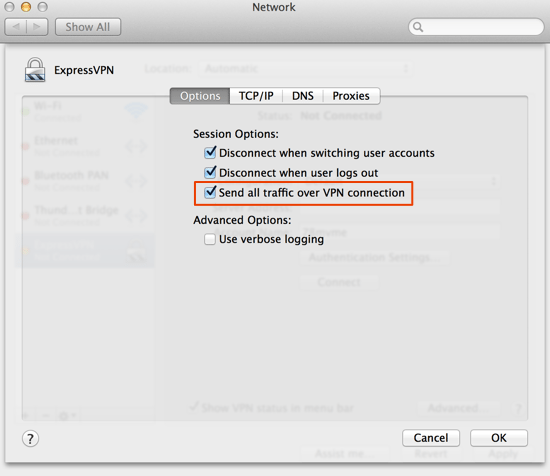
In most cases, you won’t need to alter many other settings unless explicitly told to do so by your VPN provider. However, it’s usually the case that you should send all your Internet traffic over the VPN. To do this, click on the Advanced button, and then make sure Send all traffic over VPN connection is checked, then click OK to save the changes.
Once you’ve returned to the main setup screen, click the Apply button to apply the changes – the VPN is now ready to use.
Step 6 – Activate the VPN
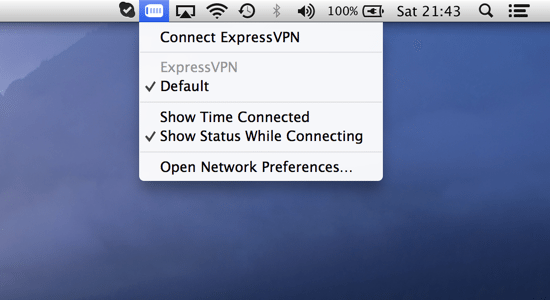
To start using the VPN, click on the VPN icon in your menu bar and select Connect <VPN name> (for example Connect ExpressVPN).
It usually takes a few seconds, but once the connection has established successfully, all your Internet traffic will now be sent over the VPN and you should be able to access whatever content you like that is normally accessible in the chosen server location.
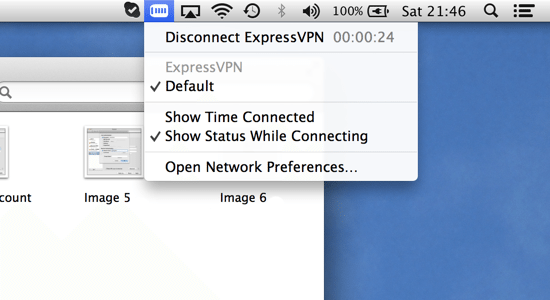
Once it’s connected, the VPN icon in the menu bar indicates success and also displays the time you’ve been connected in the drop down.
Step 7 – Access the Internet!
You should now be able to browse the Internet as normal. In our case, we successfully managed to access videos and websites normally restricted to the UK, while we were visiting Asia. As you can see below, the BBC iPlayer works as expected even though it would normally be blocked if we weren’t using the VPN.
If any of the previous steps failed, you can normally refer to the Support section of the VPN company’s website – most of which contain guidance on the recommended settings and also how to troubleshoot if you can’t connect properly.

You might find that videos don’t play smoothly – this is mainly affected by the bandwidth your VPN company offers (and of course your local ISP), so it’s important to choose a VPN that has a decent network infrastructure and good user ratings. In our case, we also discovered that once a video was playing in the BBC iPlayer, we could then disconnect the VPN and the video still played – probably because the iPlayer only checks the user’s location before you click on playing the video, and not during playback.
Before you go
After spending over 20 years working with Macs, both old and new, theres a tool I think would be useful to every Mac owner who is experiencing performance issues.
CleanMyMac is highest rated all-round cleaning app for the Mac, it can quickly diagnose and solve a whole plethora of common (but sometimes tedious to fix) issues at the click of a button. It also just happens to resolve many of the issues covered in the speed up section of this site, so Download CleanMyMac to get your Mac back up to speed today.


Add Comment