


Did you know that you can use macOS’ text-to-speech tools to convert any RTF (Rich Text Format) or TXT (Text File) into audio? It’s kind of like creating your own audiobook!
If you can overlook the slight creepiness of macOS’ various robotic voices, then this can be a handy trick for helping you revise and memorise. For example, if you have an exam coming up and a bunch of notes stored on your Mac, or you’re trying to memorise the script for an upcoming presentation, then why not convert this text into spoken audio? You can then copy this audio file to your iPod, iPad, iPhone or MP3 player and listen to it on the go, without having to cart around your Mac or a bunch of printed notes.
This text-to-speech trick can also come in handy when you’re reviewing or editing important documents, as hearing the words spoken aloud can help you zero in on errors that you might have otherwise missed.
In this article I’ll show you how to convert any RTF or TXT document into an m4a file (MPEG-4 Audio file) that you can then transfer to your iPhone, iPod, iPad, or play via iTunes on your Mac. And, just in case you want to listen to your “audiobook” on a device that doesn’t support m4a, I’ll also show you how to quickly and easily convert m4a files into MP3s.
Converting RTF and TXT into spoken audio
You can convert any RTF or TXT document into an m4a file via the Terminal, so launch a new Terminal window by navigating to ‘Applications > Utilities > Terminal.’
To perform the conversion, run the following command:
say -o output.m4a -f /path/to/file.file-extension
For example, if you had a transcript.txt file on your Desktop that you wanted to convert to an audio file named ‘transcript,’ then you’d type the following into the Terminal:
say -o transcript.m4a -f /Users/myusername/Desktop/transcript.txt
Then, press the ‘Enter’ key on your keyboard, and macOS will perform the conversion.
By default, all converted m4a files will be stored in your Mac’s ‘Home’ directory, or you can specify where this file should be stored. For example, if you wanted to store transcript.m4a in your ‘Documents’ folder, then you’d run the following:
say -o /Users/jessicathornsby/Documents/transcript.m4a -f /Users/myusername/Desktop/transcript.txt
To listen to the audio file on your Mac, double-click it and the file will be added to iTunes automatically. Once the file is stored in iTunes, you can listen to it, or transfer it to your iPod or MP3 player, just like any other audio track.
You don’t have to type the full command!
You often have to include file paths in your Terminal commands.
If you don’t fancy typing out the full file path, file name and file extension, then find the file in question, and drag and drop it into the Terminal window. This will automatically add the path, name and extension to your Terminal command. For files that are buried in an obscure corner of the file system, this can save you a considerable amount of typing!
Convert any text file into audio
While the Terminal provides a quick and easy way of converting entire TXT and RTF files into audio, what should you do if you want to convert a file that isn’t in one of these formats? Or you only want to convert a portion of a file into spoken audio?
To convert any block of text into an m4a file:
- Highlight all the text that you want to convert.
- Control-click the highlighted text and select ‘Services > Add to iTunes as a Spoken Track.’
- In the subsequent window, select the system voice that you want to use as your narrator, the name of the file you want to create, and where this file should be stored. By default, the file will be stored in your Mac’s music/iTunes/iTunes Media/Music folder, typically in an ‘Unknown Artist’ or ‘Unknown album’ folder.
- Click ‘Continue.’
Converting m4a to MP3 with iTunes
While m4a is a common audio format that plays on a range of devices, it’s nowhere near as widely supported as MP3s. Depending on where you intend to play your audio file(s), you may need to convert them to MP3s first. It’s also worth noting that m4as tend to be more memory-hungry than MP3s, so you may be able to free up some space by converting your m4a files to MP3s.
The easiest way to convert m4a to MP3, is to use a program that’s already available on your Mac: iTunes!
- Launch iTunes.
- Select ‘iTunes > Preferences…’ from the menu bar.
- Make sure the ‘General’ tab is selected.
- Click the ‘Import Settings…’ button.
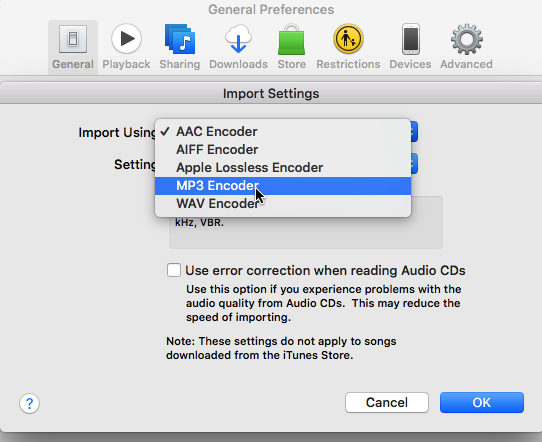
- Open the ‘Import Using’ dropdown, and select ‘MP3 Encoder.’
- Select the bitrate that you want to use. A higher bitrate is going to result in better audio, but it’ll also take up more memory.
- Click ‘OK,’ and then close the ‘Preferences’ window.
You can now convert any audio file that’s stored in iTunes:
- Find the audio file in iTunes’ user interface, and select it.
- Select ‘File > Convert > Create MP3 version’ from the iTunes menu bar.
This creates a copy of the file, in MP3 format. You can access this file in the main iTunes window, or you can get your hands on the file itself, in your Mac’s Music/iTunes/iTunes Media/Music folder, where it’ll typically be stored in an ‘Unknown artist’ and/or ‘Unknown album’ folder.
Before you go
After spending over 20 years working with Macs, both old and new, theres a tool I think would be useful to every Mac owner who is experiencing performance issues.
CleanMyMac is highest rated all-round cleaning app for the Mac, it can quickly diagnose and solve a whole plethora of common (but sometimes tedious to fix) issues at the click of a button. It also just happens to resolve many of the issues covered in the speed up section of this site, so Download CleanMyMac to get your Mac back up to speed today.


Add Comment