

To keep multiple folders and thousands of files synchronised can be a real headache without a convenient method to automate the task.
Consider this scenario: you have several folders on your Mac that must be kept fully synchronised with an external USB memory stick, hard drive, or simply with another computer or mobile phone. Copying files manually can be just too time consuming and it’s easy to miss a few files, so inevitably you end up with multiple versions in each location.
On the Mac, it’s easy to synchronise any numbers of files and folders; the most common methods are:
- With third-party apps from the App Store
- With the built-in rsync Terminal utility
- With rsync in combination with Automator
METHOD 1: Third-Party Apps
There are a dozen or so third-party apps available in Mac App Store that can simplify and automate the process of keeping files and folders synchronised. Additionally, cloud-based services such as Dropbox can synchronise files on multiple machines very simply (note that the Mac version of Dropbox is only available from their website, not in the App Store).
For most people a third-party app is the most convenient and hassle-free method to sync your data, with the advantage that lots of features are provided such as the ability to sync files, music, pictures, bookmarks and other data.
Some of the most popular synchronisation apps are:

METHOD 2: rsync Utility
Rsync is a very useful utility built into Mac OS X which allows the differences between two sets of files to be synchronised. Rsync can also sync data over a network, so if your folders are on another computer this method can be tweaked slightly to use the relevant remote hostname.
To use rsync follow the steps below.
1. Open Terminal from the Utilities folder or Spotlight
2. In the Terminal window type rsync -aE –delete ~/ <source folder> / “<destination folder>”
For example:
rsync -aE –delete “~/Documents/” “/Volumes/Macbook Pro Backup/”
This example keeps everything in the Home Folder’s Documents directory synchronised with the external disk named MacBook Pro Backup and deletes anything in the destination folder which isn’t already in the source folder. This example creates a copy of Documents in the top level of the external disk’s folder structure.
Note: rsync is a very powerful tool that has dozens of command-line options, so it’s worth reading the user manual in more depth (in Terminal, just type man rsync and press Enter).
METHOD 3: rsync Utility + Automator
While rsync certainly gets the job done, it’s much more useful when combined with Automator to simplify the whole process. This method is particularly effective when you have multiple folders in different locations that need to be synchronised, because you can enter any number of rsync commands into the script.
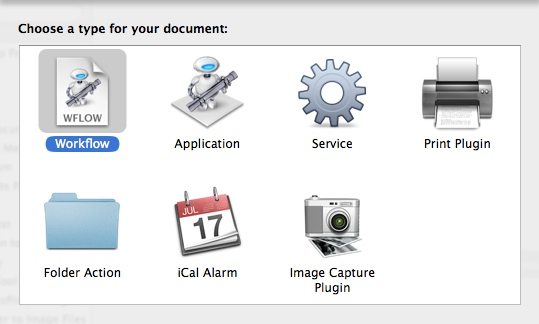
1. Open Automator from the Applications folder or within Spotlight
2. Choose Workflow when prompted, as below
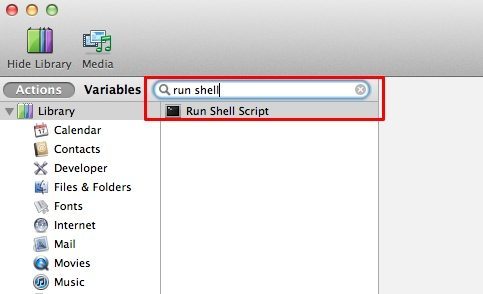
3. Search for the Run Shell Script action in the search field, then drag the icon into the main window on the right-hand side
4. In the Run Shell Script dialogue, change the Pass input drop-down field to as arguments
5. Under Options at the bottom of the workflow, make sure the checkbox labelled Ignore this action’s input is checked. The reason is that it’s just going to run as a standalone script and won’t take any files as input
6. In the Run Shell Script dialogue, delete any commands already included by default and replace them with the appropriate rsync commands. Make sure you specify the correct source and destination folders

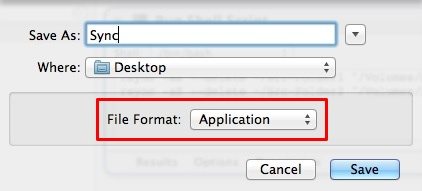
7. Choose Save from the File menu and save the workflow as an application, then hit the Save button
8. Now just run the application you’ve created whenever you want to synchronise the selected folders
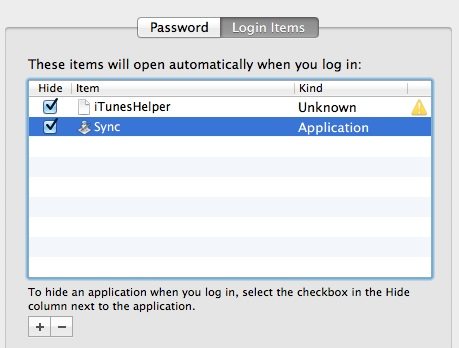
Note that it’s possible to add your sync app to the Login Items (under System Preferences -> User & Groups) to run every time you login, or to create a scheduled task to run the script on a regular basis.
You might also like to copy the application into the startup items folder to run every time your computer starts. The startup folder on your Mac is at //Macintosh HD/Library/StartupItems but note that in the case of an external drive or USB stick it would need to be connected to run successfully.
Before you go
After spending over 20 years working with Macs, both old and new, theres a tool I think would be useful to every Mac owner who is experiencing performance issues.
CleanMyMac is highest rated all-round cleaning app for the Mac, it can quickly diagnose and solve a whole plethora of common (but sometimes tedious to fix) issues at the click of a button. It also just happens to resolve many of the issues covered in the speed up section of this site, so Download CleanMyMac to get your Mac back up to speed today.


Thanks it’s very usefull 🙂
Thanks! This is very useful, great write up
Just a quick note: Your formatter appears to have replaced the “–” switch prior to “delete” with a long dash “–”, making the command as typed not work as claimed.
Very helpful. Thanks!
Very handy thank you
It’s 2017 now and the Mac and Terminal have grown a little; when tested, Terminal didn’t like the quotation marks around the source and destination file paths. Removing them allowed it to run normally. Also, as mentioned by someone else, the example command given under option 2, using the rsync utility would be better off displayed using a “code” tag: “rsync -aE –delete “~/Documents/” “/Volumes/Macbook Pro Backup/”” before the “delete” argument that copied and displays as an en-dash and needless to say Terminal didn’t like that initially.
Very helpful tip otherwise, thank you for making it so easy to follow and including the screenshots!
[…] to do that? There are graphical programs for Mac https://www.chriswrites.com/how-to-sync-files-and-folders-on-the-mac/, Windows http://www.online-tech-tips.com/free-software-downloads/sync-two-folders-windows/ and […]
thank you! this is great
[…] Source: How To Sync Files and Folders on the Mac – ChrisWrites.com […]