


Anybody that has both a Mac and a PC will understand that it’s sometimes very convenient to setup shared folders that can be accessed from either machine, to save copying files to external media such as USB drives. There are several ways to share folders, and the process is actually quite simple. However, it’s not necessarily very obvious, but with just a few minutes of setup you’ll be able to share files and folders easily between machines.
This functionality is particularly useful if you frequently work on a PC and need to copy files occasionally to the Mac in order to backup automatically using Time Machine.
This tutorial some of the basic ways to setup sharing between your Mac and a PC.
How To Share Your Mac’s Folders With a PC
One option is to share one or more folders on your Mac with your PC. The steps you need to follow are detailed below.
Create a New Sharing-Only User Account
The first thing to do is to create a new user account on your Mac that will be used for sharing only (i.e you won’t be able to login with it). This is the account that your PC will use when it connects to the Mac.
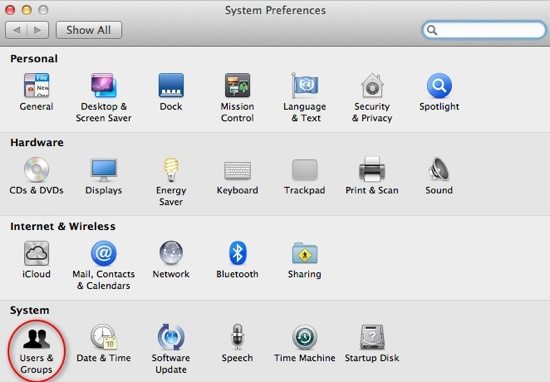
1. Open System Preferences and select the User & Groups icon in the System section
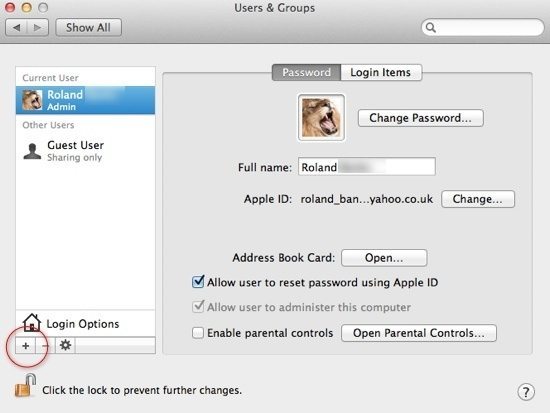
2. In the left-hand panel you’ll see all the current users already setup on your Mac, including the current user account that you’re logged in with. It’s usually best to create a new sharing-only user for your PC to access the Mac. Just click the + sign which is located just below the Login Options button
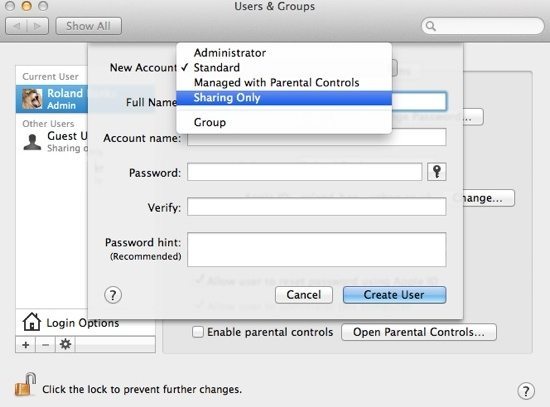
3. A new drop-down window appears with various fields that you need to complete. In the New Account field, select the drop-down menu and choose Sharing Only
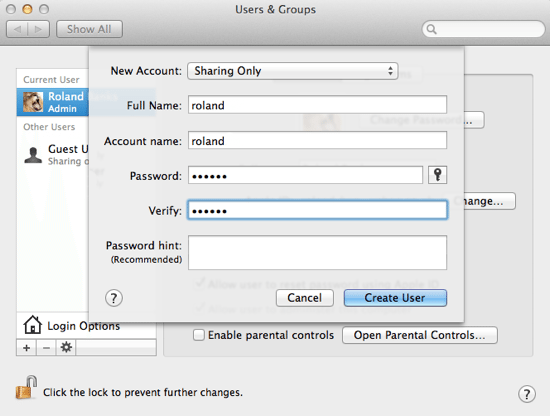
4. Next, enter the full name, account name and password for the new account and select Create User. Bear in mind that it’s advisable to use the same account name as the Windows logon account that is already setup on the PC. For example, suppose you normally login to Windows as pc-admin, then the new account name on the Mac should also be called pc-admin. This just means that you don’t need to enter the login details every time the PC connects to the Mac because the PC user account and the Mac sharing account details will match
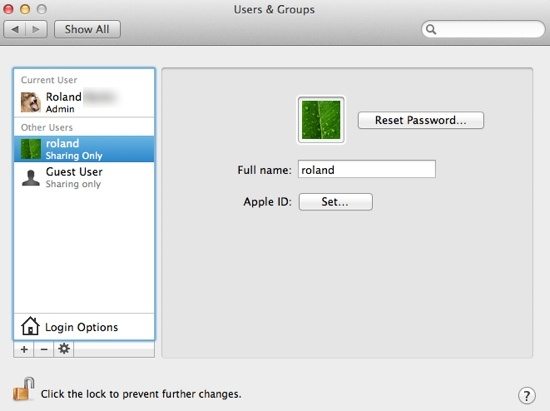
5. Once you’ve entered the relevant details, the new sharing-only account will be active and appear in the Other Users section in Users & Groups as below. In this case, my sharing-only account for the PC is just called roland
Configure Sharing Preferences
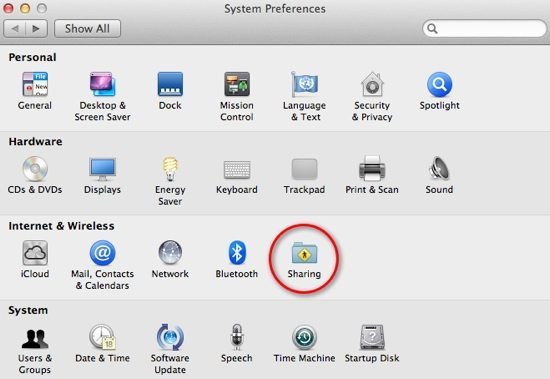
1. The next stage is to enable and configure sharing on the Mac, which is normally turned off by default. Open System Preferences and then the Sharing icon from the Internet & Wireless section
2. In the left-hand panel you’ll see a list of available options. Tick the checkbox labelled File Sharing
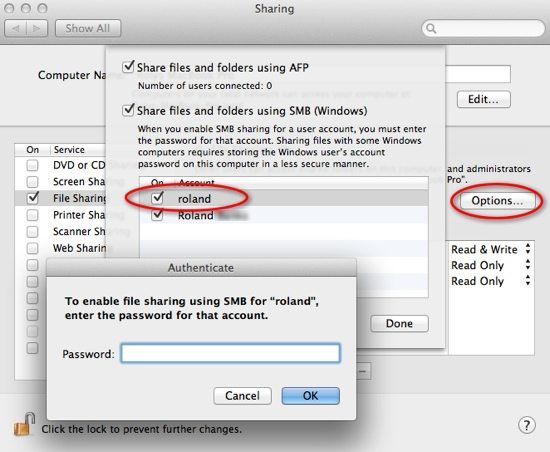
3. Next, turn on SMB sharing which lets Windows (rather than just other Macs) access your computer. Click Options and make sure the item Share files and folders using SMB (Windows) is ticked.
In the main window you’ll see a list of users, so just add the new sharing-only user account that you created in previous steps. You’ll be prompted to enter the password for the user – this will be the same as the Windows password you use, and that you entered earlier. Next, hit OK to continue
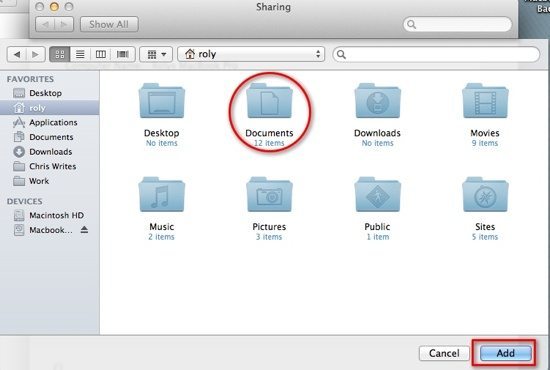
4. Back in the Sharing window, you’ll see a list of shared folders. Click Add (the + button) to open a drop-down window where you can select the folders you want to share. By default, normally only your public folder is shared with read-only permissions. In the drop-down window that appears, navigate to the folder you want to share – in this case we’ll choose the main Documents folder on the Mac, and click Add
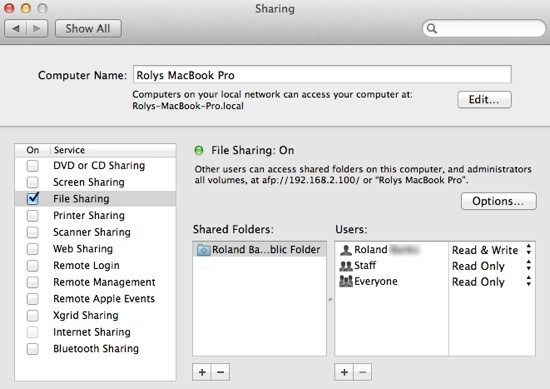
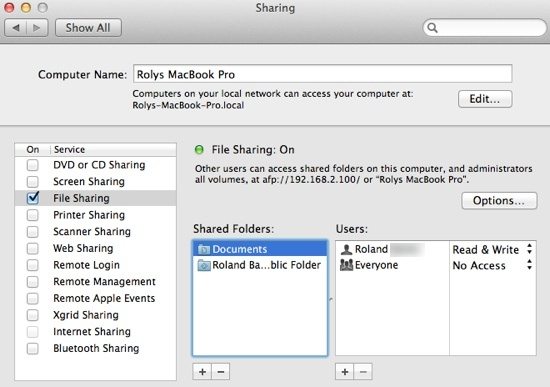
5. The Sharing window should now look like shown below. File sharing will be enabled, the shared folders will be displayed as a list, and a small green status icon indicates whether it’s been turned on successful.
In the example below, the new user (“roland”) doesn’t have any file permissions set (the user names Roland visible below is my main Mac account, not the new sharing-only user).
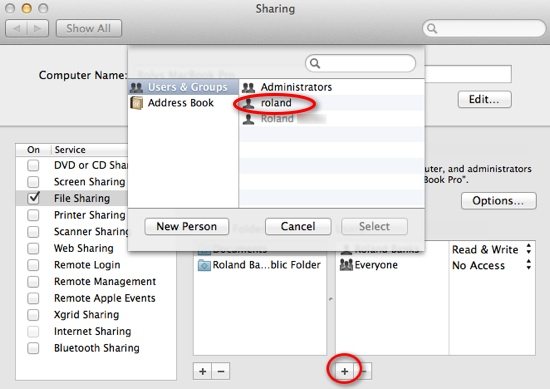
6. Next, you need to assign the new sharing-only user with the appropriate file permissions in order to be able to read and write to the shared folder. Click the + button on the lower right of the Sharing window to bring up the list of users and groups. Find the new sharing-only user, highlight them, and hit Select
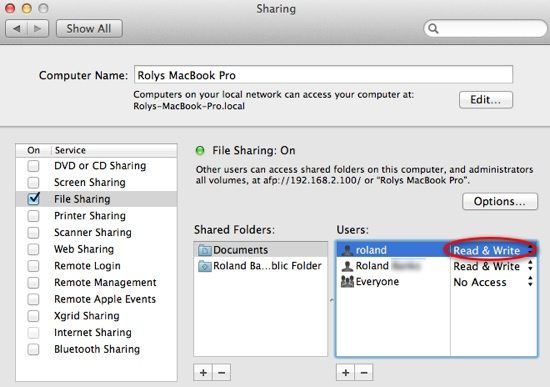
7. To assign the correct file permissions for the shared folder, click on the drop-down permissions icon as shown below, and change the default value to Read & Write
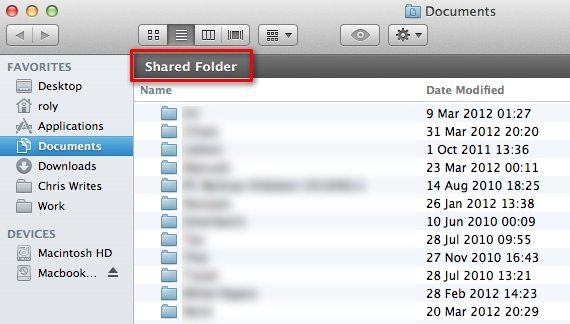
8. In Finder, you can check if the shared folder is setup properly by opening the directory location that you’ve just added. If it’s working, a dark grey strip across the top will display Shared Folder, just under the view icons
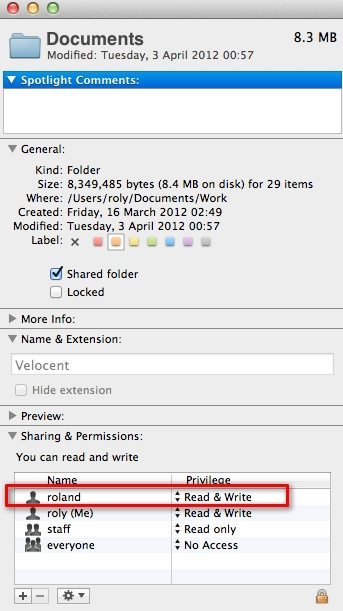
9. The last thing to do is to select Get Info (CMD + I) on the shared folder and check its properties. It should clearly be shown as shared, and the permissions at the bottom should indicate which users have access to it.
In this example, the Documents folder is set to read and write by my main Mac account (my short username is just Roly), and also by the new sharing-only user called Roland (which is my login account I use on the PC)
Access Your Shared Mac Folder on The PC
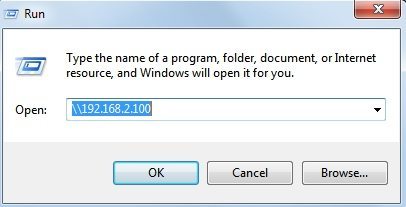
On your PC, go to the Start menu and select Run. A dialog box opens, into which you need to enter the IP address (the network address) of your Mac. The format should be \\ipaddress. After that, just hit OK to continue and open your Mac’s shared folder
If you don’t know your Mac’s IP address, you can use Network Utility to find out (just type network utility into Spotlight), and also from the Network item in System Preferences.
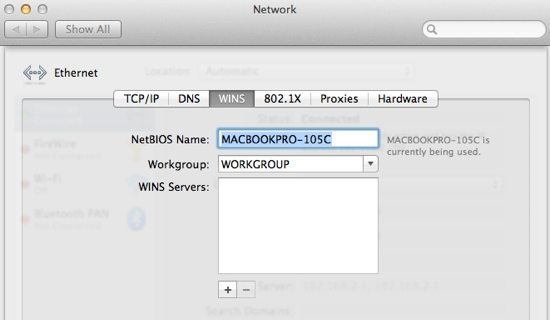
Alternatively, in Network preferences, click on the WINS tab to find your NetBIOS Name, which is assigned automatically by default and in my case is MACBOOKPRO-105C. You can change this value on the Mac or just keep the default, but this name can also be entered into the Run dialog box in Windows, for example \\MACBOOKPRO-105C
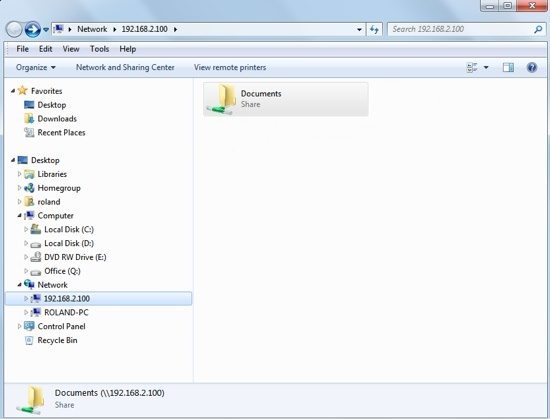
Once you’ve successfully connected to the Mac, your Windows Explorer window should look something like shown in the screenshot below, with a list of all the folders that you’ve shared.
Open the folders as normal by double-clicking, after which you can drag and drop files and other folders onto your Mac. Note that you can also permanently map the Mac’s shared folder as a network drive (e.g. the Z drive) on your PC. There are various options on the PC which should be fairly obvious once you’ve actually connected to the Mac (try looking in the Tools menu in Explorer).
An Important Note on File Permissions
Note that copying files from the Mac to the PC works perfectly, but when you’re copying files to the Mac, there may be an issue with file permissions. Any files that you copy from your PC to the Mac may not assign read and write permissions to your main Mac account – in other words, after you’ve copied a file to your Mac, you can’t actually open it to view!
You can solve this dilemma by changing the file permissions on any folders you’ve shared (look in the Sharing & Permissions section for the folder after doing a Get Info). Here, you can add the appropriate permissions for your main Mac account, and apply those permission to all sub-folders and files. Unfortunately, there doesn’t seem to be an easy way to set the default to read and write for all files copied from the PC, so you may need to edit the access rights / permissions regularly, or just create an Automator script to do it periodically. Alternatively, if you set your main PC login and user name to be exactly the same as your main Mac account, there may not be any permissions issues. Oh, the joys of sharing files!!!
How To Share You PC’s Folders With a Mac
Sharing folders on your PC with a Mac is just as easy as in the previous examples. This section explains what you need to do on your PC and Mac. Note that this applies Windows 7 only, but the process is fairly similar for other versions of Windows.
Setup Sharing On Your PC
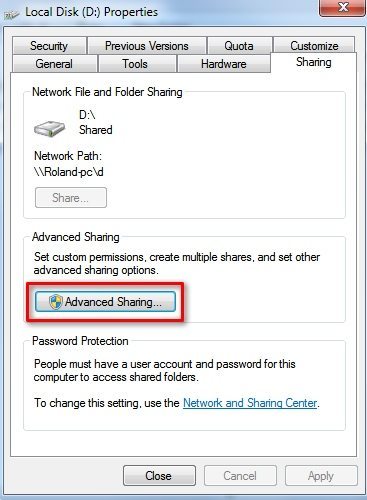
1. Open Windows Explorer and click on the folder or drive that you want to share. In this case, we’ll share the entire “D:” drive with the Mac in order to access all the user documents, pictures, music and videos stored on the PC.
Right-click the drive (or folder) and either choose Properties followed by the Sharing tab, or just expand the Share with menu and choose Advanced sharing. Both methods eventually brings you to the same screen

2. In the Sharing tab, select the Advanced Sharing option
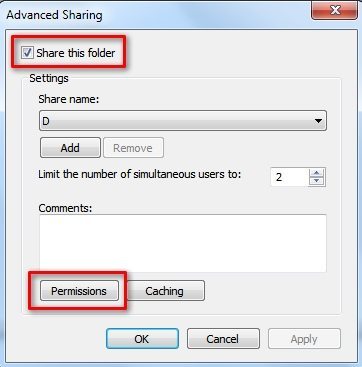
3. Make sure the Share this folder checkbox is ticked. You can also set the number of simultaneous users that you want to be able to connect to the shared folder (the default value is 20 users but I’ve set mine to just 2). Next, hit the Permissions button
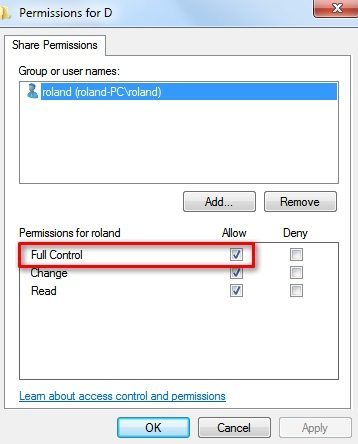
4. In the permissions dialog box, make sure the user you’re going to connect from the PC to the Mac as (normally, the same user account that you use on the PC), is shown in the access permissions with Full Control. If it’s not, choose Add and look for the correct user name
5. Once you’ve set the correct sharing permissions, go back up the hierarchy of dialog boxes you’ve just been looking at and choose OK or Apply on each one to finish the process
Connect To Your PC’s Shared Folders On The Mac
Now that you’ve setup sharing on the PC, the next step is to access those shared folders (or drive) from your Mac. There are several ways to do this and we’ll cover them in more details below.
1. From Finder’s Go menu, choose Connect to Server (or just use the CMD + K shortcut)
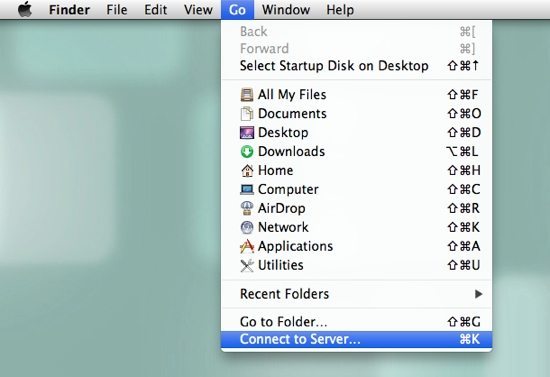
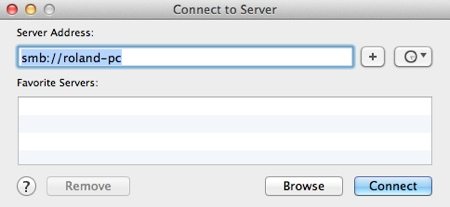
2. In the popup menu that appears enter the name of your PC preceded by smb:// in the Server Address field and click the Connect button. You can also add your PC to the list of favourite servers by clicking the + button found at the right of the Server Address field
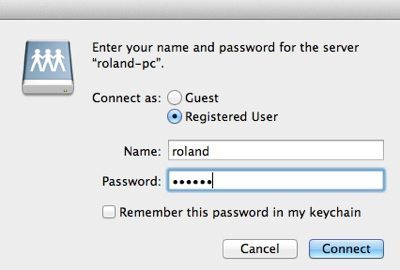
3. You’ll most likely want to use your regular user account on your PC, so enter the relevant login details (i.e. the same as your Windows login). If you choose the option Remember this password in my keychain, you’ll only need to enter the details once because the Mac will remember them for subsequent access attempts
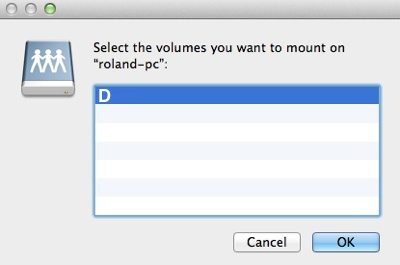
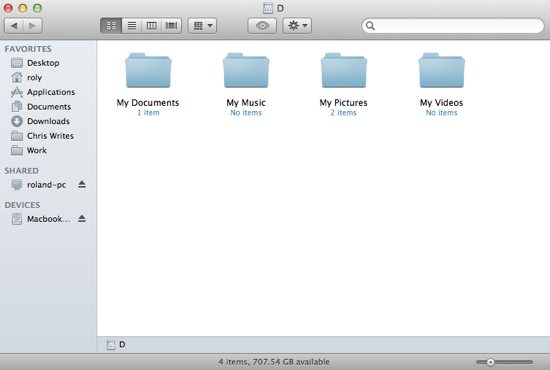
4. Another window appears prompting you to select which volume to mount from the list. In this case, we shared the “D:” drive on the PC, so this is what appears in the list. Choose the desired destination and hit OK
5. In Finder, your PC should appear in the SHARED section of the side panel, and the shared drive or folder will be shown in the main window. Simply double-click the folder to open and start using it as normal!
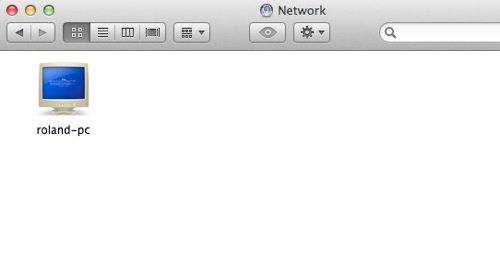
An alternative method to connect to your PC is to open the Network folder on your Mac. The Network icon is at the very top level of your Mac – use Finder to locate it (use CMD + up arrow until you see it) and double-click the icon. You should then see a list of all shared machines on your local network. As shown below, my PC pops up on the list as expected. Follow the other steps (login details and mount point) as before to connect to it if you haven’t accessed it previously. If you’ve already stored the login details in the keychain, clicking on the PC will just open it straight away. One nice touch you might notice is that PC’s are shown in Finder with the “blue screen of death” error message on the icon. Cheeky Apple!
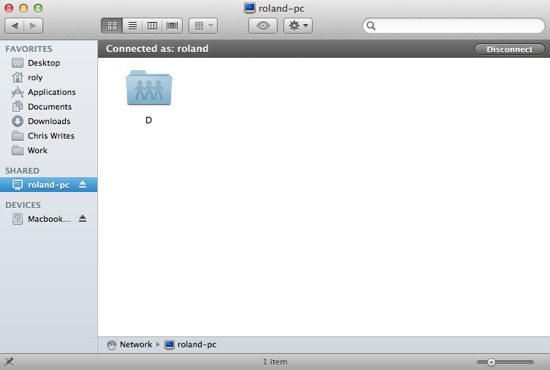
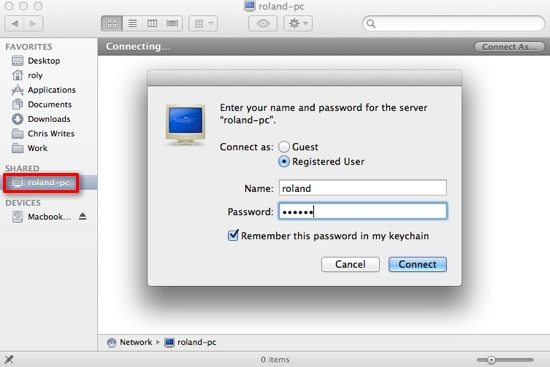
Yet another way to connect to your Mac is just from the SHARED section in Finder. Click on the PC name and you’ll be prompted for your login details as shown. Enter the relevant details and click Connect
Once again, the shared drive appears in the main finder window. The title bar indicates the user name you’re connected as.
Open the shared folder to view its contents. In this case, I can see the My Documents folder and a few others.
Note that you can unmount (i.e. disconnect from) your PC at any time by clicking the small eject button next to the PC in the SHARED section of the Finder sidebar.
Before you go
After spending over 20 years working with Macs, both old and new, theres a tool I think would be useful to every Mac owner who is experiencing performance issues.
CleanMyMac is highest rated all-round cleaning app for the Mac, it can quickly diagnose and solve a whole plethora of common (but sometimes tedious to fix) issues at the click of a button. It also just happens to resolve many of the issues covered in the speed up section of this site, so Download CleanMyMac to get your Mac back up to speed today.


Thanks for the nice article. This is the best I have read. Keep it up.
Great article. I solved the issue of permissions by creating an Apple Script (with Automator) which changes owner and permissions automatically as soon as a new file is added in my dropbox folder. Usually after a network scan.
The script does the change and moves the files into another folder automatically. It asks me for the admin password all the time though.
The scripts looks like this :
on run
do shell script “chown -R lance ~/Public/drop_box” with administrator privileges
do shell script “chmod -R 755 ~/Public/drop_box” with administrator privileges
end run
where “lance” is my admin user name. The first line changes ownership of the newly landed file -it makes me the owner of the file instead of the shared-only account. The second line changes the privileges so I can access it.
I saved the script as a workflow. I then right-clicked on the dropbox folder itself in the Finder and selected the saved workflow from the “Folder Action Setup”.
Works great.
great read thank you!
I am having issues opening documents from mac to PC and vice versa that are sharing documents. it only allows a read only option
This is the most productive file sharing tutorial on MAC and PC sharing I have found. Worked like a charm!