


If you’re experiencing problems with macOS, then sometimes you may have no choice but to cut your losses and reinstall the operating system from scratch, via its Recovery partition.
But what if you discover that your Mac doesn’t have a Recovery partition?
Don’t panic! In this article, I’ll share all the workarounds available, if you’ve tried pressing the “Command+R” shortcut, and absolutely nothing is happening.
Are your really missing a Recovery partition?
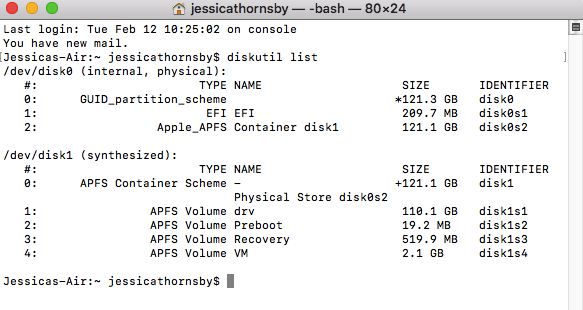
The first step, is to verify that your Mac is definitely lacking a Recovery partition. You can perform this check, using the Terminal application:
- Open a new “Finder” window.
- Navigate to “Applications > Utilities” and then launch the Terminal app.
- Copy/paste the following into the Terminal:
diskutil list
- Press the “Enter” key on your keyboard.
The Terminal will now display a list of all your drives and partitions. If this list doesn’t contain either Apple_Boot Recovery HD or APFS Volume Recovery, then it means your Mac doesn’t have a recovery partition.
If your Mac is missing a Recovery partition, then you may be able to restore it, by resetting your PRAM.
To reset the PRAM, restart your Mac while holding down the ‘Command+Option+P+R’ keys until you hear macOS’ distinctive startup chimes for a second time. Once your Mac has booted, try re-running the ‘diskutil list’ Terminal command, to see whether this has resolved your issue.
If resetting the PRAM doesn’t work, then there’s several ways that you can reinstall a fresh copy of macOS, without a Recovery partition.
Don’t forget your Time Machine backup!
Before you start, you should create a full Time Machine backup, so you can restore all of your files, folders and apps once you’ve installed a fresh copy of macOS.
To create a Time Machine backup:
- Select the ‘Apple’ logo from your Mac’s menu bar.
- Navigate to ‘System Preferences… > Time Machine.’
- If this is your first Time Machine backup, then click the ‘Select backup disk…’ button, and choose the drive that you want to use for your backups.
- If there’s any files, apps or other items that you want to exclude from your backups, then click ‘Options…’, followed by the little ‘+’ button. Select all the items that you want to exclude from your backup.

- Once you’re happy with your Time Machine settings, navigate back to ‘System Preferences… > Time Machine’ and then click ‘Back Up Now.’
Boot into Internet Recovery
If you don’t have a Recovery partition, then you can always install macOS via its Internet Recovery feature. Just be aware that Internet Recovery only works with networks that use WEP and WPA security, which can be an issue if you’re using a proxy network or PPPoE.
To boot into Internet Recovery:
- Restart your Mac while holding down the ‘Option+Command+R’ keys.
- Release these keys as soon as you see the Apple logo.
- Once your Mac boots, you should see a spinning globe and the message “Starting Internet Recovery. This may take a while.” Eventually, this will be replaced by a progress bar and, finally, the standard macOS Utilities window.
- Select ‘Reinstall macOS,’ at which point Internet Recovery will download and install a fresh copy of macOS.
Create a bootable installer
If your Mac is refusing to boot into Internet Recovery, then your only option is to create a bootable installer from a flash drive.
First, you’ll need an installer for the version of macOS that you want to restore. Assuming that you previously downloaded this version of macOS from the App Store, you can easily re-download the necessary files:
- Launch the App Store.
- Select the ‘Purchases’ tab. Even though we no longer pay for macOS updates, they’re still located within the ‘Purchases’ tab.
Find the version of macOS that you want to install, and then click its accompanying ‘Install’ button. This will download the installer to your Mac’s ‘Applications’ folder.
Once you have the necessary installer, it’s time to transform your USB drive into a bootable installer. Note that this completely erases the USB flash drive, so make sure you backup any files that you want to hold onto!
- Attach the USB drive to your Mac.
- Open a new ‘Finder’ and navigate to ‘Applications > Utilities.’
- Launch Disk Utility.
- In the Disk Utility menu bar, select ‘View > Show All Devices.’

- In Disk Utility’s left-hand menu, select the volume that you want to use.
- Click the ‘Erase’ button
- Launch the Terminal, by opening a Finder window and navigating to ‘Applications > Utilities > Terminal.’
At this point, you need to enter a single Terminal command, which will vary depending on your version of macOS.
High Sierra
sudo /Applications/Install\ macOS\ High\ Sierra.app/Contents/Resources/createinstallmedia –volume /Volumes/untitled –applicationpath /Applications/Install\ macOS\ High\ Sierra.app
Sierra
sudo /Applications/Install\ macOS\ Sierra.app/Contents/Resources/createinstallmedia –volume /Volumes/untitled –applicationpath /Applications/Install\ macOS\ Sierra.app
El Capitan
sudo /Applications/Install\ OS\ X\ El\ Capitan.app/Contents/Resources/createinstallmedia –volume /Volumes/untitled –applicationpath /Applications/Install\ OS\ X\ El\ Capitan.app
Yosemite
sudo /Applications/Install\ OS\ X\ Yosemite.app/Contents/Resources/createinstallmedia –volume /Volumes/untitled –applicationpath /Applications/Install\ OS\ X\ Yosemite.app
Mavericks
sudo /Applications/Install\ OS\ X\ Mavericks.app/Contents/Resources/createinstallmedia –volume /Volumes/untitled –applicationpath /Applications/Install\ OS\ X\ Mavericks.app
- Copy/paste the appropriate command into the Terminal, and then press the ‘Enter’ key on your keyboard.
- The Terminal will now warn that you’re about to erase the drive. To continue, press ‘Y,’ followed by the ‘Enter’ key.
Your Mac will wipe the flash drive and copy the installer, at which point you’ll have created a bootable installer.
Install macOS from the bootable installer
To use your bootable installer:
- Make sure your USB drive is attached to your Mac.
- Power down your Mac, and then restart it while holding the ‘Option’ key.
- The startup window should appear and display your USB drive with an accompanying “Install” tag. Select this drive, and then press the “Return” key on your keyboard.
- Select “Disk Utility.”
- Select the drive under “Internal” (your main hard drive), followed by “Erase.”
- Name this drive “Macintosh HD.”
- Make sure the “Format” is “Mac OS Extended (Journaled)” and the “Scheme” is “GUID Partition Map.”
- Select “Erase,” followed by “Done.”
- Choose “Disk Utility > Quit Disk Utility.”
- Select “Install macOS,” followed by “Continue.”
- When prompted, select “Macintosh HD”
- Finally, click “Install.”
MacOS will now be installed on your hard drive from the bootable installer. Once it’s finished you’ll have a new installation of macOS – and a new Recovery partition!
Before you go
After spending over 20 years working with Macs, both old and new, theres a tool I think would be useful to every Mac owner who is experiencing performance issues.
CleanMyMac is highest rated all-round cleaning app for the Mac, it can quickly diagnose and solve a whole plethora of common (but sometimes tedious to fix) issues at the click of a button. It also just happens to resolve many of the issues covered in the speed up section of this site, so Download CleanMyMac to get your Mac back up to speed today.


Add Comment