 More and more people are realising the benefits of moving from a PC to a Mac. But how do you move your files, applications and other settings? Thankfully, you can quite easily move your existing files to a new Mac and continue to use them – as long as you have compatible applications installed.
Unfortunately, not all file types can be viewed on a Mac, but the majority of common file formats used for documents, music, videos and pictures are compatible with Mac OS. Popular applications that you may already be familiar with on the PC, such as Microsoft Office, have equivalent Mac versions which are almost identical in terms of functionality and can open the same files. Check with your current software providers whether Mac versions are available or take a look on the Mac App Store.
It’s worth noting that many Mac applications such as Pages, Keynote and Numbers can import their Microsoft Office counterparts (Word, Powerpoint and Excel), so the transition will be fairly effortless in most cases. Furthermore, Mac OS X allows you to preview and view many file types even if you don’t have any applications to actually open or edit them.
There are several ways to copy your PC’s files to a your Mac – either manually which can be quite laborious, or automatically by using Apple’s Migration Assistant utility, or even with a similar third party application. The Migration Assistant in Mac OS X is by far the easiest method and is obviously recommended by Apple, so you shouldn’t encounter any problems if you choose this option.
Using Migration Assistant
Thankfully, Apple has made it a breeze to move all your important items from a PC to a Mac. The Migration Assistant is a handy utility that guides you through the complete process, step by step. Migration Assistant lets you move your pictures, videos, files and even your user account settings.
When you complete the migration process, you’ll find many items and settings conveniently copied over from your PC such as:
- Email accounts, messages and attachments are copied to Mail
- Addresses are copied to Address Book
- Calendars and meeting requests are copied to iCal
- Web browser bookmarks and your home page are setup in Safari
- Desktop files and your desktop pictures are copied to the relevant place on the Mac
- Files from My Documents, My Music, My Pictures and My Videos are copied to Documents, Music, Pictures and Movies folders in your Mac’s Home Folder
Unfortunately, some of the system settings and preferences on your PC can not be copied to the Mac, because the way the two operating systems work is quite different and incompatible. Overall, using Migration Assistant is very thorough and it copies across the most important Windows account settings and all of your files, so you don’t need to worry about losing any important documents or media.
Before you use Migration Assistant, it’s always worth doing a quick backup of your important files and data to make absolutely sure that everything can be recovered if really necessary.
- Make sure that both computers are on the same network and switched on – it doesn’t matter whether it’s a wireless network or wired one, as long as the two computers can see each other to transfer your files
- Download Migration Assistant software for the PC from Apple here. The software runs automatically once downloaded
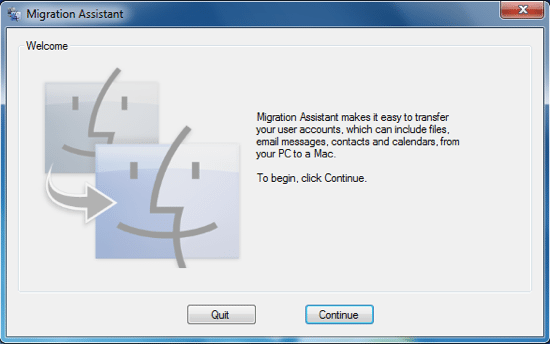
- Select Continue on the PC to start the process. On the subsequent screen, your PC will wait for your Mac to connect
- On the Mac, open Migration Assistant from the Applications / Utilities folder. An introduction screen appears and presents two options for you how you’d like to copy your information
- Choose the option From another Mac, PC, Time Machine backup, or other disk and click Continue
- When prompted, you’ll need to enter your password to allow Migration Assistant to make changes
- At the next screen (shown below), choose From another Mac or PC and click Continue
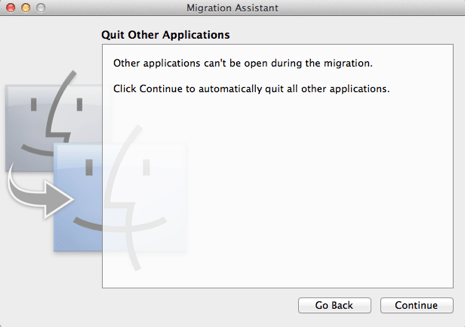
- Next, you’ll be prompted to close all running applications on the Mac, so just choose Continue
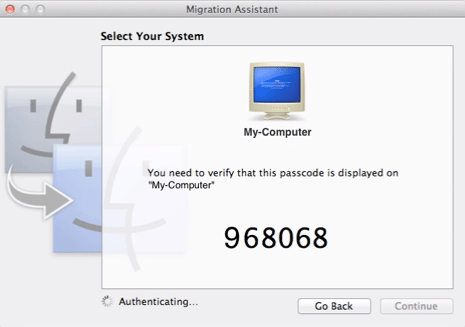
- Migration Assistant on the Mac now looks for computers on the local network. Select your computer (i.e. your PC) from the list displayed and click Continue
- A numerical passcode is generated and shown on the Mac (see below). You’ll need to enter this on the PC to authorise the transfer
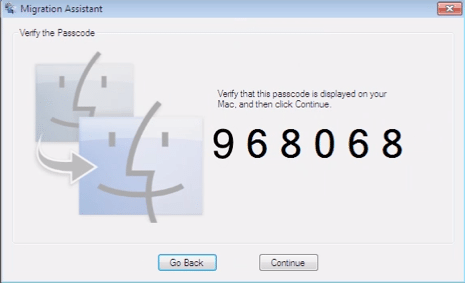
- On your PC, check that the passcode displayed in Migration Assistant matches the same one on your Mac, and choose Continue
How to Copy Files Manually
It’s possible to copy your files to the Mac manually but the process may take longer than using Migration Assistant. Here are just a few ways you could transfer your data.
- Send files to your Mac by email
- Copy files to your Mac over a network connection, for example via a shared folder
- Copy files to your Mac using an external hard disk or DVD
- Upload files to a cloud storage service (such as DropBox) and then download to your Mac
- Copy images from the My Pictures folder into the Pictures folder in your Mac’s Home Folder
- Copy videos from the My Videos folder into the Movies folder on your Mac
- Copy music from the My Music folder into the Music folder on your Mac
- Copy files from the My Documents folder into the Documents folder on your Mac
- Export your PC browser’s favourites and import them via Import Bookmarks in Safari’s File menu
- Export your PC’s contacts as vCards and import them into Address Book on the Mac
A note on Migrating Your iTunes Library
If you have an existing iTunes music library on the PC, it’s possible to move it to the Mac quite easily. An overview of the basic steps to follow are:
- Consolidate your existing media on the PC by choosing File -> Library -> Organise Library and make sure the Consolidate Files checkbox is selected
- Copy all the music from <your username>/My Music/iTunes to an external disk or over the network to your Mac
- Copy the entire iTunes folder to the Music folder (in the Home Folder) on your Mac
- Launch iTunes and it should pick up all your media, playlists, ratings and so on
There are a few situations when the process can be slightly more complicated, for example if your music is not stored in the default folder on Windows, but on the whole it’s fairly straightforward. For more details on what to do in exceptional cases, consult the iTunes help files.
Before you go
After spending over 20 years working with Macs, both old and new, theres a tool I think would be useful to every Mac owner who is experiencing performance issues.
CleanMyMac is highest rated all-round cleaning app for the Mac, it can quickly diagnose and solve a whole plethora of common (but sometimes tedious to fix) issues at the click of a button. It also just happens to resolve many of the issues covered in the speed up section of this site, so Download CleanMyMac to get your Mac back up to speed today.







Add Comment