Many Mac users will have dozens or even hundreds of apps installed on their computer. Occasionally, it’s desirable to uninstall unwanted or troublesome apps, or simply those which are taking up too much disk space and cluttering up your hard drive. Uninstalling applications in all versions of Mac OS X can be accomplished with relative ease, especially compared to Windows which has an established but somewhat old-fashioned method of adding or removing programs using the control panel.
Fortunately for Mac users, the vast majority of applications can simply be moved to the Trash and deleted with no repercussions; in most cases deleting an application’s executable file is equivalent to uninstalling it, and deleted apps tend not to leave behind much in the way of preference files or settings. OS X Lion provides an even simpler and almost foolproof method to uninstall apps, which is covered at the end of this tutorial. Always remember that before you delete any app, read its user manual or README files carefully to check if it has an automatic uninstaller, or any special manual steps that must be taken to fully remove the app and all its traces.
Despite the availability of “cleaner” utilities that promise to completely remove unwanted applications and optimise your computer, they are not essential as the procedure is really quite simple.
This tutorial explains how to completely remove a program manually.
Uninstalling Packaged Apps
Many people will be surprised to learn that the majority of Mac applications can be uninstalled just by unceremoniously moving them to the Trash (as long as they are not running at the time, of course).
Occasionally however, a couple of additional steps are necessary to ensure that preferences files and other unwanted items are not left on your computer indefinitely.
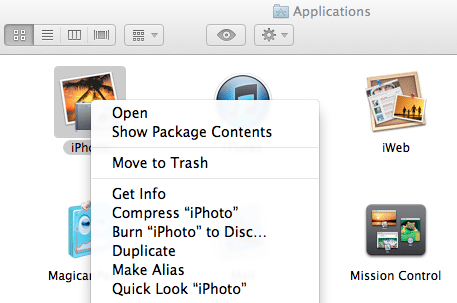
Many Mac applications (such as iPhoto and iTunes) are packaged into application bundles or packages, which are displayed a single icon but may in fact contain multiple subfolders, preferences and resource files (such as images and other content the application needs). Packages often conveniently store all their files inside the bundle without littering additional files around your computer. To inspect a package contents, right-click on its icon and select Show Package Contents from the popup menu.
The steps necessary to remove a packaged app are:
- Quit the application if it’s already open to make sure the app you are about to delete is not already running
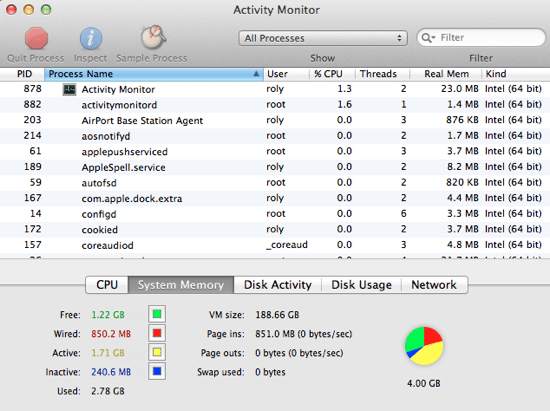
- As a precaution, use Activity Monitor to see whether the application is active
- Change the filter at the top of Activity Monitor to All Processes. The full list of running applications and processes are displayed
- Search the Process Name column for the app in question. If it’s there, highlight the name and hit the Quit Process button
- Open the folder where the application resides – it’s usually in your Applications folder
- Select the app, right-click and then Move to Trash from the popup menu (or just COMMAND + DELETE). The app is deleted and moved to the Trash, but be very careful not to empty the Trash until you are 100% sure that everything is working OK, and you haven’t deleted any critical system files by mistake!
- Optionally, restart your Mac – it may be necessary in some cases so that Mac OS recognises the app has been uninstalled properly
Now that the application has been successfully uninstalled, it’s advisable to check for any remaining files that may have been left behind. Refer to the section entitled Uninstalling Apps and Additional Files Using Finder.
How to Remove an App Icon From the Dock
Applications can be removed from the Dock easily, but the app is not actually deleted – it remains on your computer and can be opened as normal. To remove an app from the Dock, just drag it towards the desktop and let go – the icon disappears and the Dock automatically move adjacent icons as appropriate.
TIP: when you remove an item from the Dock – if you change your mind but are already in the process of moving it, then without letting go of the mouse just tap the escape key to cancel the action so that the icon automatically returns to its original position. This just saves you having to find the application icon again, so you don’t have to re-add it to the Dock.
Uninstalling Apps and Additional Files Using Finder
Deleted applications can leave behind umpteen preferences files, support files, logs, caches and other miscellaneous content. Before we describe how to remove these redundant files using Finder, here’s a brief rundown on each.
Additional Files: PREFERENCES
Every application keeps its preferences in a file with a .plist extension. These files are usually quite small so they can safely be left on your Mac without causing any serious issues or taking up too much space. The benefit of leaving them in place is that if you decide to reinstall the application later on, your current user preferences should still be intact.
Preference files normally reside in one of two locations:
- ~/ Library / Preferences
- Macintosh HD / Library / Preferences
As an example, the popular image editing app Pixelmator stores numerous preference files in your Library folder, with names like com.pixelmatorteam.pixelmator.LSSharedFileList.plist
Additional Files: SUPPORT FILES
An application’s support files are often much larger than preferences files, especially for multimedia apps like GarageBand. Therefore, it may be preferable to find and delete those files.
Support files are located here:
- ~/ Library / Application Support / <Application Name>
- Macintosh HD / Library / Application Support / <Application Name>
Additional Files: CACHE FILES
Cache files can also be fairly large depending on the app in question, so it’s wise to delete these too when you uninstall an app.
Cache files can be found in:
- ~/ Library / Caches / <Application Name>
- Macintosh HD / Library / Caches <Application Name>
How to Find and Delete Additional Files (and Applications)
Finder is an incredibly useful tool with a powerful search capability built-in. Finder’s search function can be used to locate all of an application’s additional files, as well as the main executable file itself .
Follow these steps to uninstall an application in its entirety:
- Make sure the app is not already running by using Activity Monitor as described earlier
- Open Finder from the Dock or with Spotlight
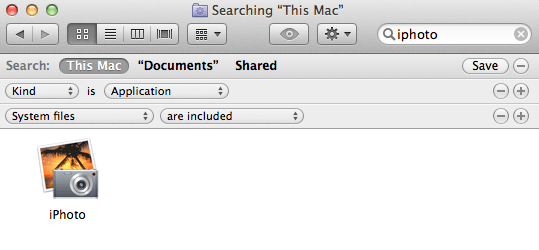
- In the Search field in the upper right corner, enter the application name (such as iPhoto) that you want to uninstall
- To add Search filters so that only relevant files are shown – click the small plus sign beneath the search box
- Add the following Search filter: (System files) (are included). If “System files” is not found in the drop-down filter menu, choose Other instead and scroll down the list (as shown below), find System files and hit OK. The inclusion of System files in the filter ensures that preference files and such will be displayed in the Search results
- Add additional Search filters as necessary to find all of the app’s related files. Example filters are: (Kind) is (Application), and (Name) (contains) <application name>. It’s really just a matter of identifying appropriate filters to locate files that may be hidden away in unusual locations
- You can now safely delete the application’s files and folders identified by Finder. Remember not to empty the Trash until you’re completely sure that your Mac is working properly and you haven’t deleted any important files by mistake
- Optionally, restart your Mac if necessary
Applications That Have a Custom Uninstaller
A minority of Mac applications come with dedicated uninstallation programs, which may be included on the original installation disk or inside the application folder or package. However, most apps can be removed as already described but it’s always advisable to check if the app has its own uninstaller first.
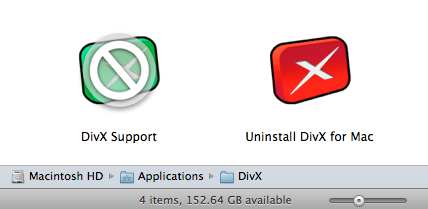
As an example, Safari’s DivX plugin provides an uninstall app in the Applications / DivX folder. Just run any such app and follow the instructions to uninstall properly. It’s always worth checking afterwards if the uninstallation has been successful by searching for related files, to make sure they really have been deleted in full.
The Easy Method to Uninstall Apps in OS X Lion
OS X Lion makes the whole process of uninstalling apps a doddle. Anyone familiar with the iPhone and iOS will appreciate the similarities, and Apple has made it unnecessary to search for leftover remnants of uninstalled apps.
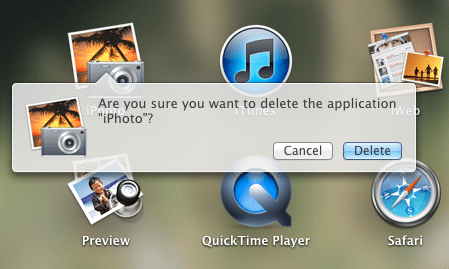
To fully uninstall an app in Lion:
- Open Launchpad from the Dock, Spotlight or with the appropriate swipe gesture
- Hold down the OPTION key (sometimes labelled ALT) until the icons wiggle. You’ll notice a small black and white cross icon in the corner of some of your Applications. Most apps installed from the App Store can be removed in this way, but the technique may not work with older apps. Only the ones that wiggle can be removed!
- Click the black “X” icon on the app you want to uninstall
- When prompted to confirm, choose Delete. The app is now completely removed – you don’t even need to empty the Trash
Thankfully, any applications obtained from the Mac App Store can be downloaded again if you need to reinstall them.
Before you go
After spending over 20 years working with Macs, both old and new, theres a tool I think would be useful to every Mac owner who is experiencing performance issues.
CleanMyMac is highest rated all-round cleaning app for the Mac, it can quickly diagnose and solve a whole plethora of common (but sometimes tedious to fix) issues at the click of a button. It also just happens to resolve many of the issues covered in the speed up section of this site, so Download CleanMyMac to get your Mac back up to speed today.





Nice one. Thank you. How about the ones in /user/bin or /use/local
i dont know if this happens in other os versions, but in os x lion applications like safari and itunes say that they are required by mac os x when you try to delete them, and wont allow you to do so. maybe im just slow and everyone else already knows this, but i just found out that you can enable the deletion of such “required ” apps by right-clicking the application, selecting get info for the popup menu, going down to and enabling alteration of the sharing and permissions part (by clicking the lock and entering your password), and then changing the permissions of the name “everyone” to read & write rather than read only or custom. then you can delete the application.
also, if you wish to redownload the app at some point and do, the permissions for the reinstalled app will be the default again (where you cannot delete it).
im sorry for the long post and for posting about this if everyone already knew how to do it and it was unnecessary, but thank you for reading it anyway.