


There’s several reasons why you might want to revert to an earlier version of macOS – perhaps you rely on an app that’s incompatible with the latest and greatest release; maybe you installed an experimental beta and it’s causing some problems, or perhaps you hate the direction that Apple are taking macOS, and you’re craving a return to the good old days.
Once you’ve installed a new version of macOS, reverting to an earlier release isn’t as easy as selecting an option from a menu, or downloading an earlier version and then simply reinstalling it.
In this article, I’ll cover the often-tricky subject of how to downgrade your Mac – whether you want to revert to the version of macOS that shipped with your laptop, or you’re interested in creating a bootable installer.
Running High Sierra?
If you’re on High Sierra 10.12.4 or later, and you want to revert to the version of macOS that shipped with your Mac, then you’re in luck! This is one of the easiest ways to downgrade your Mac:
- Restart your Mac, while holding down the ‘Shift+Option+Command+R’ keys.
- Once you see the macOS Utilities screen, select ‘Reinstall macOS’ and then click ‘Continue.’
- Choose your startup disk, and then select ‘Install.’
Using a Time Machine backup
If you create regular Time Machine backups (and you should!) then you may be able to reverse a macOS update by restoring a Time Machine backup that you created before installing that update.
Reinstalling an earlier backup will undo all the changes you made since creating this backup, so make sure all of your documents and data are stored somewhere safe before proceeding.
To restore a Time Machine backup:
- If the backup is stored on an external or network drive, then make sure this drive is available to your Mac.
- Restart your Mac while holding down the ‘Command+R’ keys. Release these keys as soon as you see the Apple logo.
- In macOS Utilities, select ‘Restore from Time Machine Backup.’
- Click ‘Continue.’
- On the ‘Restore from Time Machine’ screen, click ‘Continue.’
- Select your restore source.
- The next screen will display all of your backups. Choose the backup that you want to reinstate, which will typically be the last backup you created before updating macOS.
- Your Mac will now restore this backup, and downgrade you to an earlier version of macOS in the process!
Don’t have a Time Machine backup?
If you don’t have a Time Machine backup, then downgrading is going to be more complicated, as you’ll need to create a bootable installer.
For the best results, you’ll need a USB flash drive with at least 12GB of memory. Just be aware that formatting this drive will wipe everything from it! If the USB drive contains anything that you want to keep, then make sure you move or copy it to a safe location before proceeding.
You’ll also need the version of macOS that you want to install. In the best case scenario, you’ll want to downgrade to a version of macOS that you downloaded via the App Store, as this means you’ll be able to re-download the installer via the App Store.
If you want to downgrade to a version of macOS that you didn’t originally download from the App Store, or a version of macOS that was never available via the App Store (such as Mac OS X Snow Leopard) then there are some workarounds. We’ll be covering these workarounds in the next section, so avoid the temptation to download this version of macOS from a third party. This kind of pirated software often contains viruses, adware, spyware and other digital nasties, so you may get more than you bargained for if you download macOS from anyone other than Apple!
To re-download an installer:
- Launch the App Store.
- Select the ‘Purchases’ tab. Even though we no longer pay for macOS updates, confusingly they’re still listed under the ‘Purchased’ tab!
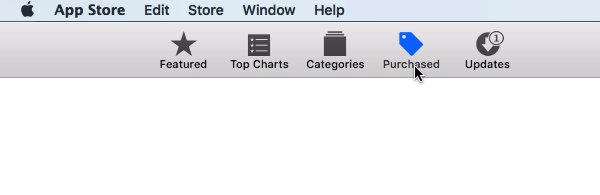
- Find the version of macOS that you want to install, and then click its accompanying ‘Install’ button.
This will download the installer to your Mac’s ‘Applications’ folder. Frustratingly, you can’t install this version of macOS simply by double-clicking its installer, which is where our USB drive comes into play!
Can’t find the version of macOS that you want?
If you want to install a version of macOS that you never downloaded via the App Store, then your best bet is to enlist the help of another Mac user. macOS installers aren’t user specific, so if you have a friend, colleague or family member who did download this version of macOS, then they can re-download the necessary installer for you.
If you want to revert to Snow Leopard, then frustratingly this version of macOS was never available via the App Store, so it’s impossible for anyone to download this installer from the official Apple App Store. In you really want to install Snow Leopard, then your only option is to purchase a boxed version (£19.99), and then use either a CD or DVD drive to install the operating system on your Mac.
Create your bootable installer
Once you have the necessary installer, it’s time to transform your USB drive into a bootable installer:
- Attach the USB drive to your Mac.
- Open a new ‘Finder’ window and navigate to ‘Applications > Utilities.’
- Launch Disk Utility.
- In the Disk Utility menu bar, select ‘View > Show All Devices.’
- In Disk Utility’s left-hand menu, select your root drive.
- Click the ‘Erase’ button.
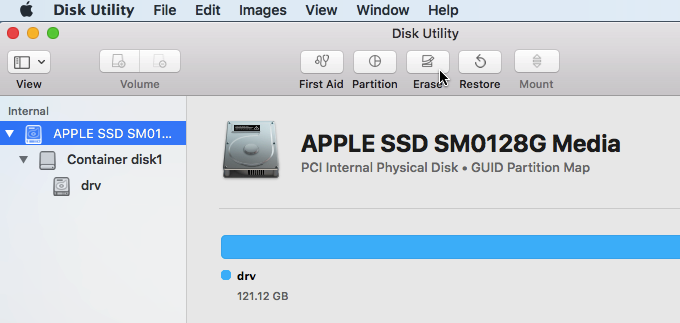
- Choose Mac OS Extended (Journaled) as the ‘Format.’
- For the ‘Scheme,’ choose ‘GUID Partition Map.’
- Your drive will be named ‘Untitled’ by default, but you can change this name, if required.
- Select ‘Erase.’
- Disk Utility will now create the partition and prepare the drive. Once it’s finished, click ‘Done.’
- Launch the Terminal, by opening a ‘Finder’ window and navigating to ‘Applications > Utilities > Terminal.
At this point, you need to enter a Terminal command, which will vary depending on your version of macOS. Remember to replace ‘untitled’ with the name you assigned to your USB drive.
High Sierra
sudo /Applications/Install\ macOS\ High\ Sierra.app/Contents/Resources/createinstallmedia –volume /Volumes/untitled –applicationpath /Applications/Install\ macOS\ High\ Sierra.app
Sierra
sudo /Applications/Install\ macOS\ Sierra.app/Contents/Resources/createinstallmedia –volume /Volumes/untitled –applicationpath /Applications/Install\ macOS\ Sierra.app
El Capitan
sudo /Applications/Install\ OS\ X\ El\ Capitan.app/Contents/Resources/createinstallmedia –volume /Volumes/untitled –applicationpath /Applications/Install\ OS\ X\ El\ Capitan.app
Yosemite
sudo /Applications/Install\ OS\ X\ Yosemite.app/Contents/Resources/createinstallmedia –volume /Volumes/untitled –applicationpath /Applications/Install\ OS\ X\ Yosemite.app
Mavericks
sudo /Applications/Install\ OS\ X\ Mavericks.app/Contents/Resources/createinstallmedia –volume /Volumes/untitled –applicationpath /Applications/Install\ OS\ X\ Mavericks.app
- Copy/paste the appropriate command into the Terminal, and then press the ‘Enter’ key on your keyboard.
- Terminal will now warn that you’re about to erase the drive. To continue, press ‘Y,’ followed by the ‘Enter’ key.
Your Mac will now wipe the flash drive and copy the installer over, at which point you’ll have created a bootable installer.
Installing macOS from an external drive
Finally, you’re ready to revert to an earlier version of macOS:
- Make sure your USB drive is attached to your Mac.
- Power down your Mac, and then restart it while holding down the ‘Option’ key.
- When you see the ‘Startup Manager,’ select your USB drive and then click ‘Install macOS.’ macOS will now be installed from your USB drive.
Before you go
After spending over 20 years working with Macs, both old and new, theres a tool I think would be useful to every Mac owner who is experiencing performance issues.
CleanMyMac is highest rated all-round cleaning app for the Mac, it can quickly diagnose and solve a whole plethora of common (but sometimes tedious to fix) issues at the click of a button. It also just happens to resolve many of the issues covered in the speed up section of this site, so Download CleanMyMac to get your Mac back up to speed today.


Add Comment