


Your typical Mac comes with a wide range of built-in keyboard shortcuts that can seriously boost your productivity and generally make using your Mac more enjoyable. However, when it comes to tweaking these built-in keyboard shortcuts to better suit your needs, by default macOS isn’t as flexible as some other operating systems.
In this tutorial I’m going to show you how to get around these limitations by using AppleScript scripts and the Quicksilver application to modify your Mac’s default shortcuts (or “hotkeys”) in three powerful ways. By the end of this tutorial, you’ll know how to:
- Substitute any keyboard shortcut for the hotkey of your choice. Maybe there’s a particular shortcut that you always struggle to remember, or find awkward to execute – some of Apple’s default shortcuts do require you to press keys at completely opposite ends of the keyboard, after all!
- Customising the Function keys. Ever felt like some of the Function keys that run along the top of your keyboard are wasted space? Your Mac’s Function keys may have little icons printed on them that relate to their default functionality, but that doesn’t mean you can’t customise them to perform completely different actions!
- Create global shortcuts. Many app-specific keyboard shortcuts will act differently depending on whether that particular application is in focus, and may not even work if the app isn’t currently visible onscreen. This inconsistency can be confusing, but there is a way to ensure you always get exactly the same behaviour regardless of which app is currently in focus: turn your favourite app-specific shortcut into a global shortcut. Towards the end of this tutorial, I’ll show you how to transform a Spotify-specific shortcut into a global shortcut, so you can interact with your music even when Spotify isn’t visible.
Before we get started
Throughout this tutorial we’ll be writing scripts that trick the system into believing you’ve activated various keyboard shortcuts. You then use the Quicksilver application to create a ‘trigger’ that launches the script whenever you press the hotkey of your choice. So, you could write a script that emulates pressing the Command-Shift-4 keys, and then trigger this script whenever you press the Command-4 keys (or, potentially a single Function key, as we’ll see later in this article). The script will then run, and the system will act as though you’ve just pressed the original Command-Shift-4 shortcut.
Before we can start writing our scripts and creating our triggers, you’ll need to do a bit of setup. To start, download and install the latest version of QuickSilver. Although you can download Quicksilver for free, this project is maintained by volunteers so you may want to consider making a donation to help support their work.
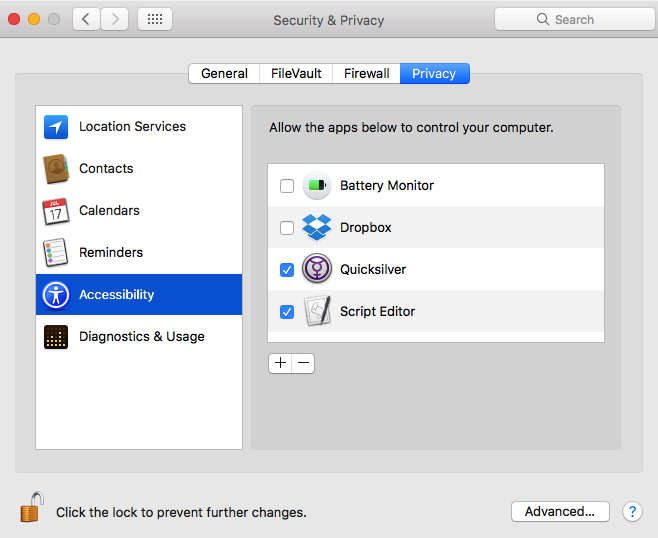
You’ll also need to grant both Quicksilver and Script Editor access to your Mac’s Accessibility features:
- Click the ‘Apple’ icon in your Mac’s menu bar.
- Select ‘System preferences….’ followed by ‘Security & Privacy.’
- Make sure the ‘Privacy’ tab is selected, then select ‘Accessibility’ from the left-hand menu.
- Click the little ‘+’ icon.
- Select the Quicksilver and Script Editor applications. You’ll find Script Editor in your Mac’s Applications/Utilities folder.
Customise any macOS shortcut
Let’s start by looking at how you can replace any default keyboard shortcut with the hotkey of your choice.
The first step is writing a script, so navigate to Applications/Utilities and launch your Mac’s Script Editor application.
The keyboard shortcut I use the most often is Command-Shift-4 shortcut, which allows you to take a screenshot of a portion of your screen. This is the shortcut I’m going to customise in this section, but I’ll also explain how the script works so you can tweak it to target any other keyboard shortcuts that may be causing you problems.
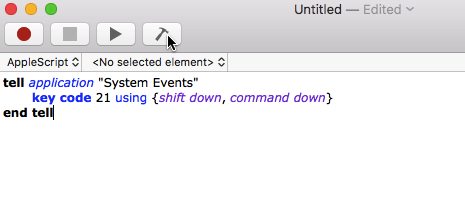
Copy/paste the following script into the AppleScript window:
tell application “System Events”
key code 21 using {shift down, command down}
end tell
Make sure this script is properly formatted, by clicking the ‘Compile the script’ button (where the cursor is positioned in the following screenshot) and then save your script by clicking ‘File>Save.’
Although this script is only a few lines long there’s a lot going on here, so let’s look at what’s happening, line-by line:
- tell application “System Events.” Here, we’re telling the system to apply this script to the application that’s currently in focus. If the current application doesn’t support this particular keyboard shortcut, then running this script will have no effect.
- key code 21. While there’s a few keys that you can refer to by name (such as the ‘Command’ and ‘Shift’ keys, as we’ll see in a moment), most of the time you’ll need to refer to keys using their unique key code. Take a look at the list of Mac key codes and you’ll see that the ‘4’ key has a code of ‘21,’ so in this line we’re essentially saying “Emulate pressing the 4 key.”
- using {shift down, command down}. The ‘using’ parameter tells the system to emulate a specific key being pressed, so this line is basically: “Emulate pressing the Shift and Commands keys.”
Creating your Quicksilver trigger
Once you’ve written your script, the next step is using Quicksilver to define the keyboard shortcut that you’ll use to trigger this script:
- Launch Quicksilver.
- Select ‘Quicksilver’ from the Mac menu bar, followed by ‘Preferences….’
- Select the ‘Triggers’ tab.
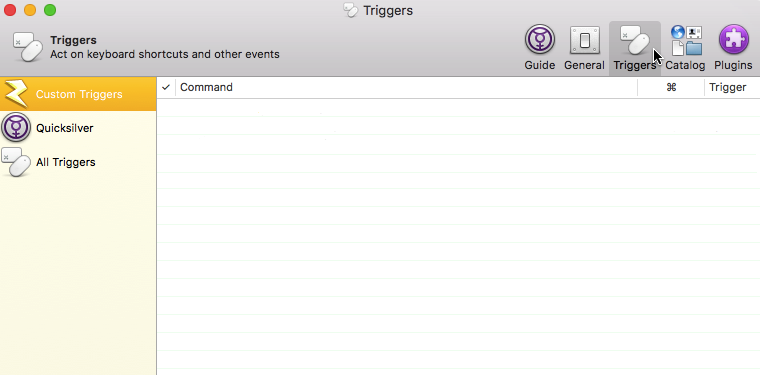
- Select ‘Custom Triggers’ from the left-hand menu.
- Click the ‘+’ icon that appears towards the bottom of this window, and then select ‘Keyboard’ from the dropdown menu that appears.
- At this point a new window will open. Start typing the name of the script you created in the previous step, until this script appears in the ‘Select an Item’ field.
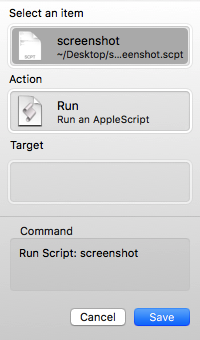
- As soon as you select a script, the ‘Action’ field should update automatically with the ‘Run’ action. If it doesn’t, then you’ll need to click this field and type ‘Run.’
- Click the ‘Save’ button.
- A new ‘Run script’ item should have appeared in the main ‘Triggers’ window.
- Find the ‘None’ label that accompanies this ‘Run Script’ item (where the cursor is positioned in the following screenshot) and give it a click.

- In the subsequent window, make sure the ‘Settings’ tab is selected.
- Click inside the ‘Shortcut’ field, and then hold down the key(s) that you want to trigger this script i.e the keys that’ll serve as your new keyboard shortcut. Make sure you opt for a shortcut that isn’t already used elsewhere – it may help to take a read through Apple’s list of existing keyboard shortcuts at this point.
- Select the checkbox that appears to the left of the ‘Run script’ item.
Test your keyboard shortcut to make sure it works. In this example, you cursor should transform into crosshairs, ready for you to screenshot a portion of your screen.
Assigning new actions to the Function keys
The Function keys that run along the top of your keyboard perform a range of special features, but if you aren’t happy with this setup you can always swap these special features for the actions of your choice. This follows the same process as the previous step: create a script, and then use Quicksilver to run this script everytime you press one of the Function keys.
The only real difference is that before you can modify the Function keys, you’ll need to let your Mac known that you want to treat these keys as “standard Function keys.” This essentially breaks the links between the Function keys and their default special features, so you can then customise them with your own functionality.
To do this:
- Open your Mac’s ‘System preferences.’
- Select ‘Keyboard.’
- Select the ‘Use all F1, F2, etc. keys as standard function keys’ checkbox.

The major drawback is that selecting the ‘Use all F1, F2….’ checkbox will impact the entire row of Function keys, so none of them will work as originally intended, which can be frustrating if you only wanted to modify a single Function key. However, you always have the option of creating a script and a Quicksilver trigger that re-assigns the original behaviour to certain Function keys.
Make app-specific shortcuts global
Many applications come with their own set of shortcuts, but these typically only work while that particular app is in focus. For example, when the Spotify app is in focus you can increase its volume using the Command-Upwards Arrow shortcut. However, this shortcut isn’t global so pressing these keys while Spotify is in the background won’t have any effect.
In this section I’m going to show you how to transform an app-specific shortcut into a global one that you can activate regardless of whether the related app is currently visible onscreen. I’m going to use increasing the volume in Spotify as my example, but once again I’ll explain what’s happening in each line so you can tweak the script to suit whatever app-specific shortcut you want to make global.
Note, your Mac does provide volume up and volume down keys, in the form of the F11 and F12 Function keys, but these alter the volume across your Mac as a whole, rather than specifically changing the volume in Spotify. Making this app-specific volume shortcut global gives you an easy way of changing your Spotify volume and your Mac volume independently.
Copy and paste the following script into a new Script Editor document:
tell application “System Events”
tell application “Spotify” to activate
tell process “Spotify” to click menu item “Volume Up” of menu “Playback” of menu bar 1
end tell
This script contains a few lines of code that we haven’t seen before:
- tell application “Spotify” to activate. Here, we’re telling the system to bring the Spotify app into focus, so the subsequent keyboard shortcut will always be applied to Spotify.
- tell process “Spotify” to click menu item “Volume Up” of menu “Playback” of menu bar 1. This line is instructing Spotify to open the ‘Playback’ menu and select the ‘Volume Up’ item. Basically, we’re asking the script to perform the following action:

Click the ‘Compile the script’ button, and save your script.
Now all you need to do is create your trigger:
- Launch Quicksilver.
- Select Quicksilver>Preferences…>Triggers>Custom Triggers.
- Click the ‘+’ icon, followed by ‘Keyboard.’
- Enter the name of your script.
- Click ‘Save.’
- In the main ‘Triggers’ window, select the ‘None’ label and enter the keyboard shortcut you want to use.
Test your script by booting up Spotify. Make sure the app isn’t currently in focus, and then try increasing the volume using your new keyboard shortcut – you should notice that your music gets louder!
Before you go
After spending over 20 years working with Macs, both old and new, theres a tool I think would be useful to every Mac owner who is experiencing performance issues.
CleanMyMac is highest rated all-round cleaning app for the Mac, it can quickly diagnose and solve a whole plethora of common (but sometimes tedious to fix) issues at the click of a button. It also just happens to resolve many of the issues covered in the speed up section of this site, so Download CleanMyMac to get your Mac back up to speed today.


Add Comment