


With the rise of smartphones, tablets and public Wi-Fi hotspots, it’s never been easier to keep one eye on your inbox. However, occasionally there may still be times when you know you won’t be checking your emails for a while. For example, maybe you have a full day of back-to-back meetings to look forward to, or you’re heading out on vacation and don’t particularly want to feel obligated to keep checking your work emails.
If you know you won’t be replying to your messages for a while, then you can create an Out Of Office email that Mail will send automatically in response to incoming messages. This means that you’ll be free to enjoy your time away from the office, safe in the knowledge that friends, family members, colleagues and other contacts will know you’re not ignoring them.
Apple’s Mail app may not have a dedicated Out Of Office feature, but it does have various rules that you can use to create autoresponders. In this article, I’m going to show you how, with some creative use of Mail rules and autoresponders, you can bring Out Of Office functionality to Apple Mail.
Auto-reply to every message
Let’s start by creating a rule that’ll send an Out Of Office response to every email that arrives in your inbox:
- Launch the Mail application, by opening a ‘Finder’ window and navigating to ‘Applications > Mail.’
- Select ‘Mail > Preferences…’ from the toolbar.
- Select the ‘Rules’ tab, and click ‘Add Rule.’
- In the subsequent window, give your rule a descriptive name; I’m going to use ‘Out Of Office.’
- Open the ‘If’ dropdown, and set it to ‘Any.’
- Open the ‘From’ dropdown and set it to ‘Account.’
- Open the next dropdown, and select the email account where you want to use this autoresponder. If you want to use your Out Of Office autoresponder across multiple accounts, then click the little ‘+’ icon and add each subsequent account.
- Next, find the ‘Perform the following actions’ header; open the first dropdown in this section and set it to ‘Reply to Message.’
- Click ‘Reply message text…’

- You can now compose your Out Of Office email. Just remember that this text will be sent in response to every email you receive, including spam messages. Since you probably don’t want to broadcast your work, travel or vacation details to random online spammers, you should avoid going into too much detail here.
- Once you’re happy with your email, click ‘OK.’
- At this point, you’ll be asked whether you want to apply this rule to all the existing messages in your inbox – select ‘Don’t Apply.’ If you click ‘Apply,’ then Mail will send your Out Of Office response to every single message currently in your inbox. People you regularly exchange emails with will potentially receive hundreds of copies of your Out Of Office email, and people you haven’t spoken to in years will be left scratching their heads, wondering why you’re suddenly trying to get back in touch with them. Save yourself a lot of embarrassment and make sure you click ‘Don’t Apply.’
As soon as you click ‘Don’t Apply,’ Mail will display a list of all your active and inactive rules. New rules are set as active by default, so if you’re not stepping out of the office just yet then you’ll need to deactivate this rule by deselecting its checkbox. Then, when you’re ready to start using your Out Of Office response, simply navigate to ‘Mail > Preferences > Rules,’ find your Out Of Office rule, and select its accompanying checkbox.
Since we haven’t specified how long this rule should remain active for, remember to deactivate it manually when you’re back in the office.
Get Selective: Auto-Respond to certain messages only
While our one-size-fits-all Out Of Office response works perfectly fine, do you really need to respond to every email you receive?
Most of us receive a tonne of spam messages on a day-to-day basis, and responding to unsolicited emails can actually increase the amount of spam you receive, as the spammer now knows that your email address is active.
Instead of sending the same Out Of Office message to everyone who emails you, you can use Mail’s rules to set some specific criteria about the kind of messages that warrant an Out Of Office response. Either create a new rule by navigating to ‘Mail > Preferences > Rules > Add Rule,’ or edit the rule we just created, by heading over to ‘Mail > Preferences > Rules,’ selecting the rule in question and then clicking the ‘Edit’ button.
There’s a list of different criteria that you can apply to your Out Of Office rule, but some of the most useful include:
- Respond to specific email addresses only. How many people really need to know that they shouldn’t expect an immediate response from you? If only a handful of people spring to mind, then you may want to tell Mail the specific email addresses that should receive your Out Of Office response. Open the first dropdown menu and set it to ‘From,’ then open the second dropdown and select ‘Contains.’ In the text field that appears, enter the first email address, then keeping clicking the little ‘+’ to add each subsequent address.
- Respond to registered contacts only. Tell Mail to only send your Out Of Office reply if the sender is registered in your Contacts app, by opening the first dropdown and setting it to ‘Sender is in my contacts.’
- Respond to specific email domains only. Many companies and organisation use a unique, “vanity” domain name for all of their email accounts. If you regularly deal with multiple people from the same organisation, and all of their email addresses feature the same vanity URL, then you may want to send your Out Of Office message in response to all emails featuring this domain name. To create a rule that’s triggered by a specific domain name, set the first dropdown to ‘From,’ the second dropdown to ‘Contains,’ and then enter the domain name in the subsequent text field.
Alternatively, Mail can scan incoming messages for keywords or phrases, which can be particularly useful if there’s certain topics Mail should always respond to, regardless of who the sender is. For example, if you’re a business owner then you may want to ensure that all enquiries from potential new customers receive an Out Of Office response, so they aren’t left wondering whether the radio silence means that your business is no longer active.
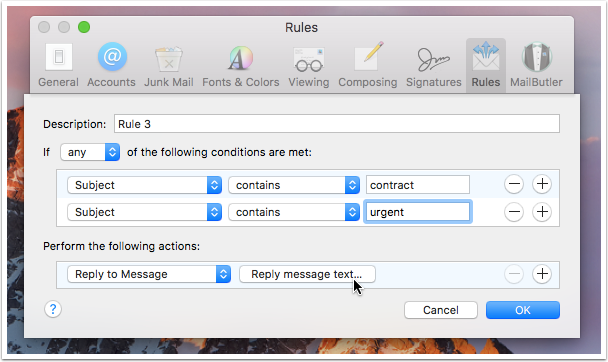
To create a rule that scans each email’s subject line, open the first dropdown and select ‘Subject,’ then open the second dropdown and select ‘Contains.’ You can then enter your keyword or phrase in the accompanying text field.
Alternatively, you can scan the body of each incoming email, by opening the first dropdown and selecting ‘Message content,’ then specifying the word or phrase that should trigger your Out Of Office response.


Add Comment