One of the new macOS features that’s already available via the Sierra beta, is the ability to automatically sync the entire contents of your Desktop and Documents folders with your iCloud account.
In the pre-Sierra world, if you wanted to sync a file with iCloud then you had to go to the effort of manually placing that file in your iCloud Drive folder. But, in Sierra and higher every file you save to your Desktop and Documents is automatically uploaded to a corresponding Desktop/Documents folder in your iCloud Drive.
Once you enable this ‘iCloud Drive Desktop and Documents’ feature, you’ll be able to access the whole of your MacBook’s Desktop and Documents from any device, simply by logging into your iCloud account. This is particularly valuable as, if you’re anything like me, you store 99% of your files in these two folders.
So, how do you create this sync between your Desktop and Documents folders, and iCloud?
Enabling iCloud Drive Desktop and Documents
Firstly, this feature is only available in the Sierra beta and higher, so make sure you’ve upgraded to Sierra if you haven’t already. Then, to create the link between your local folders and your iCloud Drive account:
- Select the Apple logo from your MacBook’s menu bar, followed by ‘About This Mac.’
- Make sure the ‘Storage’ tab is selected.

- Select ‘Details’ from the window that appears.
- In the ‘System Information’ window, make sure ‘Recommendations’ is selected, and then click ‘Store in iCloud.’

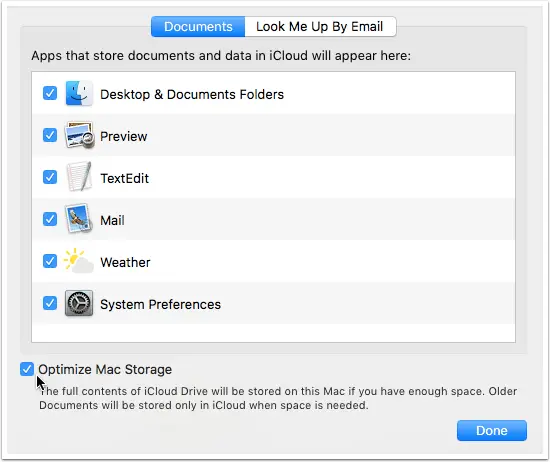
At this point, make sure you read the disclaimer as it contains important information about iCloud Drive’s ‘Optimize Mac Storage’ feature. Essentially, when your MacBook’s getting low on storage, only the most recently-opened files and folders will be stored in your local Desktop and Documents; the rest will be stored in iCloud Drive only. This means that even though you’ll be able to access these items via your iCloud Drive account, they won’t be available locally on your MacBook.
This feature is enabled by default, but if you don’t like the thought of Sierra automatically removing files and folders from your laptop, you can disable it once you have iCloud Drive Desktop and Documents up and running – I’ll show you how later in this article.
For now, click ‘Store in iCloud.’
At the time of writing, you won’t see a message confirming that this feature is enabled, but if you open your Mac’s ‘Finder’ you’ll see that the ‘Desktop’ and ‘Documents’ folders now appear under the ‘iCloud’ section of the side-menu.

And that’s it! From this point onwards, any items you add to your Documents folder or Desktop will automatically sync to your iCloud account.
Disabling Optimize Mac Storage
As already mentioned, ‘Optimize Mac Storage’ automatically removes files and folders from your local Desktop and Documents once storage starts to get low. If you don’t like the sound of this, you can always disable this feature:
- Open your ‘System Preferences’ and select ‘iCloud.’
- Select ‘iCloud Drive’ and give its corresponding ‘Options…’ button a click.

- Deselect the ‘Optimize Mac Storage’ checkbox.

- Select ‘Done.’
Monitoring your iCloud Storage
The major downside to iCloud Drive Desktop and Documents (beside its awkwardly-long name!) is that you’ll need to keep a close eye on your iCloud storage, because once this feature is enabled it can seriously gobble up those gigabytes – particularly if you’re in the habit of storing lots of large folders in your Desktop and/or Documents.
To check how much space you have left, open your MacBook’s ‘System Preferences…’ and select ‘iCloud,’ followed by ‘Manage.’ You’ll find the amount of space remaining in the upper-left corner.

This window is also where you can purchase some additional storage.
Sending Apple your Feedback
Don’t be surprised if you encounter any issues, errors, or other strange behaviour when you’re using this new iCloud Drive feature, as Sierra is still very much a beta release.
One of Apple’s main motivations for releasing betas, is so that people can test the software and report back on what’s not working, so if you encounter any issues when using this new feature you should definitely let Apple know about it! The good news is that Sierra comes with a dedicated Feedback Assistant app that makes it easy to send Apple your feedback.
To launch Feedback Assistant:
- Open your MacBook’s ‘Finder.’
- Select the ‘Applications’ folder.
- Select ‘Utilities.’
- Double-click ‘Feedback Assistant.’
If this is the first time you’ve launched the app, click ‘Continue,’ read the terms and conditions, then click ‘Accept.’ Enter your Apple ID and password, then click ‘Send us your feedback.’ This launches a form where you can let Apple know exactly what problems you’re experiencing with this new iCloud feature – or even with Sierra in general!
Before you go
After spending over 20 years working with Macs, both old and new, theres a tool I think would be useful to every Mac owner who is experiencing performance issues.
CleanMyMac is highest rated all-round cleaning app for the Mac, it can quickly diagnose and solve a whole plethora of common (but sometimes tedious to fix) issues at the click of a button. It also just happens to resolve many of the issues covered in the speed up section of this site, so Download CleanMyMac to get your Mac back up to speed today.


Add Comment