

We all have tasks that we hate doing, or that take up way too much time.
Automation has the potential to save you from all of those time-consuming, frustrating tasks!
We’ve previously covered a number of automation software and tools, ranging from Mac’s built-in Automator app to home automation, but Zapier is a web-based automation service that’s designed to integrate with all of your favourite web-powered apps and services.
You can use Zapier to create workflows, or “zaps,” that involve all of the major online services and applications, including Facebook, Instagram, Twitter, Gmail, DropBox and PayPal. For example, you can use Zapier to automatically sync your Google Drive documents to your DropBox account; tweet your latest YouTube video; import new Google Contacts into your MailChimp mailing list, or pin all of your Instagram posts to Pinterest automatically.
In this article, I’ll show you how to get up and running with a free Zapier account, and then how to use Zapier’s online editor to build two complete workflows. By the end of this article, you’ll have created:
- A workflow that monitors your inbox and automatically uploads incoming attachments to your Google Drive account, ready for you to edit.
- A workflow that monitors one or more of your favourite Twitter accounts, and notifies you every time they tweet. This workflow will send you the contents of each tweet as an email, so you can keep up-to-date on all of your favourite accounts without having to spend hours scrolling aimlessly through your Twitter timeline.
Get started with Zapier
You can sign up to Zapier for free, although a premium version is also available with some additional tools and technical support. In this article, I’ll be using the free plan.
To get started:
- Head over to the Zapier website and sign up for a free account.
- In order to provide personalised workflow recommendations, Zapier will ask you to select all the applications you use on a regular basis. For the best results, work your way through this list and select all of your favourite applications.
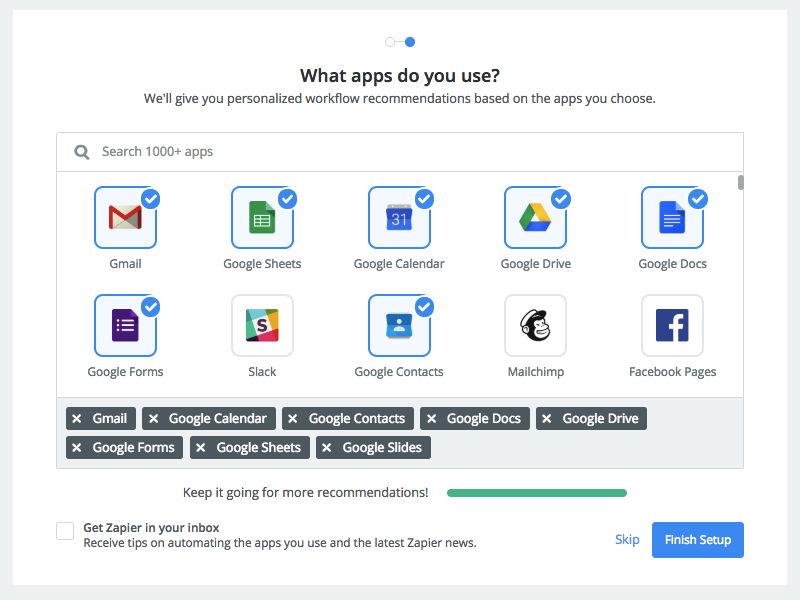
- When you’re happy with your selection, click “Finish Setup.”
Now Zapier is up and running, let’s create our first “zap” workflow.
Automatically save new Gmail attachments to Google Drive
If you regularly collaborate with people over email, then the process of downloading each attachment, only to then upload that attachment to Google Drive can quickly become frustrating – especially if you struggle with a slow or intermittent Internet connection, or you receive a large number of attachments.
You can use Zapier to automatically save all of your Gmail attachments to Google Drive, so the next time you launch Google Drive all of those attachments will be ready and waiting for you to edit:
- Log into Zapier, if you haven’t already.
- In the upper-right corner of your Zapier account, select the red “Make a Zap” button. This will launch the Zapier editor, where you’ll build each of your “zap” workflows.

- Select the “trigger app” that you want to use, which in this instance is Gmail. Depending on how your Zapier account is setup, you may need to scroll to find the Gmail app. Alternatively, you can search for a specific application, using the search bar.
- In the list of Gmail triggers, select “New attachment.”
- Click “Save + Continue.”
- Select “Connect an Account” and then follow the onscreen instructions to connect your Gmail account to Zapier. Once you’ve finished, click “Save + Continue.”
- When prompted, select “Continue.”
- Zapier will now request an attachment that it can use as a template to create this workflow. This attachment will help you specify the information that Zapier should pull from your email attachments, such as the sender’s name, the email’s subject line, and the attachment’s body text. For the best results, you should use a file that’s representative of the kind of email attachments you typically receive.
- Once you’ve chosen an attachment, click “Continue.”
- Now we have our trigger (i.e receiving a new attachment), we need to tell Zapier what action it should perform, in response to this trigger. Start by selecting “Add a Step” from the left-hand menu.
- Select “Action/Search.”
- Choose the application that you want to use, which in this instance is Google Drive.
- Select “Upload File.”
- Click “Save + Continue.”
- When prompted, select “Connect an Account.” Follow the onscreen instructions to connect your Google Drive to Zapier.
- Back in the main Zapier console, select “Save + Continue.”
- Open the “File (required)” dropdown, and select all the information that Zapier should add, when it uploads an attachment to Google Drive. For example, you might want to record who sent the attachment (“From Name”), the date you received the attachment (“Date”) and the attachment’s contents (“Attachment: Exists but not shown”). Keep clicking the little “+” button until you’re happy with your selection.

Although it’s optional, you can use the “Folder” dropdown to nominate a specific Google Drive folder, where Zapier should store your attachments.
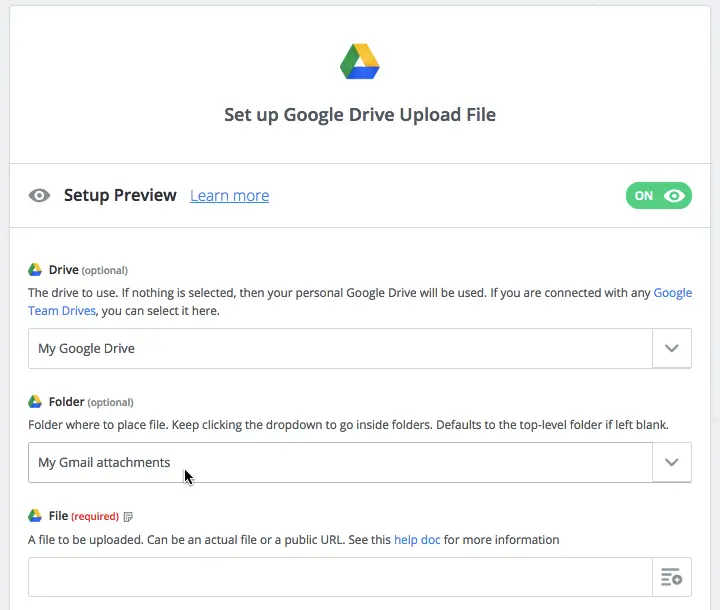
- When you’re happy with the information you’ve entered, click “Continue.”
- You can now put your integration to the test, by selecting “Send Test To Google Drive.”
- In a new tab, head over to your Google Drive account. The attachment you used as your template should have been successfully uploaded to your Google Drive account. Open this attachment, and check that it’s displaying correctly.
- If you’re happy with your test, then switch back to the Zapier editor, and click “Finish.”
- Give this zap a name and, if you’re ready to start using it, drag the “On/Off” slider to the “On” position.
Congratulations, you’ve just created and activated your first zap!
Changed your mind? How to disable, or delete a zap
You can view all of your zaps, in the Zap dashboard. To access this dashboard, either:
- Head over to the Zapier console’s homepage and select the “Zaps” tab.
- Access the dashboard directly, via a hyperlink.
To edit a zap, select its accompanying arrow icon and then select “Edit” from the dropdown menu.

To deactivate a zap, push its accompanying slider into the “Off” position. Alternatively, you can permanently delete a zap workflow, by opening its dropdown menu and selecting “Trash.”
Get notified every time your favourite account tweets
Maybe there’s a Twitter account that you want to keep a close eye on, such as the account belonging to a friend or family member, or even a potential new customer; or maybe your favourite account is in a completely different timezone, and you always seem to miss their tweets.
Whatever the reason, you can create a zap that sends you an email, every time a particular account posts a new tweet:
- Log into your Zapier account and select “Make a zap.”
- When prompted, select “Twitter” as your trigger app.
- For your trigger, choose “User Tweet.” Click “Continue.”
- Select “Connect an Account” and then follow the onscreen instructions to link Zapier to your Twitter account.
- Back in the Zapier console, click “Save + Continue.”
- In the “Username” field, enter the @ handle of the account that you want to monitor. Click “Continue.”
- Similar to the email attachment workflow, you need to select a tweet that Zapier will use as a template. Choose a tweet from the list, and then click “Continue.”
- Make sure “Send Outbound Email” is selected, and then click “Continue.”
- In the “To” field, enter your email address.
- In the “Body” field, click the little “+” button and select all the information that should be included in this email. For example, you might choose to include the contents of the tweet (“Text,”) the account that posted this tweet (“user name”), the user’s profile image (“User Profile Image https”) and the account’s bio (“User Description.”)
- In “Subject,” enter a subject line for the email. This can either be plain text or a piece of information that’s pulled from the tweet, such as the username associated with the tweet.
- Once you’re happy with the information you’ve entered, click “Continue.”
- Put your workflow to the test, by clicking “Send Test To Email by Zapier.” After a few moments, a test email should appear in your inbox.
- If you’re happy with the contents of the email, switch back to the Zapier editor and click “Finish.”
- To activate your zap, push the slider into the “On” position. Now, every time this account posts a new tweet, you’ll receive an email notification.
Get inspired for future Zapier workflows
In this article, I showed you how to create a complete Zapier workflow. Now you’ve mastered the essentials, you can use the Zapier console to create countless different workflows.
However, when there’s so much choice, it can sometimes be difficult to know where to start, so Zapier can suggest zap workflows that you might be interested in:
- Log into your Zapier account.
- Select the “Explore” tab.
If you already have an application in mind, then:
- Enter the name of this app into the “Connect this app….” field.
- Open the “View (application name) zaps” dropdown menu.
- Spend some time exploring the suggested zaps. If you find a zap that you want to implement, then give its accompanying “Use This Zap” button a click. The console will then guide you through the process of implementing and activating this workflow.
Alternatively, you may have two applications that you want to link, but are unsure how to implement the workflow that you have in mind. For example, imagine you like to do some prep work for every meeting, and want to automatically create a “Prepare for meeting” task in Asana, every time you receive a new Google Calendar invite. You know that you need to link Google Calendar and Asana, but aren’t sure how to create the actual workflow. In this scenario, you can turn to the Zapier console for help:
- In the “Connect this app…” field, type “Google Calendar.”
- In the “…with this one!” field, type “Asana.”
- Open the “View Google Calendar and Asana zaps” dropdown.
- Find a zap that meets your needs, click its accompanying “Use This Zap” dropdown and then follow the onscreen instructions to build, and activate this zap.
Finally, if you just want some ideas about the kind of things Zapier is capable of, then the Zapier homepage contains various themed sections that you can explore, including “Best Zaps to Get Started” and “Popular Zaps.”
Supercharge your Spotlight searches: Combining Zapier and Alfred
Alfred is a popular productivity app that lets you locate and launch any file, folder, application or utility from a Spotlight-style search bar. You can use Zapier in combination with Alfred, to create zaps that are triggered by Alfred’s keyboard shortcuts. However, note that this integration requires you to purchase an Alfred Powerpack and then setup the Zapier for Alfred workflow.
If you haven’t already setup Alfred, then you’ll find all the information you need in our “Upgrade your Spotlight searches with Alfred” article.


Add Comment