

Despite the fact that Apple seem to be on a mission to make each new MacBook lighter and thinner than the previous version, today your typical MacBook boasts an impressive battery life, to the point where you can expect to get a full day’s work from a single charge. But it’s human nature to always want that little bit extra!
That’s why in this post I’m going to be sharing 10 tips for getting the most out of your MacBook’s battery.
These tips are ideal
if you have an older MacBook; have recently noticed a decline in the running time you get from a single charge – or you’re just not in the mood to go hunting for your charger!Check how long your battery should last
Before we start looking at tricks for getting the most out of your battery, it’s worth taking a moment to check how long the battery should last for your particular model.
If your MacBook is drastically underperforming in the battery department, then this could indicate an underlying technical problem. If there’s a fault with your battery, then no matter how clever you are about how you use your Mac’s battery, you’re not getting to get the best results. If there’s a technical issue, then you’re better off taking your MacBook into your local Apple Store – especially if your laptop is still under warranty!
You’ll find technical specifications for all the different models at Apple’s Specs
page.You can also check whether your battery needs to be replaced or serviced, by holding down the ‘option’ key on your keyboard and clicking the battery icon in your Mac’s menu bar. At the very top of the dropdown menu, you’ll see a summary of the current state of your battery.

Ideally, this should read ‘Condition: Normal,’ but if there’s a problem you may see one of the following:
- Replace Soon. The battery is holding less charge than when it was new, but is otherwise functioning normally. It may continue to lose charge.
- Replace Now. The battery is holding significantly less charge than when it was new, but is otherwise functioning normally. You should replace the battery as soon as possible.
- Service Battery. The battery isn’t functioning normally – it needs to be looked at by a professional.
2. Keep up to date
Every new version of OS X introduces fixes and improvements, so it’s possible that upgrading to the latest version may fix any issues you’re experiencing, and could even extend your Mac’s battery life, depending on what’s included in the update.
Even if a new version of OS X doesn’t include any battery-related enhancements, it’ll include other improvements, so it’s always a good idea to make sure you’re running the latest version.
To check whether you’re fully up to date, click the Apple logo in the menu bar and select ‘App Store,’ followed by ‘Updates.’ If there’s an update available, it’ll appear under ‘Software Update.’
Similarly, make sure all your apps are up to date, as new versions may introduce improvements that’ll have a positive impact on how that app uses battery. Also, if you’re running the latest version of OS X, then the latest version of an app should be optimised to work with this version of the operating system – again, this may have a noticeable impact on that app’s battery usage.
3. Turn off Wi-Fi and Bluetooth
It’s easy to get into the bad habit of leaving your MacBook’s Wi-Fi and Bluetooth permanently switched on, even when you’re not actively using these connections. Leaving your Mac’s Wi-Fi or Bluetooth running in the background is a surefire way to burn through your battery, so make sure you disable these connections when you’re not using them.
To turn off Wi-Fi, select the Wi-Fi icon from your Mac’s menu bar, and click ‘Turn Wi-Fi off.’
To prevent your MacBook from permanently scanning for other devices over Bluetooth, click the Apple icon in the menu bar and select ‘System Preferences…’ followed by ‘Bluetooth’ and ‘Turn Bluetooth Off.’

4. Unplug unnecessary accessories
As a general rule, anything that’s attached to your MacBook is going to drain your battery, whether it’s a USB stick, SD card, 4G modem or external drive. Make sure you disconnect any peripherals that you aren’t currently using. If you have a SuperDrive then it’s also a good idea to eject any CDs or DVDs that aren’t currently in use.
And even though we’ve all done it at some point, avoid the temptation to charge other devices by attaching them to your MacBook, such as your phone, tablet, e-reader or iPod, as this will have a massive, negative impact on your Mac’s battery life.
5. Try the Battery Health App
Battery Health is a free app that displays a wealth of technical information about the state of your battery, including the original battery capacity vs. its current capacity, when the battery was manufactured, its temperature, and the number of charge cycles completed. This information can be invaluable for diagnosing problems with your battery.
Install and launch Battery Health, and you’ll notice a new icon in your MacBook’s menu bar. Click this icon to open a dialogue containing lots of useful information about the overall health of your battery.

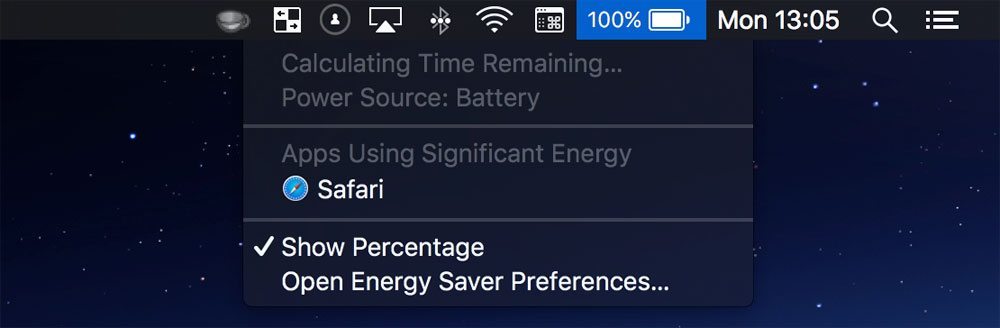
6. Close Unused Apps – particularly battery-hogging ones!
It’s a simple fact of life that the more apps you have running, the quicker your battery is going to drain, so it’s crucial that you close any apps that you aren’t actually using – particularly apps that are sucking up more than their fair share of juice.
The quickest way to identify the biggest battery hogs, is to click the ‘Battery’ icon in your MacBook’s menu bar and check whether any apps appear under ‘Apps Using Significant Energy.’
For a more in-depth look at all the apps currently running on your Mac, and the impact they’re having on your battery, launch the Activity Monitor:
- Open your ‘Finder’ window and select ‘Applications’ from the left-hand menu.
- Open the ‘Utilities’ folder, followed by ‘Activity Monitor.’
- Select the ‘Energy’ tab.
 Activity Monitor lists all the apps that are running on your Mac, plus the amount of power they’re using. Again, you should close any apps that you aren’t currently using,particularlyif those apps are consuming a large amount of power.
7. Check for runaway processes
While you have Activity Monitor open, this is the perfect time to look for any parts of the Mac operating system that are misbehaving and consuming unusual amounts of battery.
In ‘Activity Monitor,’ select the ‘CPU’ tab. In the ‘CPU’ column, look for any processes that are taking up more than 70% of your CPU.

To close an item, select it and then click the ‘Quit’ icon towards the upper-left of the Activity Monitor window. However, be cautious about terminating processes at random, as some may be performing important work behind the scenes. If you’re unsure about a particular process, it’s always a good idea to research it on Google, before terminating it.
8. Adjust Energy Saver on MacBook
Another method of conserving battery, is to limit the amount of time your laptop is stood idle, before the screen turns off:
- Click the Apple icon in your Mac’s menu bar.
- Select ‘System Preferences…’
- Select ‘Energy Saver’ from the menu that appears.
- Select the ‘Battery’ tab.

Then, adjust the amount of time before your screen powers down, using the ‘Turn display off after…’ slider.
9. Dim Screen Brightness on MacBook
If you can cope with staring at a slightly darker screenwithoutgetting eye strain, then you may want to try reducing the screen brightness as this will make your battery last just that little bit longer.
To adjust screen brightness, you can either:
- Adjust the brightness manually, using your keyboard’s F1 key. If you get carried away and turn the brightness down too low, you can crank it back up by pressing your keyboard’s F2 key.
- Set the brightness to adjust automatically. Whenever you unplug your MacBook from the mains, by opening your device’s ‘Energy Saver’ (Apple icon > System Preferences… > Energy Saver). Make sure you have the ‘Battery’ tab selected, and then select ‘Slightly dim the display while on battery power.’
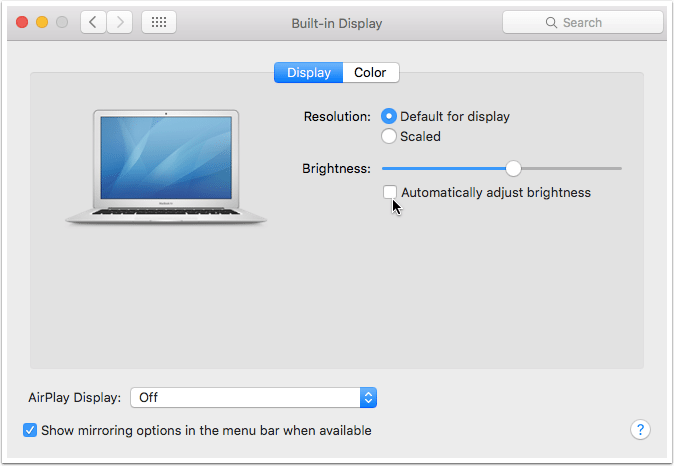
- If your Mac has a built-in ambient light sensor, then it’ll automatically adjust your screen’s brightness to match the current lighting conditions. Bad news if you’ve purposefully scaled your display’s brightness down in order to conserve battery. To disable auto brightness, open your Mac’s ‘System Preferences…’ and select ‘Displays,’ then ensure ‘Automatically adjust brightness’ is disabled.
10. Go to extremes!
If you’re getting down to the last dregs of battery and are nowhere near a plug socket or, even worse, you’ve misplaced your charger (it happens to the best of us!) then you may want to resort to extreme measures, in order to make that last bit of battery last just that little bit longer:
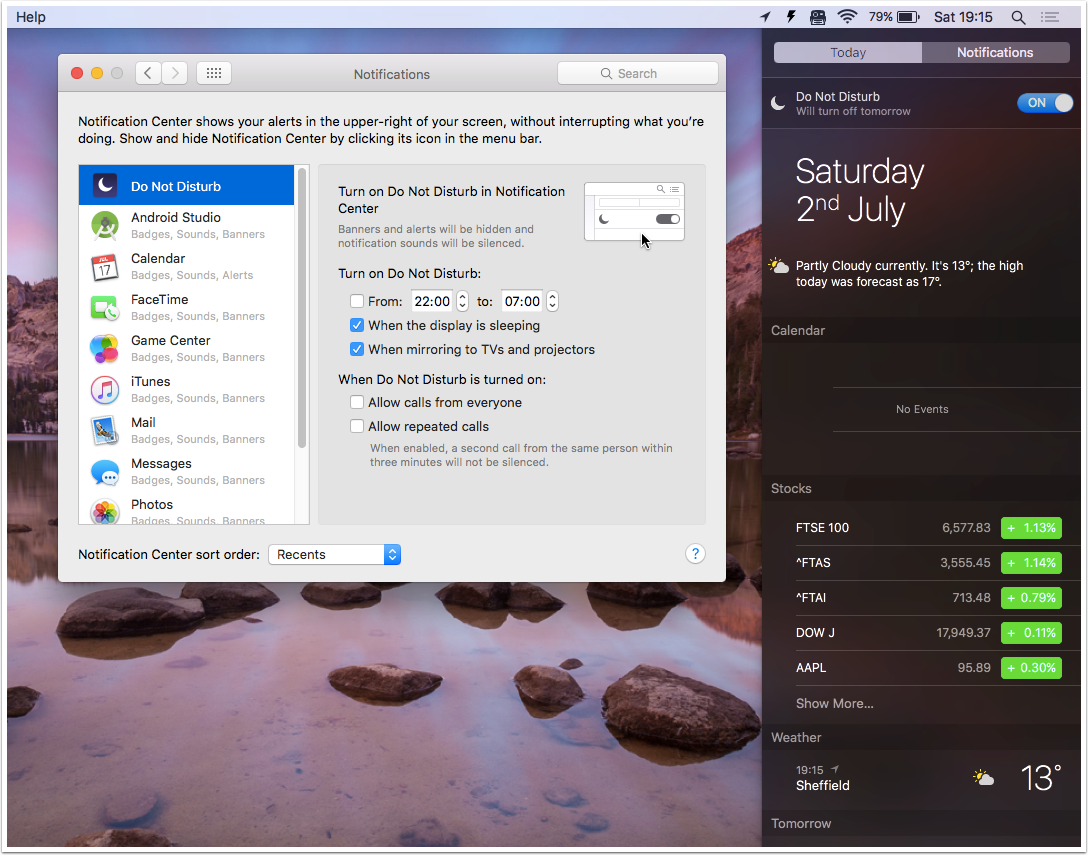
- Turn off Notifications. Restrict which apps can check for notifications, or even turn notifications off completely, by opening your ‘System Preferences…’ and clicking ‘Notifications.’ You can disable notifications on an app-by-app basis, by working your way through the various apps that appear in this menu. To disable all notifications, click the thumbnail to the right of the ‘Turn on Do Not Disturb in Notification Center’ text, then in the side menu that appears, set the ‘Do Not Disturb’ slider to ‘On.’
- Disable Mail’s auto-check. If you’re using Apple’s Mail client, then you may want to temporarily block Mail from running checks for new emails in the background. Launch Mail, then select ‘Preferences’ from the toolbar, and set ‘Check for New Messages’ to ‘Manually.’
- Use invert colours. This display method is pretty stark and does take some getting used to, but it can save you precious battery – assuming your eyes can stand it! To give invert colours a go, open your Mac’s ‘System Preferences…’ and select ‘Desktop & Screen Saver.’ Make sure the ‘Desktop’ tab is selected, and then select ‘Apple,’ followed by ‘Solid Colours.’ Click the white thumbnail.

Next, return to the main ‘System preferences…’ window and select ‘Accessibility.’ Select ‘Display’ from the left-hand menu, and then select the ‘Invert colours’ checkbox.

If you have any battery saving tips we haven’t mentioned in this post please share them in the comments below.
Before you go
After spending over 20 years working with Macs, both old and new, theres a tool I think would be useful to every Mac owner who is experiencing performance issues.
CleanMyMac is highest rated all-round cleaning app for the Mac, it can quickly diagnose and solve a whole plethora of common (but sometimes tedious to fix) issues at the click of a button. It also just happens to resolve many of the issues covered in the speed up section of this site, so Download CleanMyMac to get your Mac back up to speed today.


Add Comment