


Every operating system needs a decent amount of free memory to function properly, and without a sufficient amount applications are prone to run more slowly and your Mac will seem more sluggish. Whilst Mac OS is a fairly robust and modern operating system built on a solid UNIX-style foundation (unlike Windows), there are nonetheless occasional glitches and issues plaguing users that can make things grind to a halt over time. Issues such as what’s know as memory leaks (caused by inefficient or sloppy coding) in applications, as well as inefficiencies in the core OS can cause your Mac to perform less than optimally, so it’s always wise to make sure your system is as up to date as possible.
Thankfully, there are a few things that you can do to resolve some of the most common memory usage problems. After all, buying a new Mac or more memory (RAM) isn’t necessarily a viable solution to the issue – memory is a bit like a motorway – the more capacity there is, there more that will inevitably be used up! Regardless, it’s advisable to have as much RAM as possible installed in your Mac, and certainly more than you need so that Mac OS has room to manoeuvre.
If your memory issues are caused by too many applications (and tabs in Safari) being open, then closing a few of these will certainly help things move along smoothly. But what if you’ve already done this and your system memory usage is still going through the roof? This article discusses some of the common memory usage issues and tips to resolve them in Mac OS Lion.
1. Check How Much Memory You Have
The first thing to do is to check how much RAM your Mac has. If you can’t remember the configuration, the simplest way to check this is to choose About This Mac from the Apple Menu which opens a small window showing basic system information as below.
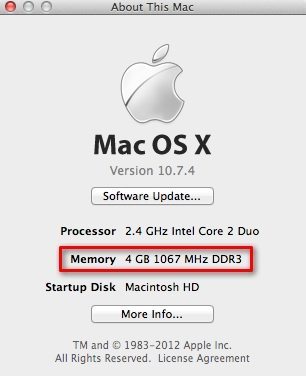
The amount (and speed) of installed memory is shown – obviously the more the better, but most Macs these days come with at least 4 GB of memory. Its speed is also a factor that contributes towards performance – DDR3 is the most common speed and considerably faster than DDR2 or DDR1. If you have less than 4 GB then you should certainly consider upgrading your memory, but bear in mind the analogy that taking your foot off the accelerator pedal won’t increase your speed; rather, it will just stop you slowing down. Memory can be thought of as a bottleneck in your system, so the more you have and the faster it is, the better.
From the About This Mac screen, selecting More Info will helpfully bring up a more detailed view – click on the Memory tab to show the details about memory installed in each slot (most Macs have 2 memory slots which accepts 2 lots of memory modules, such as 2 x 1 GB, 2 x 2 GB, 2 x 4 GB – and they are always installed in pairs. This means that if you have 2 x 2 GB and want to upgrade, you need to chuck those away and buy 2 x 4 GB modules – you can’t just add a 4GB in one slot and leave 2 in the other.

![Activity Monitor Icon]() 2. Check Memory Usage With Activity Monitor
2. Check Memory Usage With Activity Monitor
Every Mac comes with a fantastic utility called Activity Monitor. This useful application lets you inspect CPU activity, memory usage, disk and network activity, and is often the first port of call to determine what’s going on in your system. Activity Monitor presents a list of system and user processes which are currently running, and lets you see how much memory they’re taking up – you can sort applications and processes by the amount of memory used and check them over time to see if it’s ballooning. If any application’s memory usage is steadily increasing over time, it should be obvious and can help you to track down the root of the problem.
Open Activity Monitor from the Applications -> Utilities folder on your Mac or just type its name into Spotlight. When it opens, the first thing that you’ll see is the main window with a long list of all the processes currently active.
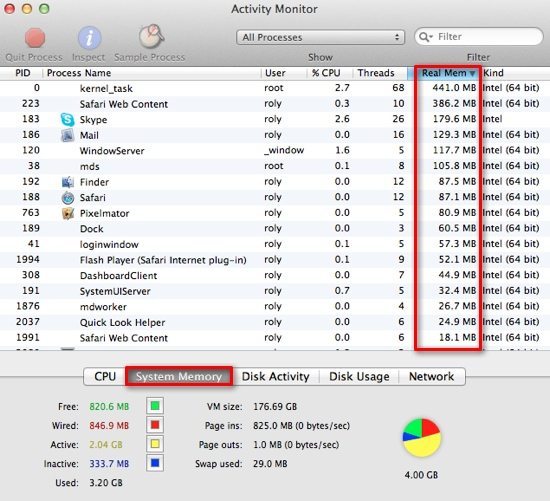
To determine which greedy process is hogging memory, click on the System Memory tab at the bottom to display overall system memory statistics. At the top of window, choose All Processes from the drop-down selection, and then click the Real Mem column header to order them by the amount of memory used.
Of course, just knowing which process is using the most memory won’t solve the issues, but at least it will point you in the right direction. For example, Mac users consistently report that Safari uses heaps of memory which grows steadily over time – possibly caused by having lots of tabs open or plug-ins (such as Flash) and extensions enabled, or perhaps due to inefficient code in Safari itself.
In the bottom of the Activity Window, if you can see a lot of Page Outs then it means you have had some RAM shortages since the last power on. Note that the coloured pie chart is only a snapshot of the current status of your Mac, and tells you nothing about the usage history or previous peaks in demand.
![Software Update Icon]() 3. Perform a Software Update (and Update Safari)
3. Perform a Software Update (and Update Safari)
It goes without saying that it’s always wise to keep your software up to date, and most Mac users are very good at this – after all, Mac OS constantly reminds you when there are application updates available, and anything obtained via the App Store can be updated that way. However, if you use Safari as your main web browser (and most of us do), then it’s especially important to keep Safari updated. The reason is that since it seems to be the main offender in terms of memory use on the Mac, new versions are regularly being released that address some of the most common related issues.
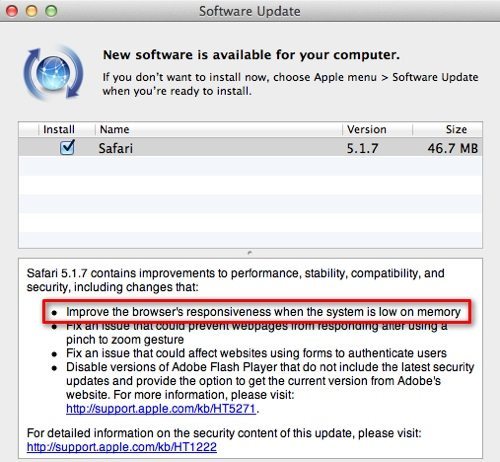
For example, the latest version of Safari (which is 5.1.7 at the time of writing) addresses memory and performance issues as indicated below in the Software Update window.
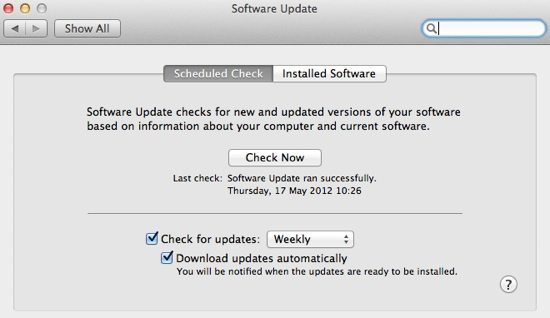
If you haven’t already set Software Update to check automatically, open System Preferences and choose Software Update from the System panel located at the bottom. At the next screen, choose the automatic settings you’d like (e.g. when to check for updates), or just hit the Check Now button to check immediately.
![Safari Extensions Icon]() 4. Update / Disable Flash (and Other Offending Extensions)
4. Update / Disable Flash (and Other Offending Extensions)
Adobe’s Flash gets a lot of bad press on the Mac unfortunately. As they say there’s no smoke without fire, so it’s probably somewhat true that Flash (especially the older versions) do in fact consume more system resources than they should. There’s a simple way to solve this – firstly make sure that your Flash player is as up to date as possible (the latest version of Safari disables older, less secure versions) as follows:
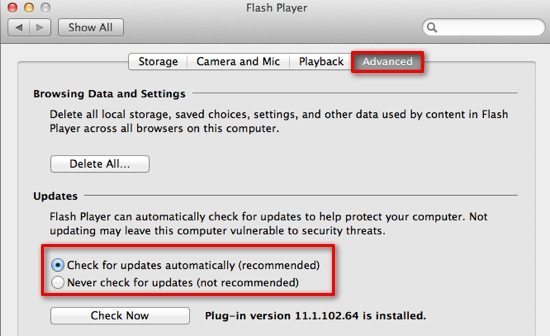
- Go to System Preferences and under Other choose Flash Player (if it’s not visible, it should be available in the View menu)
- From the Advanced tab in the Updates section, select Check for updates automatically, which will periodically check for the latest version
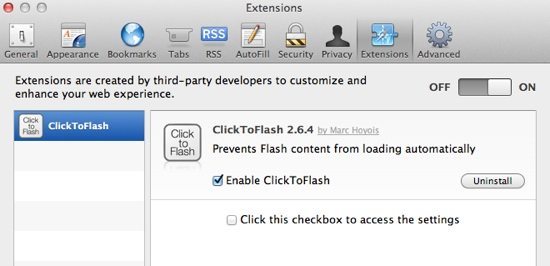
Secondly, it’s fairly easy to install an extension for Safari to block Flash on websites completely (when the extension is enabled). Click To Flash is perhaps the most well known and can be downloaded from the Safari Extensions Gallery. It gives you more control over when to view Flash content in websites and can be selectively turned on or off from Safari’s preferences, in the Extensions section.
If you have lots of Safari Extensions, it’s also a good idea to try disabling some of them (one at a time) and then view memory usage in Activity Monitor to see whether that makes a difference. If you find a specific extension is to blame for the increase in memory, try disabling it to see what happens.
![Mac App Store Icon]() 5. Use Third-Party Apps to Free Up Memory
5. Use Third-Party Apps to Free Up Memory
There are dozens of third-party apps available in the Mac App Store that claim to be able to free up system memory with just one click of a button. Most of these should be able to improve performance somewhat, and range from totally free to just a few pounds. Quite how effective they are might depend on each user’s applications and the way they use their computer, but they are certainly worth a try – especially the free ones!
Check out some of these apps which can free up your Mac’s memory. They can be obtained via the App Store:
- FreeMemory (£Free)
- Memory Free 2 (£Free)
- MemoryFreer (£0.69)
- Memory Cleaner (£3.99)
- Memory Sweeper Pro (£0.69)
Before you go
After spending over 20 years working with Macs, both old and new, theres a tool I think would be useful to every Mac owner who is experiencing performance issues.
CleanMyMac is highest rated all-round cleaning app for the Mac, it can quickly diagnose and solve a whole plethora of common (but sometimes tedious to fix) issues at the click of a button. It also just happens to resolve many of the issues covered in the speed up section of this site, so Download CleanMyMac to get your Mac back up to speed today.


Add Comment