


Split View is a new window management feature in El Capitan, that makes it much simple to run two apps side by side in full screen mode. Apple introduced what it called “Spaces” (in other words, virtual desktops) in OS X many years ago, and Split View is a natural enhancement that behaves almost identically on iOS too.
Spaces is one of the best ways to switch between windows, and is one of those features that MacBook owners in particular get the most of, as they’re the users who are most likely to be running apps in full screen mode due to the limited screen space. People with the latest 5K iMac are probably content with opening several apps on-screen, but that’s a luxury that owners of smaller screen devices don’t have.
However, the downside of Spaces is that it doesn’t make it simple to switch back and forth between apps – all those sliding windows can be quite tiresome if all you want to do is use the web while taking notes, for example. This is where Split View comes into its own.
Using Split View
Using Split View is very straightforward. There are a couple of ways to use it, all of which should become fairly intuitive once you’ve done it a couple of times.
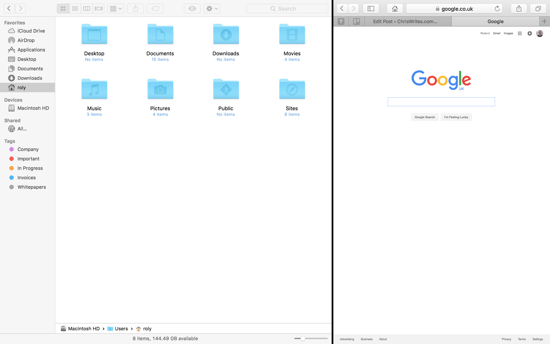
Let’s start with a simple example, arranging two windows side by side – in this case we’ll use Safari on one side of the screen and add another app to the other side.
Open Safari (or another app of your choice) and enter full screen mode either by pressing the green traffic light button, or by using the keyboard shortcut which is Control + Command + F.
Next, go back to the Finder and open whatever other app you won’t to use as the second app. In this example, we’ll just use a Finder window.
Next, swipe upwards on your trackpad with three fingers to show your available spaces. In El Capitan, a single swipe upwards doesn’t show a graphic representation of your spaces, just a semi-transparent bar with the names of each space shown as text:

You can however just move your cursor to the top of the screen which expands the spaces and shows little graphics of each one. This step isn’t really necessary as the next step will automatically do that in any case.

The next step, is to grab the Finder window and move it to the space you want to use Split View with. In this example, just move the Finder window onto the Safari space, after which you’ll see the Finder window in miniature in the Spaces bar, and Safari squeezes over to one side.

If you move your cursor (while still holding down the mouse button or trackpad), you can move the selected window left or right on any of the spaces to select the left or right side of the split view. A “+” icon shows which side of the space the window will be positioned:

You can of course just (while holding down your mouse button) move the window back down onto the desktop and cancel the Split View action.
Once you have the window on the desired space and the side you want, just release your mouse to drop the window into the Space. The space is not activated by default: you still need to then switch to that space using the familiar three finger swipe left/right, or by clicking on it in the list of Spaces at the top of your screen.
It’s also possible to just drag any window “off the top” of your screen, at which point the Spaces view appears and lets you drop the app into any space to active Split View. This might take a bit of practice, as it’s a case of dragging the app to the top of the screen and then moving up further until the Spaces view activates, much in the same way that you would access the Dock in fullscreen mode by dragging your mouse to the very bottom of the screen then pulling down further.
By default, Split View arranges the new app occupying two-thirds of the screen, and the original app taking up the other third:
You can resize split to your liking though by hovering your mouse on the narrow vertical black bar that separates the two apps. A cursor then appears indicating possible directions you can drag the divider to resize both apps. Unfortunately, that cursor isn’t captured when taking a screenshot, but it looks similar to my rather crudely post-processed image below. A double-headed cursor is shown when it’s possible to move the divider in either direction.

In El Capitan, you can adjust the amount of horizontal space the apps take up in any way you like, so you could for example have a 50/50 split, or as little as 25/75 or anywhere in between. It’s not possible though to have an app occupy less than a quarter of the screen width:

For some reason when you resize the apps, one of the windows appears blurred:

Quite why this happens is unknown – it’s a nice effect and so it might be purely for cosmetic reasons. It should be technically possible not to blur the window whilst it’s being moved – that would be a nice UI tweak in a future update.
If you wish to return either of the apps back to the normal, windowed mode (i.e. not in fullscreen) just use the green traffic light button again (or Control + Command + F with the desired app selected) to return it to a normal desktop view:

The other app that remains in fullscreen mode will return to use the full width of the screen, and the app that you sent back to the Desktop will return to its original position before you put it into Split View mode.
That’s really all there is to using Split View in El Capitan. It’s a really useful feature for people that want to use two apps simultaneously, and it’s definitely more flexible than the iOS version (though that’s also a welcome addition to Apple’s mobile devices).
Before you go
After spending over 20 years working with Macs, both old and new, theres a tool I think would be useful to every Mac owner who is experiencing performance issues.
CleanMyMac is highest rated all-round cleaning app for the Mac, it can quickly diagnose and solve a whole plethora of common (but sometimes tedious to fix) issues at the click of a button. It also just happens to resolve many of the issues covered in the speed up section of this site, so Download CleanMyMac to get your Mac back up to speed today.


Add Comment