

If you’re one of the lucky people that own an Apple TV, it’s possible to mirror what’s your Mac screen on your HDTV using the default apps that are already installed. This feature is however limited to sharing movies (played from iTunes or the QuickTime player) and photos, but there’s a great little app called AirParrot which lets you share your entire Mac screen at the touch of a button.
The very same feature will be built into OS X Mountain Lion (which should be available in July), but for now this is the next best thing. Anyone that doesn’t plan to upgrade to Mountain Lion will also find AirParrot an invaluable tool to view your computer screen on the telly.
About AirParrot
Price: $9.99 (1 license), $29.99 (5 licenses)
Link: AirParrot website
AirParrot is one of the few apps that can mirror your Mac’s screen on TV (or let you extend your Mac desktop). Besides video, it can send an audio stream so you can watch and listen to movies on YouTube and any other website. For a very reasonable price of just $9.99 (and available as a free time-limited trial which times out after 20 minutes’ of use), AirParrot performs the job admirably and is a cool way to use your Mac.
Installation
Navigate to the AirPar website and click on the download link to save the DMG file. The installation process is exactly like the standard method for most Mac apps (and the app can be deleted simply by moving the application icon to the Trash). Once it’s downloaded, just double-click the DMG file (which was probably saved in your Downloads folder), after which a new hard disk icon appears on your desktop. Open this disk and you’ll be prompted to actually install the app by dragging the AirParrot icon into your Applications folder as shown below.
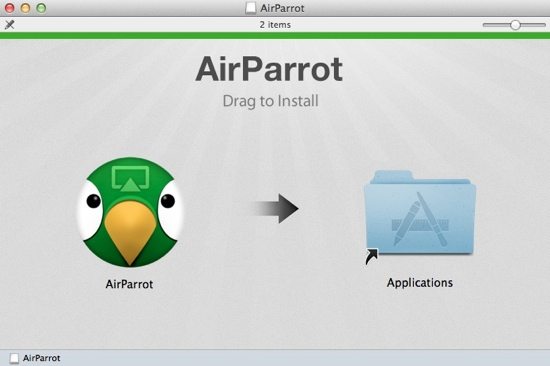
Once that’s done, AirParrot should now be successfully installed and can be launched either from the Applications folder or by typing it’s name into Spotlight. You can now safely eject the mounted disk icon (drag the icon to the Trash) and delete the original DMG file.
Using AirParrot
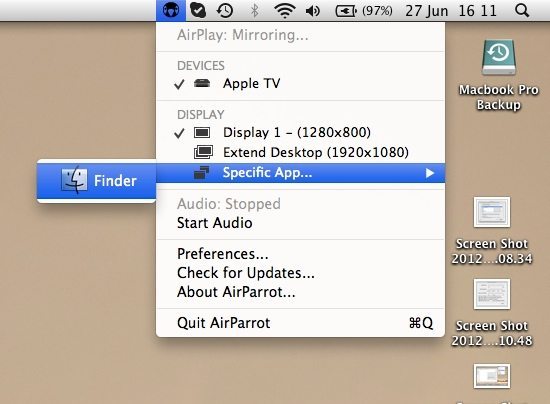
Open AirParrot and enter your license key at the welcome screen if you’ve bought a copy, or just select the trial option to get started. The trial version is time-limited so you won’t be able to use it to watch long movies, for example. When the app opens, the AirParrot icon appears in the main menu bar. When it opens, it searches for your Apple TV – so make sure it’s already switched on and available on your local network. The various AirParrot menu options are shown below.
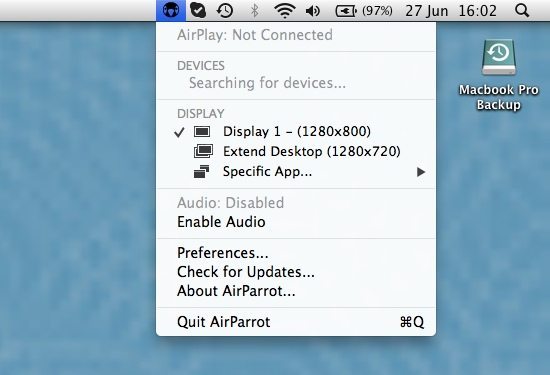
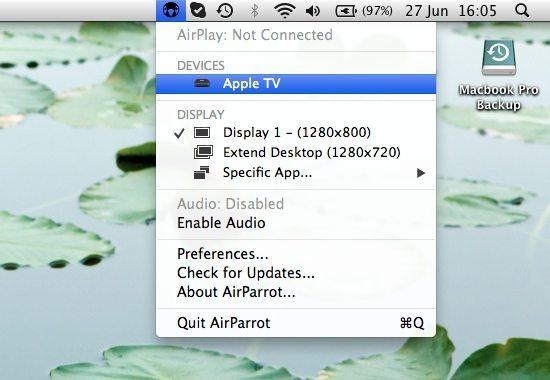
Once your Apple TV has been found by AirParrot it shows up in the DEVICES menu, but AirParrot won’t automatically connect to it and mirror your screen until you click on the Apple TV icon.
Configuring AirParrot
At this point, you’ll be asked to allow incoming connections from your Apple TV to the Mac. Choose Allow when prompted as shown below. However, if you inadvertently select Deny by mistake, you can resolve the connectivity issue by going to your Mac’s Security and Privacy settings as described in the next step. Note that as long as you do choose Allow when prompted, you won’t need to modify your security settings at all.
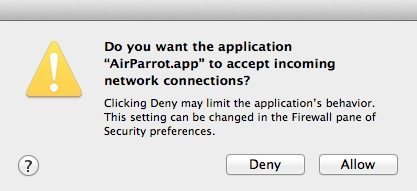
For anybody that chose the Deny option too hastily, just go to System Preferences and then Security & Privacy. In the Firewall tab, select Firewall Options. You may also be prompted for your administrator password in order to make configuration changes.
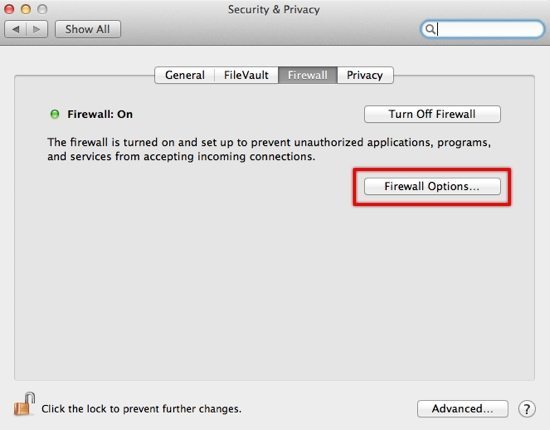
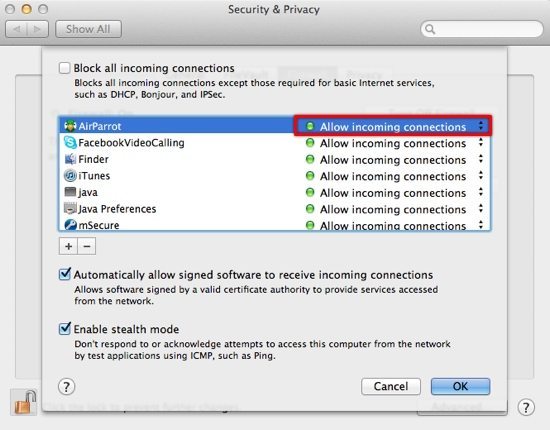
The firewall menu drops down and lists all the applications on your Mac and their corresponding firewall settings. Find AirParrot in this list and change the setting on the righthand side to Allow incoming connections and then hit the OK button. Once you’ve done this, AirParrot is ready to use.
AirParrot Preferences
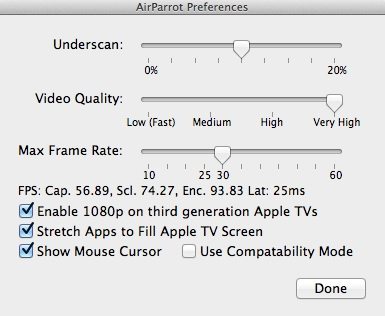
AirParrot presents various options to control the video quality shown on your TV, such as the amount of compression and the maximum frame rate. There’s a real-time update of the frames per second (FPS) and various other statistics shown below the three sliders. The High video quality setting looks great and doesn’t consume too much bandwidth, so that option should be more than adequate for most people, but it’s a good idea to play around with these settings if you’re experiencing video quality issues.
If you have a third-gen Apple TV you can view your screen in 1080p which is the best possible resolution, and individual apps can be stretched to occupy the entire screen, or shown at the normal size.
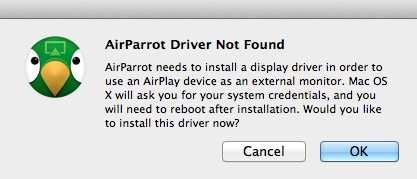
If you want to stream audio from your Mac to the Apple TV, choose the Start Audio option from AirParrot’s main menu. You will be asked to install additional audio drivers to make this work, so hit OK to install the drivers and then reboot your machine.
Once you’ve selected your Apple TV in the main AirParrot menu, your screen will instantly appear on the HDTV connected to your Apple TV. If you want to mirror individual apps, expand the Specific App menu and choose one. Note that if applications are in fullscreen mode or minimised, they won’t appear in this menu – in other words, the app window must be open already. If you’re sharing your entire display, every time you switch between fullscreen apps they’ll also appear fullscreen on your TV. Try swiping between fullscreen apps and you’ll see everything perfectly on your TV! To extend your Mac desktop onto the TV, use the Extend Desktop option.
AirParrot in Action
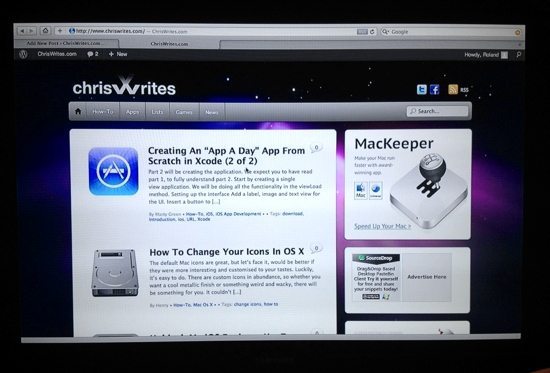
Using AirParrot is a breeze; there’s hardly any configuration necessary and works seamlessly. Here’s a photo taken of screen showing Safari displayed on a Samsung HDTV:
In this screenshot, I’ve only shared Finder and chosen to expand app windows to fullscreen from AirParrot’s preferences.

Lastly, here’s what the iTunes visualizer window looks like on my TV (excuse the photo quality). The quality of video is superb and there’s almost no delay between what’s shown on the Mac screen and what’s on TV.

AirParrot is a great way to mirror your Mac’s screen perfectly. Installation and configuration is very simple, and it all just seems to work smoothly. If you can’t wait for the imminent OS X Mountain Lion update, then AirParrot is definitely a recommended purchase in the meantime.
Before you go
After spending over 20 years working with Macs, both old and new, theres a tool I think would be useful to every Mac owner who is experiencing performance issues.
CleanMyMac is highest rated all-round cleaning app for the Mac, it can quickly diagnose and solve a whole plethora of common (but sometimes tedious to fix) issues at the click of a button. It also just happens to resolve many of the issues covered in the speed up section of this site, so Download CleanMyMac to get your Mac back up to speed today.


Add Comment