

Whenever you access a URL on the Internet your Mac checks the address against a list of IP addresses stored in the hosts file. Normally your Mac doesn’t find what it’s looking for in the hosts file and quickly moves on to resolving the web address via the DNS (Domain Name System) server.
With a little tinkering you can use the hosts file to make sure your Mac doesn’t resolve certain URLs via the DNS server. This is can be useful for blocking sites you suspect may be malicious or for locally testing websites whilst remaining offline.
Editing your hosts file requires using Terminal, and incorrectly editing the hosts file can have significant effects on how your Mac connects to the internet. So make sure you have a good idea of why you need to edit the hosts file before following this guide.
This guide will show you three things:
- How to use Terminal to access the hosts file
- How to edit and save changes to the hosts file
- How to flush the DNS cache so that your changes are put in place
How to use Terminal to access the hosts file
1. Open Terminal. You can either search for Terminal using Spotlight, or open in from your Applications -> Utilities folder. You’ll see a window like this, though “macbook” will be replaced with the name of your Mac and “Mike” with your username.

2. To open the hosts file use the command below (you can Copy and Paste it directly into the terminal window):
sudo nano /private/etc/hosts
Press the return key. Terminal will ask you for a password. Enter the Administrator password for your Mac. As you enter the password the characters will not appear on screen, this is a privacy feature included in Terminal, simply hit enter after you’ve completed the password and the hosts file will load.
How to edit and save changes to the hosts file
Once the hosts file has loaded it will look like this:
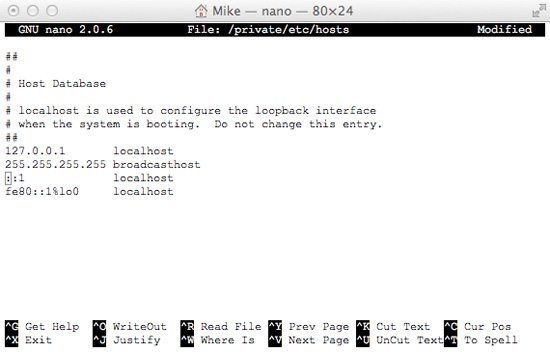
1. Use the arrow keys to navigate below the last entry. Ignore the comments separated by # marks and any existing entries.
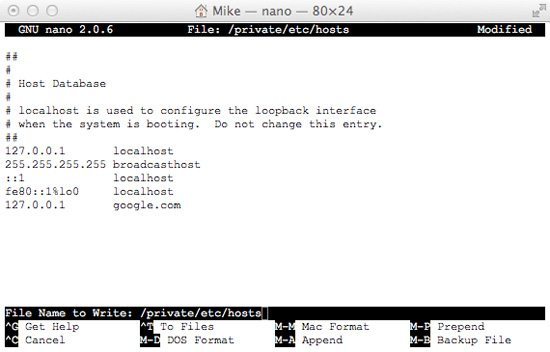
2. Enter the IP address and URL that you want the hosts file to map to. In this case I have told the hosts file to locally resolve the address “google.com” to the local IP address 127.0.0.1 (which will block me from accessing the site google.com). Use TAB to separate the IP address from the URL.

At this point you could use the hosts file to block sites that serve adverts, to resolve your own website to a local IP address, or for any other function.
3. Now you just need to save the changes. Press ctrl-o and Terminal will open the correct “File Name to Write” at the bottom of the window.
4. Press the return key to save the changes you’ve made to the hosts file. You can now exit this screen and return to the main Terminal window by pressing ctrl-x.
How to flush the DNS cache
Before you changes will take place you will need to flush your Mac’s DNS cache. You can do this from the main Terminal window you currently have open.
1. Copy and Paste this command into the prompt:
dscacheutil –flushcache
Press the return key and you will flush your DNS cache and push through the changes you have made to the way in which your Mac resolves IP addresses from URLs.
2. You can now close the Terminal window.
You have now opened, edited and saved the hosts file on your Mac. You have also made sure the changes have been put in place by flushing your Mac’s DNS cache. If you need to make any more changes to the hosts file you can simply repeat this procedure.
Before you go
After spending over 20 years working with Macs, both old and new, theres a tool I think would be useful to every Mac owner who is experiencing performance issues.
CleanMyMac is highest rated all-round cleaning app for the Mac, it can quickly diagnose and solve a whole plethora of common (but sometimes tedious to fix) issues at the click of a button. It also just happens to resolve many of the issues covered in the speed up section of this site, so Download CleanMyMac to get your Mac back up to speed today.


Many thanks for a perfect and comprehensive guide. It all worked perfectly for this newbie!