

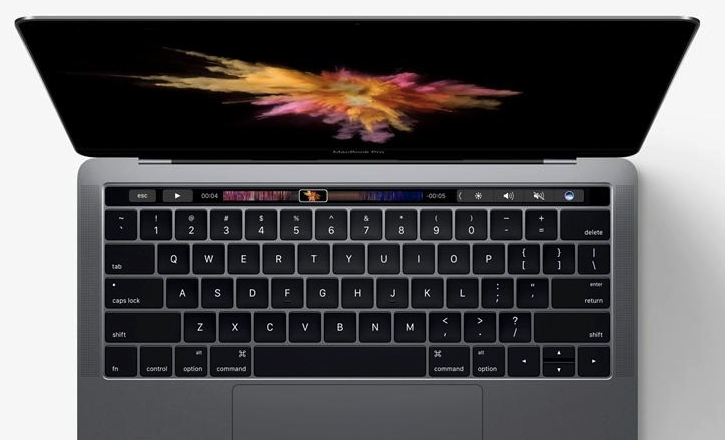
Back in October 2016, Apple unveiled their brand new MacBook Pro – and introduced an unexpected new feature.
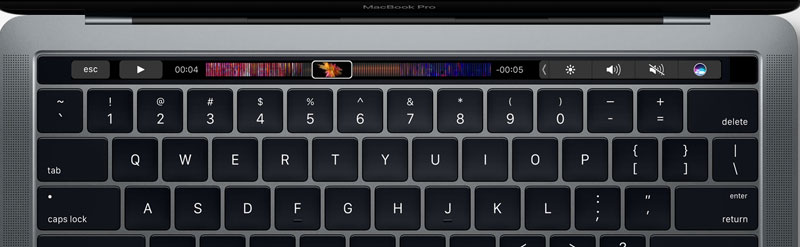
The 2016 MacBook Pro saw the removal of the familiar row of function keys that have pretty much become a staple feature of Mac keyboards, and in its place we have a brand new OLED display.
Rather than simply replacing the physical function keys, the MacBook Pro’s new ‘Touch Bar’ area displays application shortcuts that update automatically depending on whatever’s currently onscreen. For example, if you’re working in the Mail app then the Touch Bar will display email-related shortcuts, and if you’re penning a response in Messages then the Touch Bar may display a row of your most frequently-used Emojis.
Currently, the physical Touch Bar is limited to the 2016 MacBook Pro line, but if you’re curious to try this new feature for yourself, then there is a way to get a taste of the Touch Bar experience without having to spend £1,700+ on a new Macbook Pro.
Touch Bar Demo and Touchè are two apps that you can use to emulate the Touch Bar on any MacBook that’s running macOS Sierra. In addition, if you have access to an iPad, then you can install the Demo app on your iPad, which turns your iPad into a stand-alone Touch Bar. Then, all you need to do is attach your iPad to your Mac, and you’re ready to use this simulated Touch Bar to interact with your Mac via touch – just as Apple intended when they designed the Touch Bar (the clue’s in the name, after all!)
Using Demo or Touchè to ‘try before you buy’ can be especially helpful if you’re unsure about replacing the familiar, physical function keys with something entirely new. Once you’ve experienced the Touch Bar first-hand, you’ll have a better idea of whether this is something that should be at the top of your “must have” list when you’re shopping for a new MacBook, or whether you prefer the traditional function keys.
In this article, I’ll be showing you how to setup and use both Touchè and Touch Bar Demo, plus how to get a more authentic experience, by using your iPad as a stand-alone Touch Bar.
Before you start
The interesting thing about Touchè and Demo is that they aren’t third-party copies of Apple’s Touch Bar – both apps leverage the Touch Bar software that’s baked into macOS Sierra. For this reason, both Touchè and Demo require a very specific build of Sierra: 10.12.1 build 16B2657, to be precise, which is the build where Apple introduced Touch Bar support.
If you’re unsure what build of Sierra you’re running, then you can double-check by clicking the ‘Apple’ logo in your Mac’s menu bar, followed by ‘About This Mac.’ In the subsequent window, make sure the ‘Overview’ tab is selected – you’ll find the build number towards the top of this window.
If you discover that you aren’t running 10.12.1 build 16B2657, then you’ll need to download and install it.
Touch Bar Demo
When it comes to the Touch Bar Demo app, you have two options: install it on your Mac only, or install it on your Mac and your iPad.
If you install the Demo app on your Mac, then it’ll appear as a floating row of buttons on top of the macOS interface, in a similar way to the application switcher. At this point you can interact with this simulated Touch Bar using your Mac’s cursor and buttons, but since MacBooks don’t have touchscreen support you won’t be able to interact with it using touch.
If you’re craving a more authentic Touch Bar experience, then you can install the Demo app on your iPad, attach that iPad to your Mac via a USB cable, and then control your Mac using the Touch Bar on your iPad. The major benefit here is that the iPad’s touchscreen allows you to interact with the Touch Bar in the way that Apple originally intended – via touch.
Let’s start by installing the Touch Bar app on your Mac, and then you can decide whether you want to install this app on your iPad, too.
Installing Touch Bar Demo on your Mac
On your Mac, head over to GitHub and download the latest release of TouchBarServer.zip.

Unzip this file, then launch the extracted TouchBarServer app. If you see a warning that this app can’t be opened because it’s from an unidentified developer, then launch your Mac’s ‘System preferences…’ and select ‘Security & Privacy.’ Find the text declaring that ‘TouchBarSever was blocked…’ and click its accompanying ‘Open Anyway’ button. You should now be able to launch the TouchBarServer app without any problems.
When you launch this app, initially it may seem like nothing’s changed, but if you press the ‘fn’ key in the bottom-left of your Mac’s keyboard, then the Touch Bar will appear onscreen. As long as the Demo app is running, you can toggle this bar on and off at any point, by pressing your Mac’s ‘fn’ key.
The options that appear in the Touch Bar will vary depending on the app that’s currently onscreen, so at this point you may want to spend some time switching between apps and seeing how the Touch Bar changes. Note that the Touch Bar is still a relatively new feature, so currently the level of Touch Bar support may vary between third party apps, but this is something that’s likely to improve over time.
If no apps are currently visible, then the Touch Bar’s contents will typically mirror the function keys that run along the top of your Mac’s keyboard, for example you’ll see keys that allow you to control your Mac’s brightness and volume settings, and launch Mission Control.
At this point, you can interact with your Touch Bar using your Mac’s cursor and keys, but if you want to interact with it using touch then you’ll need to install the Demo app on your iPad.
Turning your iPad into a Touch Bar
Installing Touch Bar Demo on your iPad is a bit more complicated, as you’ll need to build the app yourself from its source code, and then sideload it onto your iPad.
Start by downloading Apple’s Xcode 7+ to your Mac, as this is the program you’ll use to build the iPad version of Touch Bar Demo. You’ll also need to register for an Apple Developer account, if you don’t have one already.
To build and install the Demo app on your iPad, work your way through the following steps:
- Head back to GitHub, but this time download the latest ‘Source code (zip).’ Unzip it.

- Launch your Xcode program. When you see the ‘Welcome to Xcode’ screen, click the ‘Open another project….’ link.

- Navigate to your unzipped TouchBarDemoApp folder, select the TouchBar.xcodeproj file and then click ‘Open.’ Xcode will then load TouchBarDemoApp in its main editor.
- Make sure the TouchBar project is selected in Xcode’s left-hand menu.
- In the center of the Xcode window, you’ll find detailed information about the TouchBar project. Find the ‘Bundle Identifier’ field and change its value to something unique.

- In the ‘Signing’ section, open the ‘Team’ dropdown and select ‘Add an account…’ Enter the details for your Apple Developer account.
- Connect your iPad to your Mac using the USB cable.
- In the Xcode editor, open the dropdown towards the left-hand side of the screen (where the cursor is positioned in the screenshot below).

- Select your iPad from this dropdown menu.
- Click Xcode’s ‘Run’ button (where the cursor is positioned in the following screenshot).

If you see a popup prompting you to enable developer mode on your Mac, then click the ‘Enable’ button and follow the onscreen instructions. Xcode will then build the Demo app and install it on your iPad automatically.
If this is the first time you’ve sideloaded an app onto this iPad, then when you try to launch Touch Bar Demo for the first time you may encounter an ‘Untrusted developer’ error message. If this happens, launch your iPad’s ‘Settings’ and select ‘General > Profiles & Device Management.’ Find the ‘Developer App’ section, select your email address and then tap ‘Trust this email address.’ You should now be able to launch the Touch Bar Demo app without any problems.
When you launch the Demo app on your iPad, you’ll see a black screen with a virtual Touch Bar running along the bottom. As long as your iPad is attached to your Mac via the USB cable, you can use this simulated Touch Bar to interact with your Mac, using touch alone.
Using Touchè
The Touch Bar Demo app isn’t your only option for getting some hands-on experience with Touch Bar.
One alternative you may want to try, is Touchè. To try this app for yourself, download it to your Mac, unzip it, and then double-click the extracted Touchè app. Touchè will then appear as an overlay window that you can interact with using your Mac’s cursor and keys.

There are a few tweaks you can make to the standard Touchè setup, including changing the keyboard shortcut that toggles the simulated Touch Bar on and off. You can access these options by clicking the Touchè text in the menu bar and then selecting ‘Preferences.’

If you find yourself using Touchè all the time, then you may want to set this app to launch automatically whenever you sign into your Mac – just Control-click the Touchè icon in your Mac’s ‘Dock’ and then select ‘Options,’ followed by ‘Open at Login.’
Before you go
After spending over 20 years working with Macs, both old and new, theres a tool I think would be useful to every Mac owner who is experiencing performance issues.
CleanMyMac is highest rated all-round cleaning app for the Mac, it can quickly diagnose and solve a whole plethora of common (but sometimes tedious to fix) issues at the click of a button. It also just happens to resolve many of the issues covered in the speed up section of this site, so Download CleanMyMac to get your Mac back up to speed today.


Add Comment