

Family Sharing is a new feature in iOS 8 that allows you to share all of the iTunes and App Store purchases you make on iOS with your family, even without sharing the same Apple ID. Additionally, there’s a level of built-in protection as children need to ask permission from the designated parent or elder before they are allowed to purchase anything – with the notification appearing on your iOS device (iPhone, iPad or iPod Touch) for you to accept or deny.
To use Family Sharing, there are a couple of steps that you need to follow first in order to set it up correctly.
Getting started with Family Sharing
With Family Sharing, you can add a number of family members to your own account. Right now that’s limited to six people, which should be plenty for most families.
One of the prerequisites is that you need to have iOS 8 installed, which is the latest version of Apple’s mobile operating system that was released in September.
Once you have added each family member, you can also view each other’s purchases and download them if you want to, just the same way you would from your own account. Once Family Sharing is activated, everything that you purchase from then on will be charged to the organiser’s account, unless the individual’s iTunes account has enough credit to pay for the item – in that case, the credit from individual accounts is always used first. An example is if you have credit that you may have added using a gift card – that credit will be used first.
It’s also possible to remove anyone from Family Sharing if you change your mind some point later on, however, they will still be able to access items bought before Family Sharing was activated as you would expect. Every Apple ID added will be able to access everything that has been shared, and anything that was purchased after you deleted someone won’t be accessible by those people. Pretty much all as you would expect, but it’s worth bearing in mind if you do want to remove or add people at various times.
What exactly can you do with Family Sharing?
In summary, Family Sharing lets you:
- Share content such as music, TV, and movies
- Share photos with anyone in the Family Sharing group
- Share your calendars (but you can still keep your personal one)
- Share your location to keep track of your family’s whereabouts
- Locate your family’s devices (using Find My iPhone)
- Use the Ask to Buy feature – children under 18 must request permission to buy anything
With Ask to Buy, you must respond to purchase requests from an iOS device, but there are a few limitations: currently you can only possible create two Family Sharing groups per year, which means that if you start a group and then want to delete it later you will only be able to create one more. Additionally, you have to wait at least a year before you create another group, so it’s probably better in fact to delete individual members from a group rather than the group, unless you really don’t need it anymore.
The last point to remember is that it’s not possible to place purchase limits on anyone over 18. For children under 13 years, limits will be automatically applied.
Setup Family sharing step-by-step
When using Family Sharing, one person is designated the organiser, and that’s the person that needs to set it up on their iOS device. The organiser will receive requests to purchase content and needs to agree them.
To get started, follow these steps on your iOS device:
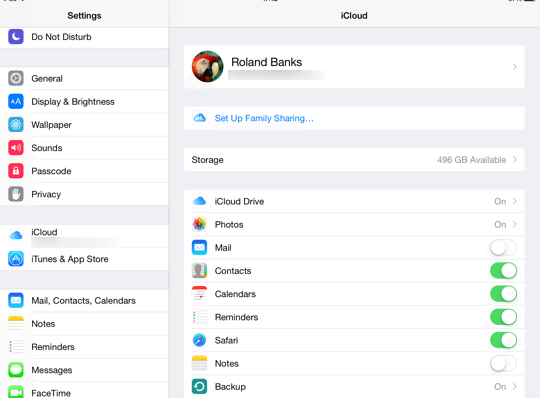
- Open Settings
- Tap iCloud
- Tap Set Up Family Sharing
- Tap Get Started

- Tap Continue

- Tap Continue if you are already signed into iCloud

- Confirm the credit card information that you already have on file with iTunes

- View and confirm the terms and conditions

- Tap continue once more

- Add a family member by tapping on the Add Family Member section

- Enter the contact’s name (i.e. just choose their email address) and then either send them an invitation or wait for them to join

Now add the rest of the family members as described above.
Each person will receive an email and a push notification on their Apple device to accept your invitation to join the Family Sharing group. When they do, everything they buy from then on will be charged to the organiser’s account, assuming it’s accepted and they don’t already have credit in their iTunes account. Also, the great thing is that you will have access to every item that they buy too.
Family Sharing is a great feature that makes it much easier to share content and also be informed whenever anyone in the group wants to buy something. It’s especially good if you have young children, as it means you can keep an eye on what they purchase, as well as checking up where they (and their devices) are.
You can also find out more about Family Sharing on Apple’s support page.
Before you go
After spending over 20 years working with Macs, both old and new, theres a tool I think would be useful to every Mac owner who is experiencing performance issues.
CleanMyMac is highest rated all-round cleaning app for the Mac, it can quickly diagnose and solve a whole plethora of common (but sometimes tedious to fix) issues at the click of a button. It also just happens to resolve many of the issues covered in the speed up section of this site, so Download CleanMyMac to get your Mac back up to speed today.


Add Comment