


For anyone that owns more than one Mac, keeping your browser’s bookmarks in sync is very simple with iCloud – but what about other items such as browser tabs? iCloud doesn’t yet sync tabs but fortunately in Safari, Chrome and Firefox there are several other ways synchronise them, so that you can work more seamlessly across different computers no matter where you are.
This tutorial describes the most popular ways to synchronise browser tabs in Safari, Firefox and Chrome.
![Safari Icon]() How To Sync Tabs in Safari
How To Sync Tabs in Safari
Safari doesn’t yet include the ability to sync tabs natively, even though iCloud lets you sync bookmarks with your other devices such as an iPhone and iPad. However, thanks to Safari extensions, it’s still possible to do this quite easily just by installing a little extra software.
There are currently at least 2 extensions to Safari that provide this functionality and a whole lot more, namely Xmarks and Surfon. Each of these is compatible with the browsers mentioned above, and Xmarks additionally works with Internet Explorer. Both systems require that you create an account but the process is simple and painless.

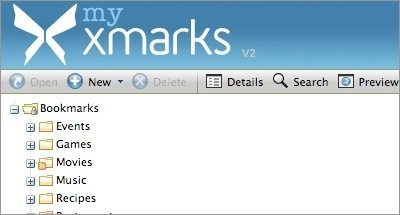
Xmarks also lets you access your bookmarks online (as shown below) by going to my.xmarks.com and logging in.
Note: to sync tabs you need to sign up to a premium account which costs $12 per year, but that service also comes with lots of other features such as backup and recovery.
![Firefox Icon]() How To Sync Tabs in Firefox
How To Sync Tabs in Firefox
Syncing tabs in Firefox is easy with an add-on. Xmarks is one of the most popular third-party bookmark and tab syncing tools for Firefox. Unfortunately, as already mentioned tab sync requires the premium account but the service works seamlessly and works between different browsers types.
Luckily, Firefox already has built-in tab synchronisation which can be configured as follows:
Setup Firefox Sync on Your Mac
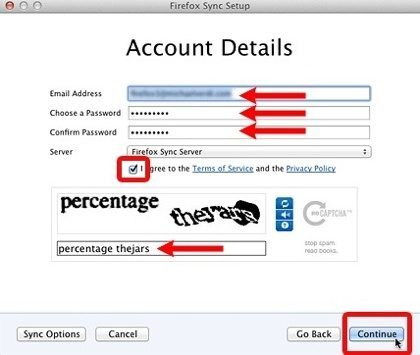
- Open Firefox and in the menu bar click Tools followed by Set Up Sync to open the Firefox Sync Setup window
- Hit Create a New Account and proceed to enter the account details such as your email address and a password
- To choose which items to sync, select Sync Options and choose from the list displayed. The available options include bookmarks, preferences, passwords, history and tabs
- Click the Continue button and you’ll see the setup complete message
Setup Firefox Sync on Your Second Computer
The following steps should be performed from the second computer that you want to synchronise with:
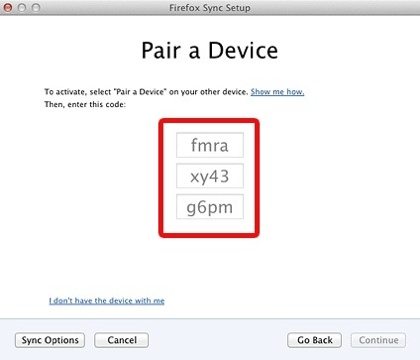
- In the Firefox main menu, select Tools followed by Set Up Sync
- Choose I have an Account to proceed. A 12-digit pairing code that you’ll need in subsequent steps will appear similar to that shown below
Connect Your First Computer To The Sync Account
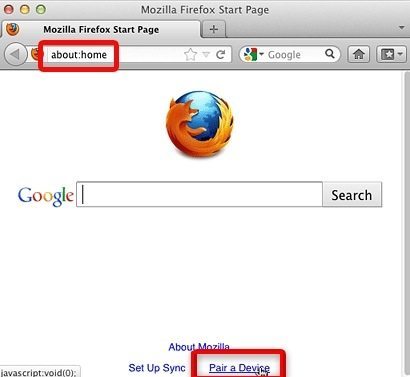
- In Firefox, click on the Home button or just type about:home in the address bar to open the default Firefox home page
- At the bottom, select the Pair a Device link to open the Firefox Sync Setup window
Now just enter the password that you received on the other machine in the relevant fields and click continue, as shown below:
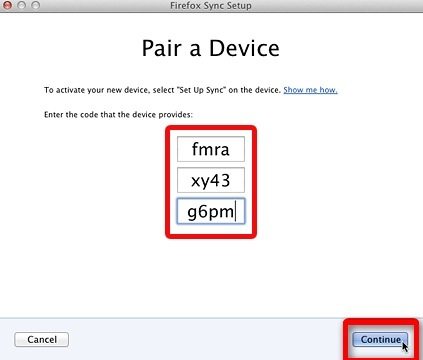
When the code is accepted you will see a Device Connected message and your computer will immediately begin syncing. Click Done to close the setup window.
![Chrome Icon]() How To Sync Tabs in Chrome
How To Sync Tabs in Chrome
Google’s Chrome browser also has a method to synchronise tabs quite easily, besides many other items such as bookmarks, preferences, extensions and themes. There are a several possible methods depending upon which version of Chrome you have, so if one of these doesn’t work for you then try one of the alternatives. You’ll need a Google account and will need to sign in within Chrome for it to work.
Here’s how to set it up:
1. Type Chrome://flags/ in the Chrome address bar

2. Turn on the option Enable syncing open tabs as shown above
3. Next restart Chrome (there should be a Relaunch button at the bottom of the window)
4. Go to Chrome’s options page and select Personal Stuff
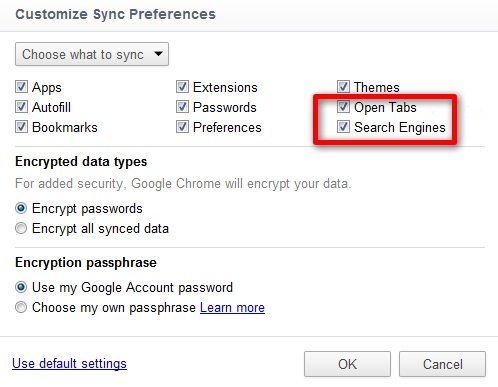
5. Click Customise under your Google Chrome Sync Profile
6. You should now have the option to sync open tabs and also search engines, as shown below. Tick the relevant box to sync tabs
Alternative Ways To Sync Chrome
There are a few additional ways to sync tabs within Chrome – plug-ins such as Xmarks, Surfon and Tab Sync are all available from the Chrome webstore which do the job nicely.
Depending on which version of Chrome you have, the previous methods might not work for you, because there are many different versions of Chrome on various development tracks and so some versions have features that others don’t.
A slight variation on the first method is described below:
1. Launch Chrome and open the Preferences tab
2. Click on Personal Stuff (you just type Chrome://settings/personal into the address bar)
3. In the Sign In section choose Advanced
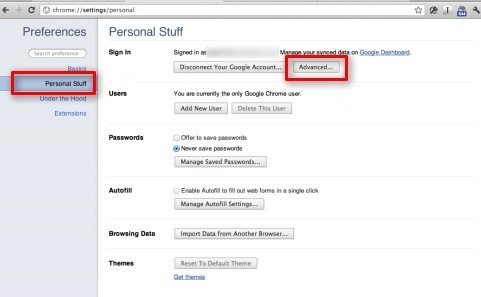
4. (Make sure you are already signed into your Google account in the Sign In section). Next, if you choose Sync everything from the drop-down box, your open tabs are automatically synced. Otherwise manually choose which items you want to sync from the selection shown

Before you go
After spending over 20 years working with Macs, both old and new, theres a tool I think would be useful to every Mac owner who is experiencing performance issues.
CleanMyMac is highest rated all-round cleaning app for the Mac, it can quickly diagnose and solve a whole plethora of common (but sometimes tedious to fix) issues at the click of a button. It also just happens to resolve many of the issues covered in the speed up section of this site, so Download CleanMyMac to get your Mac back up to speed today.


Add Comment