

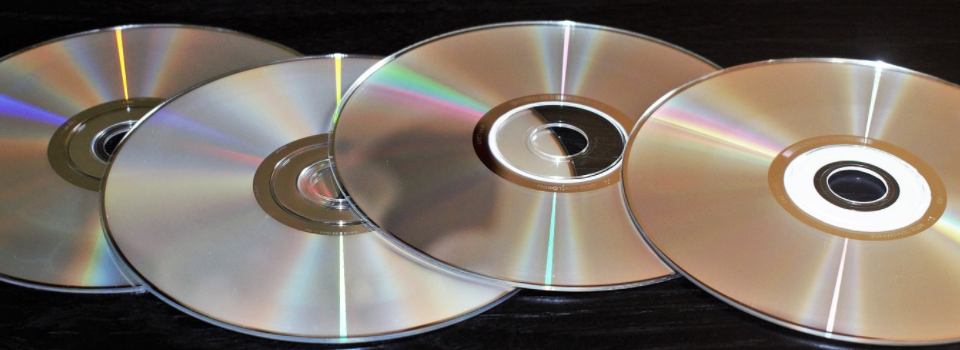
Since Apple made the decision to remove disc drives from their laptops, watching a movie or TV show on your Mac isn’t always the easiest thing in the world!
With the rise of streaming-on-demand services like YouTube, Netflix and Amazon Instant Video, your Mac’s lack of a physical DVD drive might never become an issue. However, if you do ever want to play a DVD or Blu-ray on your Mac, then it can be incredibly frustrating to have the disc and your Mac physically in front of you, with no way of getting the two to communicate. It might even make you long for the days when Macs were heavier, bulkier, and had built-in DVD drives!
Assuming that your Mac doesn’t have a built-in drive, you’ll need to purchase an external one, but even then you may not be wild about carting this drive around with you, just on the off-chance you want to watch a movie! By ripping a DVD or Blu-ray, you can ensure that you always have easy access to your favourite TV shows and movies.
This article covers everything you need to know about ripping unprotected and copy-protected DVDs and Blu-rays to your Mac using Disk Utility, the popular third party Handbrake application, plus a library that can help you overcome the copy-protection present on certain discs. We’ll also offer some advice on what to do if your Mac doesn’t have a built-in disc drive, plus the legalities of ripping videos to your Mac.
My Mac doesn’t have a disc drive! How can I rip DVDs?
Most modern Macs don’t have a built-in optical disk drive. While this makes your typical Mac more lightweight, it does present a problem if you ever want to rip a DVD or Blu-ray.
If your Mac doesn’t have a built-in drive, then there’s still a few ways to get your favourite TV shows and movies from a physical disc, and onto your hard drive:
- Find a computer that does have a disc drive. If a friend or family member owns a computer that has a built-in disc drive, and they’re willing to help you out, then you can rip the disc on their computer instead. Once the video is present on their hard drive, you can transfer it to your Mac using any of the usual methods, such as sending it wirelessly over Bluetooth or AirDrop, via online sharing services such as DropBox, or using a USB stick.
- Purchase an external disc drive. There’s countless external drives on the market that you attach to your Mac’s USB port in exactly the same way as attaching a USB stick or external keyboard. Many electronics and computer retailers stock a selection of external drives, including Amazon.
Is it illegal to rip DVDs?
The answer to this question will vary depending on where you live. Depending on your location, ripping a DVD or Blu-ray is often illegal, even if you own the disc and are only creating a copy for personal use.
Before transferring your favourite movie or TV show from a physical disc to your Mac, you should always check local laws and the small print on the DVD or Blu-ray case, to see whether its contents are under any form of copyright protection, such as DRM (Digital Rights Management).
In reality, the chances of getting prosecuted for copying a DVD or Blu-ray that you already own are fairly slim, particularly if you’re only creating a copy for personal use. However, you should always check local laws and the disc’s small print, so you can make an informed decision about whether this is a risk you’re willing to take.
Rip unprotected DVDs
If a disc isn’t under digital copy protection, then you can rip it to your Mac using the pre-installed Disk Utility application:
- Insert the disk into your Mac’s built-in or external DVD drive.
- Open a new Finder window.
- Navigate to ‘Applications > Utilities.’
- Launch Disk Utility.
- Locate the DVD that you want to copy, and click it.
- Select ‘New Image.’
- Set the ‘Image Format’ to ‘DVD/CD Master.’
- Change the ‘Encryption’ to ‘None.’
- Click ‘Start.’ Disk Utility will now create your copy!
Rip copy-protected DVDs with HandBrake
If you want to rip a copy-protected DVD, then you’ll need to use third-party software such as Handbrake. Due to legal issues, when you install Handbrake it doesn’t include any of the software needed to decrypt protected videos.
If you do want to use Handbrake to rip copy-protected DVDs, then you’ll need to install some additional software. There’s several libraries that supply this missing functionality, but in this tutorial I’m going to use the libdvdcss DVD playback library.
Installing libdvdcss with Homebrew
If you’re running macOS Sierra, then System Integrity Protection (SIP) can prevent you from installing the libdvdcss library. While you could disable SIP, install libdvdcss, and then re-enable SIP, this process requires you to boot into Recovery Mode several times, which makes it a long-winded process. An easier alternative, is to install libdvdcss using Homebrew.
If you’re not familiar with Homebrew, then we’ve published a complete guide, which includes instructions on how to install Homebrew.
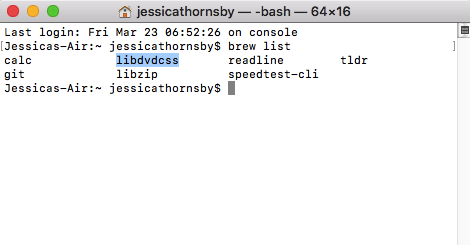
Once Homebrew is up and running, you’re ready to install libdvdcss:
- Open your Mac’s Terminal.
- Type the following command into the Terminal window:
brew install libdvdcss
- Press the ‘Enter’ key on your keyboard.
- Your Mac will now download libdvdcss. Once libdvdcss has been successfully installed, you should see a message along the lines of:
Pouring libdvdcss-1.4.1.high_sierra.bottle.tar.gz
If you want some extra confirmation that libdvdcss has been installed correctly, then run the following command in the Terminal:
brew list
This returns a list of all the packages that are installed with Homebrew, which should include libdvdcss.
Installing HandBrake
Once libdvdcss is installed, you’re ready to rip copy-protected DVDs:
- Download and install the latest version of Handbrake.
- Insert the DVD you want to copy.
- Launch Handbrake. Handbrake should display a sidebar asking which drive it should examine; select your DVD drive and then click ‘Open.’
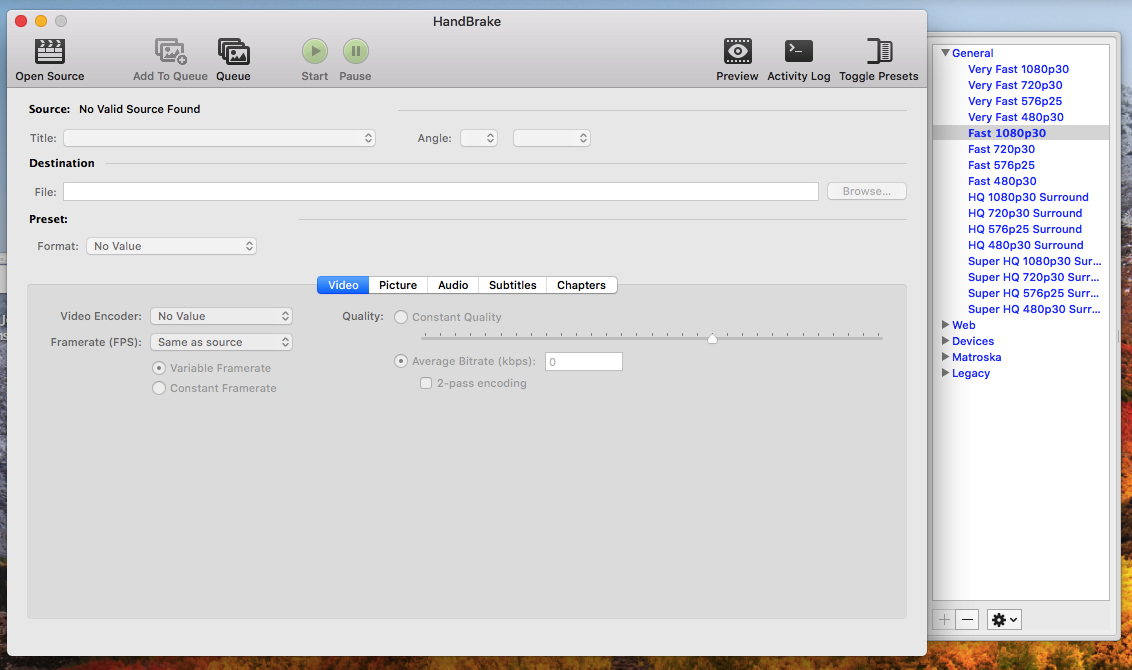
- Handbrake will now scan the selected DVD.
- Open the ‘Source: Title’ dropdown and select the title you want to copy, for example Handbrake may detect the main feature, plus any extras that are present on the disc. If you want to rip multiple Titles from the same disk, then select each item, one at a time, and then click ‘Add to Queue.’
- If you only want to rip a section of the movie, then open the ‘Chapters’ dropdown and specify the ‘From’ and ‘To’ chapters that you want to record.
- Select the ‘Browse’ button and specify where Handbrake should store the subsequent video file.
- By default, Handbrake’s left-hand menu contains a list of presets, formatted as blue text. These are default settings that you can use to control the quality of the subsequent video file. The higher the quality, the more space the file will take up on your hard drive. If you’re copying a DVD to watch on your Mac, then you’ll typically use one of the ‘General’ presets – the various ‘Fast’ and ‘Very Fast’ presets are lower quality but will take up less space on your hard drive, whereas the ‘HQ’ and ‘Super HQ’ presets will be higher quality but take up more space. If you don’t see the preset list, then click the ‘Toggle presets’ button in Handbrake’s menu bar.
- If the video is available in multiple languages, or includes subtitles, then select Handbrake’s ‘Audio’ tab, open the ‘Tracks’ dropdown, and then select the audio track that you want to record.
- Once you’re happy with all your selections, click the ‘Start’ button towards the bottom of the Handbrake window. Handbrake will now begin ripping the selected video, and display a progress bar along the bottom of the screen.
Before you go
After spending over 20 years working with Macs, both old and new, theres a tool I think would be useful to every Mac owner who is experiencing performance issues.
CleanMyMac is highest rated all-round cleaning app for the Mac, it can quickly diagnose and solve a whole plethora of common (but sometimes tedious to fix) issues at the click of a button. It also just happens to resolve many of the issues covered in the speed up section of this site, so Download CleanMyMac to get your Mac back up to speed today.


Add Comment