

An SSD (solid state drive) is one of the most worthwhile for your Mac. They provide lightning fast disk access times because there are no moving parts, unlike a traditional spinning hard disk. The only minor downside is that SSD capacities are usually way below those of regular disks and they can be quite expensive too. But an SSD will speed up Mac OS X Lion and provide a significant performance boost – applications will open up more speedily and boot-up times will improve noticeably.
Many of the iMac desktops have quite a lot of spare room inside, so it’s possible to install an SSD as a secondary disk drive – this way Mac OS X and all your apps can be kept on the SSD and documents, pictures and other files moved to the larger capacity hard disk. Since the vast majority of Mac sales are MacBooks, this article describes the basics of installing an additional SSD in your MacBook. The MacBook Pro doesn’t have space for a second drive by default, but because it has an optical drive (and most people hardly use them anyway) this can be removed to make way for the new SSD.
A word of caution: it’s recommended that you read up and consult a professional before attempting any hardware upgrades yourself – the upgrade process is difficult so it might be wise to let an expert do it. And don’t forget to make a complete backup with Time Machine or another suitable solution, just in case the worst happens!
Lastly, taking apart your MacBook and following the process below will certainly void your warranty, but if you’re not too concerned about this fact then it will probably be the best upgrade you’ll ever do…
What You’ll Need
Here’s a quick rundown of everything you’ll need to perform the upgrade:
- A MacBook Pro. Most unibody Macs have pretty much the same insides and layout
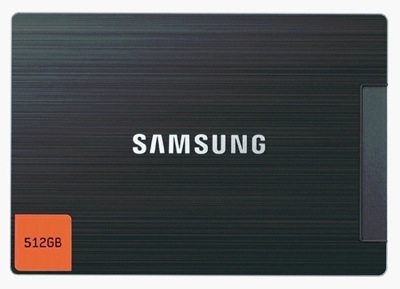
- A solid state hard disk. There are dozens of models to choose from, such as the excellent Samsung SSD 830 512 GB which provides a decent amount of storage and has had excellent reviews. Note that some SSDs are pre-formatted as NTFS (for Windows), so you may need to reformat using Disk Utility before it can be used in a Mac
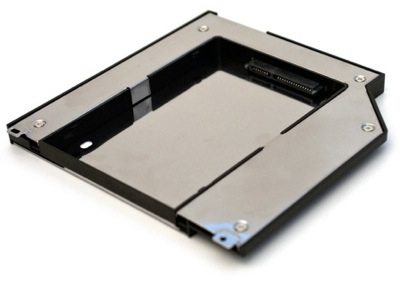
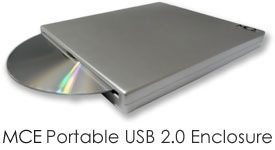
- An MCE Optibay (cost: about $99) to replace the dusty old SuperDrive (optical disk drive) that you’ll remove from your Mac. The Optibay can house either an SSD or a hard disk, and every kit also comes with a USB 2.0 enclosure so that your SuperDrive can be used as a regular external optical disk drive (there’s no need to throw it away!)
- Carbon Copy Cloner or similar disk cloning utility. Carbon Copy Cloner is free, so it’s probably the one to go for
1. Open Your Mac
Before you open up your Mac and perform open heart surgery, make sure it’s cool – it’s best to wait 10-15 minutes because they can get quite hot. Next, unscrew the 10 screws found underneath your MacBook – note that some are longer than others, so it’s important that you remember which ones go where and put them to one side. Once you’ve unscrewed them, you should be able to remove the bottom plate of your computer.

2. Remove the Optical Drive
Before you touch your Mac’s innards, it’s essential that you’re grounded. Invest in one of those special wrist straps or touch part of the metal case before you handle any of the sensitive electronic components inside.
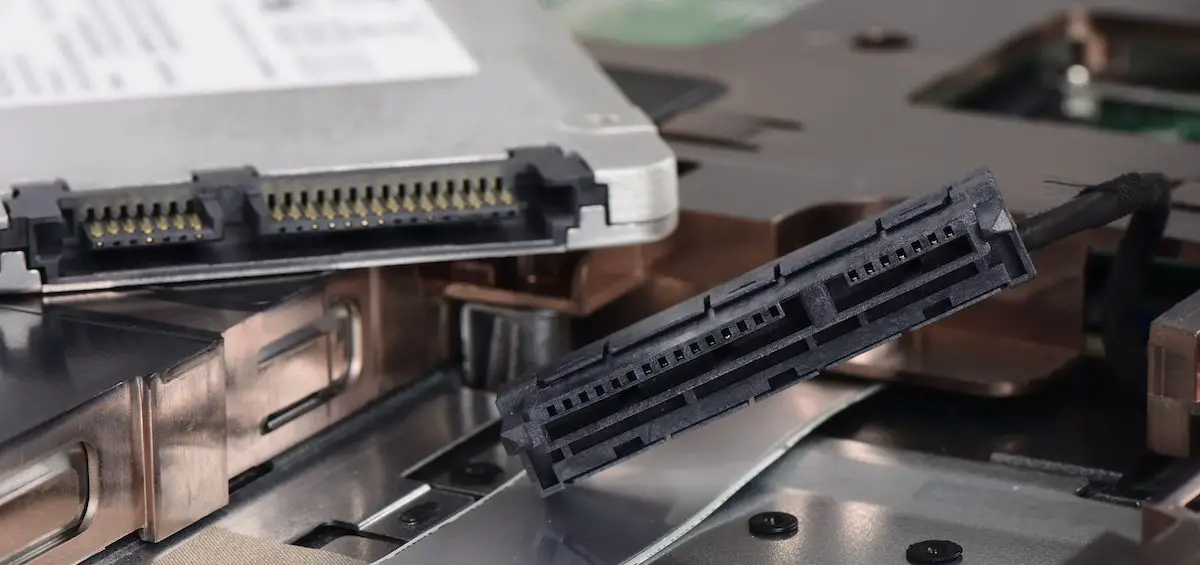
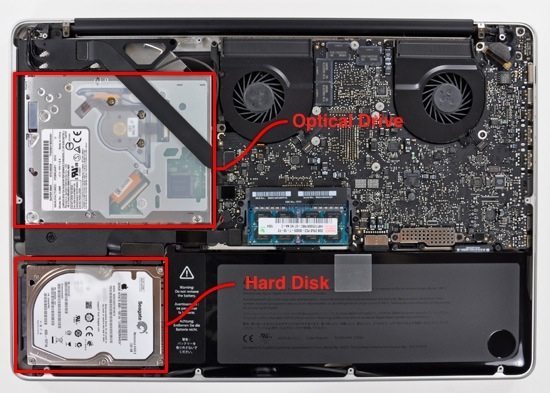
The SuperDrive optical drive is the big flat silver component as shown in the picture below – it should be fairly obvious. Remove any cords attached to it (or there may be a small Bluetooth circuit board in the way which has to be removed). The SuperDrive is connected to the motherboard by a small black or red ribbon – just pull this out of the socket before you continue. Next, unscrew the drive from the Mac’s case – it’s advisable to use a magnetic screwdriver, because the screws themselves are notoriously easy to lose inside your Mac. Once you’ve freed the optical drive from the case, remove the SATA plug which is attached to the ribbon cable.
3. Connect the SSD
The old hard disk is going to sit in the OptiBay where SuperDrive you just removed used to be. The SSD will occupy the space that the old disk uses. The reason is that if you just leave the old hard disk in the current position and install the SSD in the SuperDrive slot, there will be problems when your Mac wakes from sleep, as it doesn’t expect the SuperDrive slot will be the main drive.
Remove your old hard disk as above – it’s a nearly identical process. Just disconnect the cables and remove any screws. Next, load your old drive into the OptiBay housing before you install it into your Mac. It slides into the OptiBay case but might need some force applied to sit snugly. Slide it in all the way until it’s secure in the SATA plug on the housing.
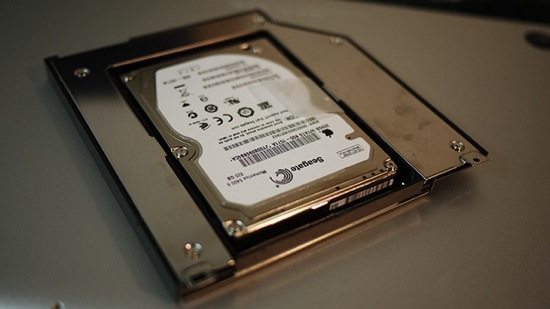
Next, connect the SATA ribbon cable that was connected to the SuperDrive to the slot on the side of the OptiBay and put it onto the empty space which was left by the optical drive. Use the old SuperDrive screws that you removed earlier to secure the OptiBay onto the motherboard – be careful not to lose any screws in the process. The next step is to connect the SSD to the cables that the old disk drive was using and screw it firmly into place. Lastly, re-attach the bottom panel of your Mac and use the original screws taking careful note of which ones went where.
4. Check the New Disk is Installed
Once all the hardware has been installed, start your Mac and once you’ve logged in hopefully the SSD will appear on the desktop. Open Disk Utility and check that the SSD appears in the sidebar on the left. If so, installation was successful, and it now has to be formatted as Mac OS Journaled using the controls in the Erase tab. Once that’s done, continue to the next step.
5. Move OS X to the SSD
Make sure you’ve downloaded Carbon Copy Cloner and launched the app.
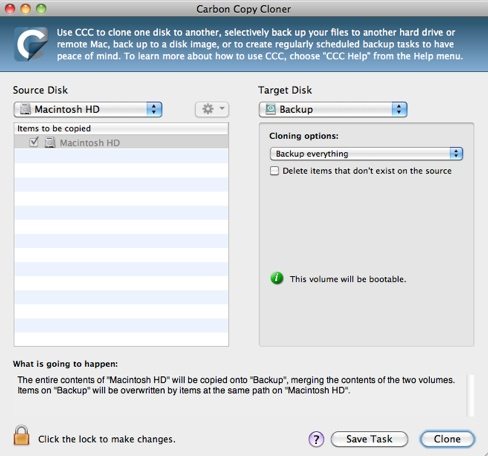
On the left side, set the Source Disk to the current boot volume, which is normally called Macintosh HD. Then set the Target Disk to the new SSD which has just been installed. In the Source Disk section deselect the Home Folder checkbox, because your Home Folder will reside on your old hard disk so it should be excluded from the cloning process. When that’s done, just select the Clone button and just wait for it to finish.
Next, reboot your Mac and hold down the OPTION key so you can choose the boot disk – select the SSD and watch in awe as your Mac boots quicker than ever before!
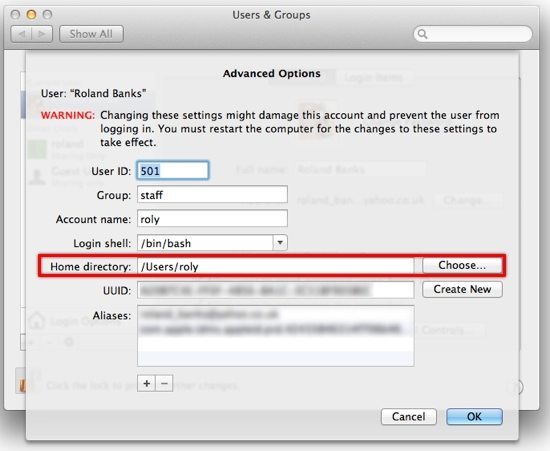
Next, you need to move some of the application settings from your Home folder onto the SSD. To do this, open System Preferences and select Users & Groups. Click the lock at the bottom left and enter your password to be able to make changes. Then right-click on your user name and select Advanced Options (as shown below). In the Home directory section, hit the Choose button and navigate to the existing Home folder on your old disk. Then just log out and back in again. This process must be repeated for every user on your Mac. Note that for items such as desktop backgrounds, you may need to set them up again.
Lastly, go to the old drive and delete everything except the Users folder which is at the very top level. This will free up loads of space and also makes it non-bootable, so your Mac will default to the SSD when it boots.
That’s really all there is to it – saving user files to folders such as Downloads and Documents simply works because you’ve relocated your Home folder.
6. Configure the External SuperDrive
Lastly, you’ll probably want to get your old SuperDrive to work using the enclosure that comes with the OptiBay kit. Just take apart the black plastic case and connect the chip inside to your SuperDrive’s SATA port, then put the drive in the case and close it. To use the drive, just slide a disk into the slot and it’ll automatically be sucked in just like when it was installed in your Mac. The enclosure connects via USB and should run without problems on USB power, but just case there’s an extra lead and power socket supplied if necessary.
7. Enjoy an Insanely Fast Mac!
Your Mac should now automatically boot from the SSD and all your files and documents will be saved to the old disk drive that was moved to the slot previously occupied by the SuperDrive. Everything should seem snappier and the boot time will be much quicker. So just sit back and enjoy using your new super-fast Mac…
Before you go
After spending over 20 years working with Macs, both old and new, theres a tool I think would be useful to every Mac owner who is experiencing performance issues.
CleanMyMac is highest rated all-round cleaning app for the Mac, it can quickly diagnose and solve a whole plethora of common (but sometimes tedious to fix) issues at the click of a button. It also just happens to resolve many of the issues covered in the speed up section of this site, so Download CleanMyMac to get your Mac back up to speed today.


Here is my first try in the SSD world:
http://ricardo-dias.com/2012/09/11/my-post-on-ssd-upgrade-in-macbook-pro/
Give your feedback 😉
Hi. I have a macbook black 13-inch Late 2007. could these steps also help? Thx.
Is it possible to put a secondary HDD in the optibay along with the 1st one? I would like to increase my HDD space without lugging an external drive
Is it possible to put a secondary HDD in the optibay along with the 1st one? I would like to increase my HDD space without lugging an external drive