

Mac OS X Lion has many superb features and the majority of users enjoy it immensely. However, some people who have installed Lion may wish to revert back to Snow Leopard simply because they prefer its look and feel, or because they have issues with Lion that cannot be resolved. For example, some older applications simply won’t run on Lion and so the ability to revert to Snow Leopard can be useful.
Fortunately the process to downgrade from Lion to Snow Leopard is quite simple, but it depends on a several factors such as whether you’ve already made have a backup of your pre-Lion system and files.
Here are some of the alternative ways to revert from Lion to Snow Leopard.
METHOD 1: Clean Wipe and Install
 This method is a good way to totally reset your Mac and clear out any old files and applications that might be slowing your computer down. This default new installation will delete everything on your hard disk and install a fresh copy of Snow Leopard, so it’s important to backup your user files before you begin.
You will need a Snow Leopard installation disk (e.g. the one that came with your computer) and an external hard drive in order to backup your important files. Note this method also removes the system restoration partition created by Lion.
Follow the steps below.
1. Backup all your documents and files to an external hard drive. This is necessary to keep all your documents, music, videos and such. If they’re not stored in the default folders, remember to find them and include them in the backup. You will need to copy them back onto your Mac manually later on.
2. Insert the Snow Leopard installation disk, restart you computer and hold down the OPTION key when you hear the boot chime
3. Choose Mac OS X Install DVD when the list of options is displayed
4. When the installer opens, don’t proceed with the installation but go to the Utilities menu and select Disk Utility
5. In the sidebar find the drive that contains Lion, select it and click on the Partition tab
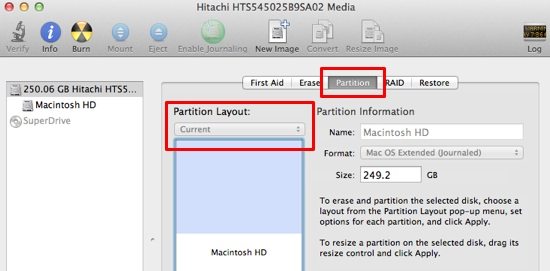
6. In the drop-down menu labelled Partition Layout, choose 1 Partition and hit Apply
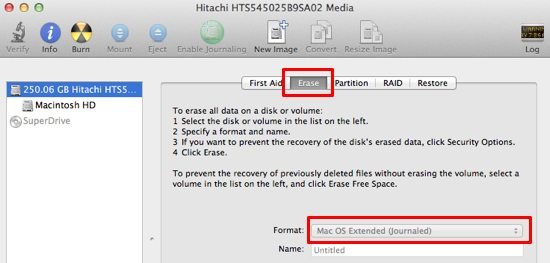
7. Go to the Erase tab and make sure Mac OS Extended (Journaled) is selected and then Erase to delete everything on the disk
8. Quit Disk Utility to return to the installer screen and continue with the Snow Leopard installation
9. When Snow Leopard has been installed successfully, manually copy your files across from your backup disk
10. Run Software Update to make sure your Mac is fully up to date. You will also need to re-install any applications
METHOD 2: Restore From Time Machine

Downgrading using Time Machine is probably the easiest way to go back to Snow Leopard, because it returns the OS, applications and files exactly back to the state they were in before you installed Lion. You will be able to choose from various save points, so it’s easy to find one that corresponds to the earlier installation.
Note that if you’ve only just upgraded to Lion and follow this procedure, all your up to date files and folders will be intact, but if you’ve been running Lion for some time then you’ll also need to manually copy any files that may have changed since you installed Lion.
Follow the process below to install Snow Leopard from Time Machine.
1. Backup your documents and files to an external hard drive
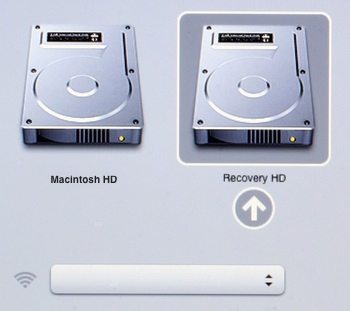
2. Restart your Mac and hold down the OPTION key when you hear the chime
3. When the list of startup options is displayed, choose Recovery HD to start in recovery mode
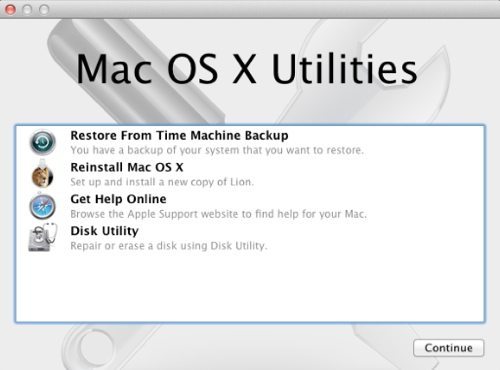
4. When your Mac has started, at the Mac OS X Utilities screen choose Restore From Time Machine Backup and then Continue
5. Make sure that your Time Machine backup disk is already connected. In the list shown, click on the volume that contains your backup
6. Next, select the date that you want to restore your Mac to. Dates and versions are clearly displayed so just use the most recent Snow Leopard backup before you installed Lion
Now you’ll just need to wait a while for the installation to complete, after which you should be back to a fully restored and working Mac running Snow Leopard. The last task is to manually copy over any documents that may have changed since you installed Lion.
METHOD 3: Restore From a Backup Using Disk Utility
If you previously created a bootable Snow Leopard replica of your Macintosh HD with Disk Utility, then you can completely restore everything to Snow Leopard as follows.
1. Restart your Mac and hold down the OPTION key when the chime plays
2. Choose Recovery HD when the list of boot options is displayed, to boot in recovery mode
3. When your Mac has started, connect your backup drive that contains the startup disk replica
4. Open Disk Utility and select your backup drive from the sidebar panel
5. In the Restore tab, make sure your intended startup disk (i.e. your Macintosh HD) is in the Destination field (just drag the relevant volume from the sidebar into the correct fields) and the backup is shown in the Source field as below

6. Next, click Restore and when the process has finished just restart your Mac
You should now be back up and running with Snow Leopard exactly in the state when you made the disk backup.
Before you go
After spending over 20 years working with Macs, both old and new, theres a tool I think would be useful to every Mac owner who is experiencing performance issues.
CleanMyMac is highest rated all-round cleaning app for the Mac, it can quickly diagnose and solve a whole plethora of common (but sometimes tedious to fix) issues at the click of a button. It also just happens to resolve many of the issues covered in the speed up section of this site, so Download CleanMyMac to get your Mac back up to speed today.


Hey, nice write-up. Helps a lot! I was just wondering though, I have never attempted to re-install the OS and I am worried about loosing programs like Photoshop and that. If I do method one will I loose programs, or just the files like photos and documents.
Cheers
Great article! After reading conflicting blogs with personal opinions, I appreciate your step by step no nonsense approach. It worked for me and I got my files back locked out by Lion.
Full instructions for installing Snow Leopard (and Rosetta) into Parallels 7 in Lion:
http://forums.macrumors.com/showthread.php?t=1365439
Thank you!!