Do you find yourself performing the same boring, monotonous tasks time and time again? Folder Actions is a powerful, but often-overlooked, feature of MacOS that aims to take the pain out of repetitive tasks, by performing them for you.
If that sounds a bit like Automator, then that’s because it is!
The only major difference between Automator and Folder Actions, is that you attach a Folder Action script to a specific ‘target’ folder. The system will then monitor this folder and execute this script in response to certain actions, most commonly kicking in when you add a certain type of file to the folder. For example, you might create a script that converts Word documents into a PDF, or a script that automatically uploads every new file to a web server.
You can also create Folder Actions that trigger every time you remove items from a folder, or whenever a folder is opened or closed.
In this article, I’m going to share two ways of getting started with Folder Actions. First, we’re going to make good use of the ready-made scripts that come pre-installed on every MacBook, before moving onto creating our own custom Folder Actions, using Automator.
Apple’s Built-in Scripts: Convert Any Image to PNG
Let’s start with the easiest method: applying one of your MacBook’s built-in scripts to a folder. The script I’m going to use in this example is ‘Duplicate as a PNG,’ as the name suggests, this script converts any image file into PNG format.
Start by creating the folder you’re going to attach this ready-made script to. Make sure you give this folder a descriptive name; I’m going to use ‘Convert images to PNG.’
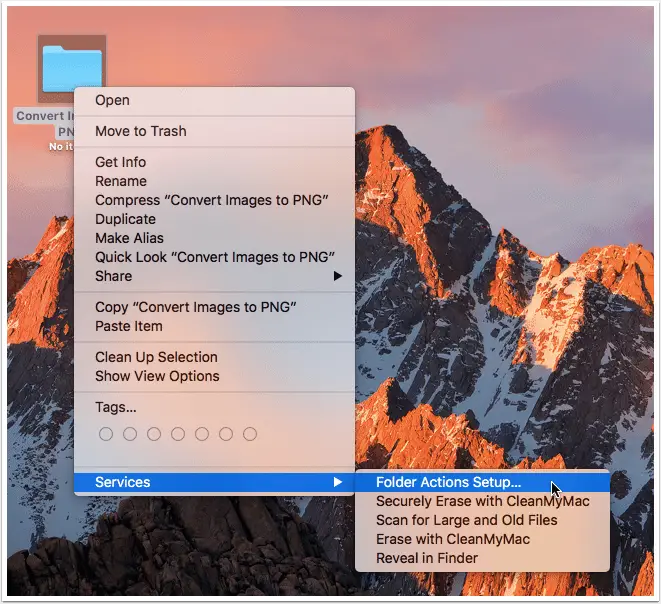
Next, Control-click your folder and select ‘Services’ from the context menu, followed by ‘Folder Actions Setup…’

This launches the Folder Actions Setup app and automatically opens a menu where you can choose from any of your MacBook’s built-in scripts. Select ‘Image – Duplicate as as PNG.scpt’ and click the ‘Attach’ button.
If this is your first foray into Folder Actions, then you’ll need to enable this feature on your MacBook by selecting the ‘Enable Folder Actions’ checkbox (if it isn’t selected already).
Take your folder for a test drive by dropping any non-PNG image onto it. Open the folder and you should see your original image, plus a new ‘PNG images’ folder that contains the PNG version of your image.
Exploring Apple’s other ready-made scripts
Attaching any of Apple’s ready-made scripts to a folder follows the exact same pattern:
- Create a new folder.
- Control-click the folder and select ‘Services,’ followed by ‘Folder Actions Setup…’
- Select the script you want to use and click ‘Attach.’
- Make sure the Folder Action is working as you intended, by dragging an appropriate file onto the folder and checking the results.
Now you know how to attach any of the default scripts that come pre-installed on your MacBook, let’s explore each of these scripts in more detail. Although most are pretty self-explanatory, a few require some additional explanation:
- Flip Horizontal/Vertical. Orientates any image you drop onto the associated folder.
- Rotate Left/Right. Rotates any image you drop onto the associated folder.
- Duplicate as JPEG. Creates a JPEG copy of any non-JPEG image.
- Duplicate as TIFF. Creates a TIFF copy of any non-TIFF image.
- New item alert. A popup notifies you whenever a new file has been added to this folder. This script is particularly useful for monitoring shared folders, or as a security measure that gives you a heads-up if anyone modifies your MacBook’s sensitive system folders.
- Close sub-folder. If a particular folder contains lots of sub-folders, then you’ll know that chasing down and closing every single sub-folder window can be annoying. Attach this script to the parent folder, and all sub-folders will be closed automatically as soon as you close the parent folder.
- PostScript to PDF. Automatically converts any PostScript file to PDF format.
- Add Icon. When you drop any image file onto the folder, this script changes the file’s icon to display a preview of the image itself, so you can see that file’s contents at a glance.
- Info to Comment. Whenever you add an image to this folder, information about that file is automatically added to the file’s ‘Comments’ field. To see this information, Control-click the file, select ‘Get Info’ and then expand the ‘Comments’ field.

- Show comments in dialog. Whenever a user opens this folder, the contents of the folder’s ‘Comments’ field is displayed as a popup. This feature is particularly useful for shared folders, as it gives you a way of leaving messages for other users. Note, this popup only appears if the folder already has some comments attached to it, so if the folder’s ‘Comments’ field is empty a popup won’t appear. (If you’re unfamiliar with comments, then you can add them to a folder by Control-clicking the folder, selecting ‘Get Info,’ expanding the ‘Comments’ section and typing your message into the comments field.
Creating Custom Folder Actions
Although Apple’s built-in scripts cover a variety of actions and file types, these defaults are only going to take you so far. At some point you’ll want to create your own Folder Actions, and one of the easiest methods is to use Automator – which is exactly what we’re going to be doing in this section.
Personally, I find that my ‘Downloads’ folder has a nasty habit of getting out of control, as I always forget to rename files once I’ve downloaded them. In particular I seem to always have a tonne of images with filenames that are just a string of random numbers – not particularly helpful!
To help combat this common problem, let’s create a Folder Action that prompts you to rename any file you add to the associated folder. I’m going to attach this script to my ‘Downloads’ folder, so that whenever I download a file this script kicks in and launches a popup, ready for me to enter a more descriptive filename.
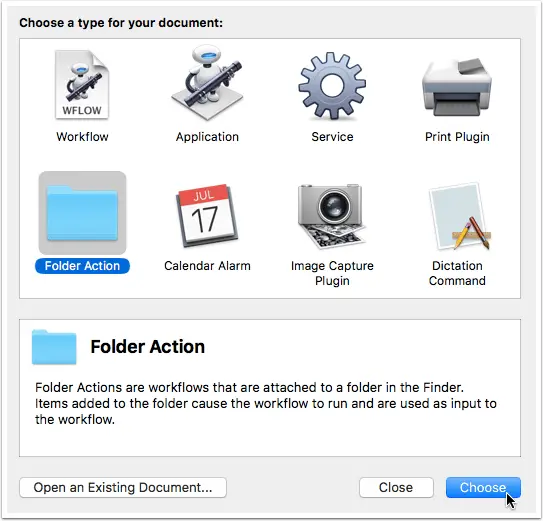
To create this script, open your MacBook’s ‘Applications’ folder and launch the Automator app. Give the ‘New Document’ button a click and select ‘Folder Action,’ followed by ‘Choose.’

This opens the main Automator screen, which is divided neatly into two: on the left is a menu containing all the ‘Actions’ and on the right-hand side is the editor where you’ll build and edit your workflow.

You create a workflow by grabbing items from the ‘Actions’ menu and dropping them into the editor portion of the Automator window.
Start by pointing Automator at the folder you’re ultimately going to attach this workflow to. Open the ‘Folder action receives files….’ dropdown menu and select ‘Other,’ then select the ‘Downloads’ folder (or another folder of your choosing).

In the ‘Actions’ menu, make sure ‘Library’ is selected, then find the ‘Set Value of Variable’ action.

Drag and drop this action into the editor portion of the Automator window.

We’ll need to tweak this action slightly to make it fit into our workflow, so click the ‘New variable’ field and type ‘File’ into the popup that appears.

Click ‘Done.’
The next step is creating the popup that’ll prompt you to rename the newly-downloaded file, so grab the ‘Ask for Text’ action and drop it into your workflow.

The ‘Question’ text is the message that the popup will display; I’m going to use “Please give this file a descriptive name.” You can leave the ‘Default Answer’ field blank.
Next, drag another ‘Set Value of Variable’ item into your workflow. Open its dropdown menu, select ‘New variable,’ enter ‘Name’ and then click ‘Done.’

Find the ‘Get value of variable’ action and drop it into your workflow. This action should be set to ‘File’ by default, but if it isn’t displaying this value then you’ll need to open its ‘Variable’ dropdown menu and select ‘File’ yourself.

Next, drag and drop the ‘Rename Finder Items’ action into your workflow. At this point, Automator will ask whether you want to preserve the original filename by creating a copy and applying the new name to the copy only, or whether you want to apply the new name to the original file. I’m going to opt for the latter, by clicking ‘Don’t Add.’
Once you’ve added the ‘Rename Finder Items’ action to your workflow, open its ‘Add Date or Time’ dropdown and select ‘Name single item.’ Since you don’t want the renaming process to ever change a file’s extension, open the ‘Name’ dropdown and set it to ‘Basename only.’

Finally, in the ‘Variable’ panel towards the bottom of the screen, grab the ‘Name’ variable, and drop it onto your workflow’s empty ‘To’ field.

And that’s it! Open Automator’s ‘File’ menu, click ‘Save’ and give your Folder Action a descriptive name; I’m going to use ‘Automatically rename file’. Click ‘Save.’
Check your Folder Action is working as intended, either by:
- Downloading a file.
- Dropping a file into your ‘Downloads’ folder.
A popup should appear, prompting you to rename the file.
If the popup doesn’t make an appearance, then check that the workflow you’ve just created has been successfully attached to the ‘Downloads’ folder. Navigate to your MacBook’s ‘Home’ directory (by selecting ‘Go’ from the Mac menu bar, followed by ‘Home’) and Control-click the ‘Downloads’ folder. Select ‘Services,’ followed by ‘Folder Actions Setup.’ Your workflow should appear in the right-hand section of the Folder Actions Setup window.
If your workflow is nowhere to be seen, then you’ll need to add it manually by giving the ‘+’ icon a click (where the cursor is positioned in the screenshot below).
![]()
This opens a list of all the currently available scripts. Find the ‘Automatically rename file’ script you just created, and click ‘Attach.’
To check the folder is now functioning as intended, either download a file or move a file to the ‘Downloads’ folder – at this point, your script should kick in and request that you rename the file.
If you want to disable this Folder Action at any point, Control-click the ‘Downloads’ folder, select ‘Services’ and then click ‘Folder Actions Setup.’ Select your custom script, and then click the little minus icon.
![]()
When prompted, confirm that you want to delete this Folder Action, and MacOS will remove it from your ‘Downloads’ folder.
Before you go
After spending over 20 years working with Macs, both old and new, theres a tool I think would be useful to every Mac owner who is experiencing performance issues.
CleanMyMac is highest rated all-round cleaning app for the Mac, it can quickly diagnose and solve a whole plethora of common (but sometimes tedious to fix) issues at the click of a button. It also just happens to resolve many of the issues covered in the speed up section of this site, so Download CleanMyMac to get your Mac back up to speed today.


Add Comment