

Nearly everyone knows by now that the next version of the Mac operating system – OS X Mountain Lion (which is actually OS X version 10.8), is scheduled to be released sometime this summer. At the moment however, it’s still only a developer preview that’s not quite ready for prime time, and contains quite a few bugs and issues that are still being ironed out.
Nevertheless, many of you will want to experiment with Mountain Lion either now or when it’s released, and the safest way to do that whilst leaving your existing installation untouched is to dual boot your Mac and create a new hard disk partition running Mountain Lion. The advantage of this is that if it all goes horribly wrong (which it’s bound to for someone) you can simply boot up back to Snow Leopard or Lion and carry on as normal.
This tutorial shows you the basic steps necessary to dual boot with both systems installed on your beloved Mac.
![Mountain Lion Icon]() About Mountain Lion
About Mountain Lion
 About Mountain Lion
Mountain Lion was announced in February this year, and unusually for Apple they gave journalists and some tech websites an advanced sneak peak. Mountain Lion pounced almost out of the blue and took many people by surprise.
The list of new features is quite comprehensive and should make for a worthy upgrade to anyone on Lion or Snow Leopard. For more details on what’s new in the new OS, read our article What’s New in OS X Mountain Lion.
Some of the headline features of Mountain Lion include:
- AirPlay – wireless screen sharing to a TV
- Notification Center – which unifies all your messages and alerts (hopefully it’ll be called Notification Centre in the British version!)
- Deeper iCloud integration – seamless updates and synchronisation across all your devices
- More iOS-like – lots of new iOS style features and interface enhancements
- Game Centre – play games with friends across Mac and iOS
1. Check Whether Your Mac is Compatible With Mountain Lion
Before installing Mountain Lion, it’s recommended that you first check whether your Mac is 100% compatible, because older Macs and those with certain graphics cards probably won’t be able run it.
In general, the prerequisite system requirements are:
- 64-bit Intel Core 2 Duo processor or better
- The ability to boot into OS X 64-bit mode
- An advanced GPU (i.e. not one of the Intel GMA 950 cards)
- An Internet connection to download OS X 10.8
It’s possible to confirm if your Mac can boot into 64-bit mode using Terminal. Just open the application (which resides within the Applications -> Utilities folder, or just search in Spotlight) and type uname -a at the command prompt. You should see something like this:
Darwin Rolys-MacBook-Pro.local 11.3.0 Darwin Kernel Version 11.3.0: Thu Jan 12 18:47:41 PST 2012; root:xnu-1699.24.23~1/RELEASE_X86_64 x86_64
The relevant part here is the x86_64 bit I’ve highlighted in bold.
The Macs which should be able to run Mountain Lion are as follows:
- MacBook Pro (13″): models from mid 2009
- MacBook Pro (15″): models from late 2007
- MacBook Pro (17″): models from late 2007
- MacBook Air: models from late 2008
- iMac: models from late 2007
- Mac Mini: models from early 2009
- Mac Pro: models from early 2009
- Any Mac with an Intel GMA 950 or x3100 integrated graphics card
- Any Mac with an ATI Radeon X1600 graphics card
- Any MacBook released before 2008
- Any iMac released before 2007
- The original MacBook Air
2. Create a New Disk Partition
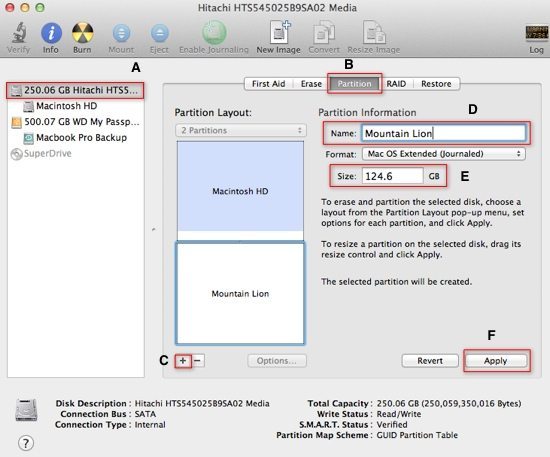
To install Mountain Lion, it’s necessary to create a new disk partition on your Mac. This is a relatively easy task using the built-in Disk Utility tool, which can help you to accomplish the task in just minutes. Just open Disk Utility from the Applications -> Utilities folder and follows the steps below – each step is labelled correspondingly in the screenshot.
- (A) Select your hard disk in the left hand side panel
- (B) Click on the Partition tab in the main window
- (C) Click on the small Add (+) icon to create a new partition
- (D) Name the partition something easily identifiable, such as Mountain Lion
- (E) Choose a decent size for the partition. The amount you choose is entirely up to you, but it’s recommended that you allocate a decent amount of storage considering how much you think you’ll need for storing documents, photos and applications. If you plan to just play around with Mountain Lion and not install too much, you could allocate a small figure such as 20 GB.
- (F) When you’ve entered the desired size of the partition, hit Apply
Install Mountain Lion On The New Partition
Step 1. Before you can actually install Mountain Lion you need to download the OS. At the moment, it’s only possible to obtain the developer preview, but when it’s officially released it will of course be available as a normal download from the App Store. If you’ve already registered with the Mac Developer Program (which costs a fairly reasonable $99 per year), you’ll be able to download Mountain Lion from the Mac Dev Center.
Step 2. Launch the OS X Mountain Lion Preview installation file, and open the Install OS X Mountain Lion Preview application to initiate the installation routine.
Step 3. Now just follow the installation process, and when prompted select the new Mountain Lion partition that you just created.
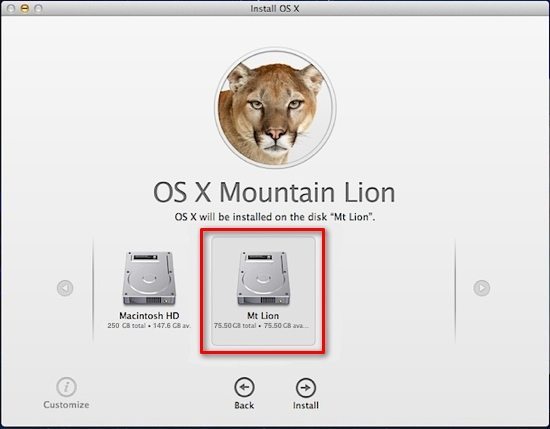
Step 4. If all’s gone to plan, you’ll now be able to sit back and watch the installation process. Your Mac should reboot and Mountain Lion will then be fully installed. Once it’s installed correctly and booted up, you’ll be presented with the normal OS X welcome screen.
How To Select The Boot Up OS
Now that you have two versions of OS X on your Mac, how do you control which version it boots up to? The solution is simple – when your Mac starts, hold down the OPTION key and you’ll be shown a list of the drives and partitions on your computer – they’ll be labelled something like this:
- Macintosh HD
- Mountain Lion
- Recovery HD
- Recovery-10.8
The first item in the list will be the standard Mac OS installation (e.g. Lion). The second item is obviously Mountain Lion, and the Recovery HD partition is for the first OS in the list (i.e. Lion or Snow Leopard if that’s what you already had installed). The Mountain Lion recovery partition will be labelled Recovery-10.8.
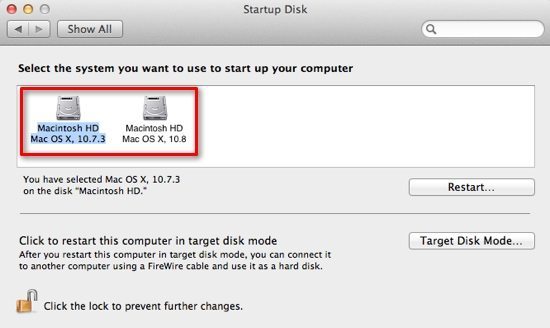
You can select whichever version of Mac OS that you want to boot to simply by clicking on the appropriate icon. It’s also possible to set the default startup disk/partition from the Startup Disk option in System Preferences. When the following window is displayed, choose whichever item you want to boot to as the default.
You should now have Mountain Lion installed, and will be able to switch between that and whichever other version of Mac OS X you have on your Mac – simple! If you’d like to know some of the essential things to do now that you’re all setup, check out our related guide 5 Things To Do After Installing OS X Mountain Lion.
Before you go
After spending over 20 years working with Macs, both old and new, theres a tool I think would be useful to every Mac owner who is experiencing performance issues.
CleanMyMac is highest rated all-round cleaning app for the Mac, it can quickly diagnose and solve a whole plethora of common (but sometimes tedious to fix) issues at the click of a button. It also just happens to resolve many of the issues covered in the speed up section of this site, so Download CleanMyMac to get your Mac back up to speed today.


Add Comment