There’s nothing more frustrating than having to switch computers or log in and out of multiple Apple iTunes accounts just to access the music, videos, and apps you have downloaded as a different user or on a new device.
There are a number of reasons why one might run into this problem; There could be separate libraries for different members of the family, you could have more than one computer (say, an iMac and a MacBook), you could have separate files for work and play, or you could have an iTunes library stored on an external hard drive to free up your computer from your 1 billion song playlist.
Whatever the reason, I’m going to show you how to fix the problem so your technology can do what it was built to do: make your life easier.
The Options
The Export – Import Method:
For this method you will need to export your library from the first computer (or user, as the case may be), and import it into the second computer as its final destination. Many people may suggest just copying and pasting the iTunes media files, which is fine if you just want the plain song, video, or pod cast but you should be warned that you will lose all of your metadata (read: playlists, ratings, play count) if you choose to go this way. If you have spent a lifetime rating all of your songs and videos or make use of the ‘most played’ playlist that iTunes automates for you, you’ll be unhappy to see all of that information disappear.
Luckily there is a method of merging your iTunes library without losing metadata.
Pros:
- This method is completely free.
- Metadata will transfer with your music.
Cons:
- The process may be intimidating to some users.
- Problems may arise with file locations when transferring between PC and Mac.
If you’re combining libraries from separate computers, you’ll need a way to transfer the files between them. Your options include:
- Connect the two computers using Ethernet.
- Save the files onto an external hard-drive/USB drive/DVD’s.
To begin, I recommend making sure all of the media files from both libraries you’re combining are in their correct folders.
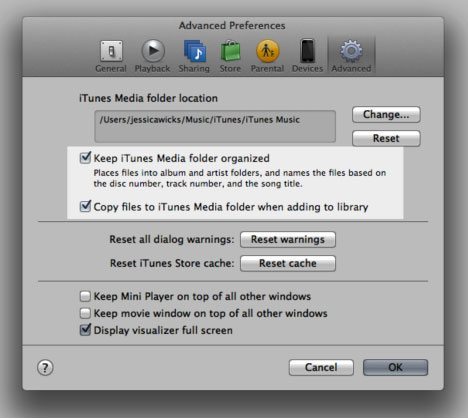
1. Go to iTunes->Preferences->Advanced. Select both Keep iTunes Media folder organized and Copy files to iTunes Media folder when adding to the library. Select OK.

You will also need to organize your libraries, which will make sure that each of your movies, songs, etc. are stored just how your new iTunes library will expect them to be.
2. Go to File ->Library->Organize Library. Choose both Consolidate Files and Reorganize files in the folder ‘iTunes Music’. If you cannot select “Reorganize files in the folder ‘iTunes Music”, it means that your computer has already done this. Select OK.

Next you’ll want to make sure all of your file types are being exported.
3. Go to iTunes->Preferences->General. Make sure all of the file types you’d like to export are checked off, such as Movies, TV Shows, Podcasts, iTunes U, etc. Select OK.

Now it’s time to go through the actual export. This will create an XML file that holds the playlist and rating info on each of your songs, videos, etc.
**So as not to be so confusing, I’ll be referring to the computer or user you are moving the library from to “Computer A” and the computer that you are merging the two libraries on as “Computer B”.**
If you are able to connect your computers through Ethernet, you’ll be able to save yourself a step that can be fairly time consuming (transferring one entire library twice). Use step 4 to complete the transfer.
4. Share the hard drive of Computer A. In iTunes on Computer B go to File->Add to Library. Navigate to the User->Music->iTunes folder on Computer A’s hard drive. Select the file ending in .xml (in my case, “iTunes Music Library.xml”) and click Open.

All of the media files (music, videos, etc.) and its important data will move over to Computer B.
If you are transferring your music with an external hard drive (EHD), you’ll need to first export Computer A’s library to the EHD, and then import it from the EHD onto Computer B. Use steps 5 and 6 to complete the transfer.
5. Connect the external hard drive (EHD) to Computer A. Go to iTunes->Preferences->Advanced. Where it says “iTunes Media folder location” select Change. Select (or create) a folder on the EHD, and select Open. Go to File->Library->Export Library. Navigate to the EHD and select Save.

Now that your Computer A’s library is successfully saved on the EHD, you’ll need to import it in Computer B’s iTunes.
6. Connect the external hard drive (EHD) to Computer B. In iTunes on Computer B go to File->Add to Library. Navigate to the EHD and select the file you’ve just saved there ending in .xml. Click Open.
There you have it. You’ve merged your library for FREE! However, if you are among those who choose to pay for benefit of combining your iTunes libraries, you do have another method you could use. There are a number of programs that can do the job for you.
Program Options:
- PowerTunes
- Syncopation
- MyTuneSync
- TuneRanger
PowerTunes seemed to be the more highly recommended program among Mac forum users, but with a $20 price tag you might be more interested in it for some of the other features (such as doing the opposite and creating multiple libraries).
And there you have it! Regardless of your method choice, you should be the proud owner of one beautiful iTunes library with all of your media in one place.
Before you go
After spending over 20 years working with Macs, both old and new, theres a tool I think would be useful to every Mac owner who is experiencing performance issues.
CleanMyMac is highest rated all-round cleaning app for the Mac, it can quickly diagnose and solve a whole plethora of common (but sometimes tedious to fix) issues at the click of a button. It also just happens to resolve many of the issues covered in the speed up section of this site, so Download CleanMyMac to get your Mac back up to speed today.


Thank you, this is a very useful article. I wish I would have looked for and read it prior to my computer taking a dump. Prior to the dump, I had basically just copied my itunes library folder onto my EHD, without going through the above “export” process. Then I had to erase and reinstall my OS (now essentially the same machine is ‘computer B’). I imported the itunes library from the EHD to computer B, only to find I was missing 10 years of meta data. I realize I may be SOL on this, but is there any chance all that meta data is retrievable from the copied itunes library (which is still sitting on the EHD)?
Thank you!! This enabled me to finally (after years) get rid of duplicate playlists…