


It can happen so gradually that you barely notice it, until one day you realise that you can get up and make a cup of tea in the time it takes your Mac to boot.
Maybe your Mac has always run slower than you’d like, or perhaps it’s slowed down in its old age – maybe you’re even guilty of putting your poor Mac under more pressure than you probably should. But it doesn’t have to be like this! In this article, I’ll share 22 reasons why your Mac might be running slower these days – plus 22 simple tricks for getting your Mac back up to full speed.
1. You need to purchase more memory
Upgrading your RAM is one of the most effective ways of speeding up your Mac (although, disclaimer: it’s also the most expensive tip we’ll be covering in this article).
One way to check whether your computer might be ready for a RAM upgrade, is to use the Activity Monitor app to analyse your Mac’s memory usage. To access Activity Monitor, open your Mac’s ‘Finder’ and navigate to the ‘Applications’ folder. Select ‘Utilities’ and double-click ‘Activity Monitor.’
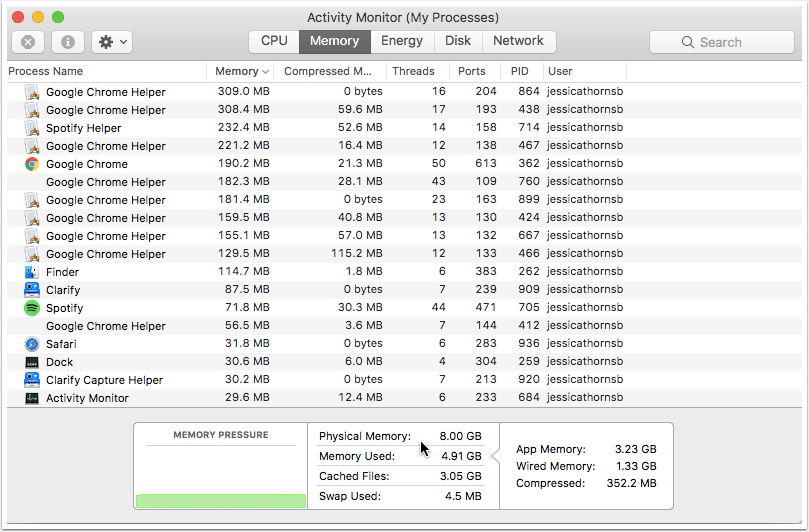
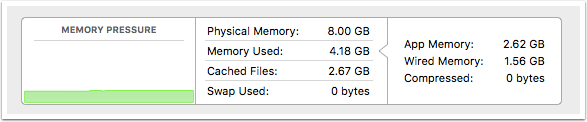
Once you’re inside Activity Monitor, make sure its ‘Memory’ tab is selected and then take a look at the ‘Memory Pressure’ graph. This live-updating graph provides an instant overview of your Mac’s memory situation:
- Green. Memory resources are available.
- Yellow. Memory resources are available but they’re being taken up by memory-management processes, such as compression.
- Red. Your Mac is out of memory and MacOS has resorted to using your hard drive as virtual memory. This is a strong indication that your Mac requires more RAM – whether that means purchasing additional RAM, or taking steps to free up some of the memory that’s already available.
This graph is useful for getting a quick insight into just how good (or bad) your Mac’s memory situation is, but it doesn’t provide you with cold hard facts about how many bytes the system still has available. If you want an exact number, then check the figures to the right of the Memory Pressure graph. Here, you’ll find an exact readout of the total memory available (‘Physical Memory’), and how much of this is currently being used by the system (‘Memory Used’).
It’s also worth noting that your Mac doesn’t have an unlimited amount of physical memory. If the system ever requires more memory than is physically available, it’ll resort to using your hard disk as virtual memory. To ensure the system always has sufficient virtual memory to fall back on, make sure you have at least 10% of free space set aside at any one time.
2. Your operating system isn’t up to date
It’s not unusual to notice an overall performance improvement after updating your version of MacOS, so you should always ensure that you’re running the very latest version of the Mac operating system.
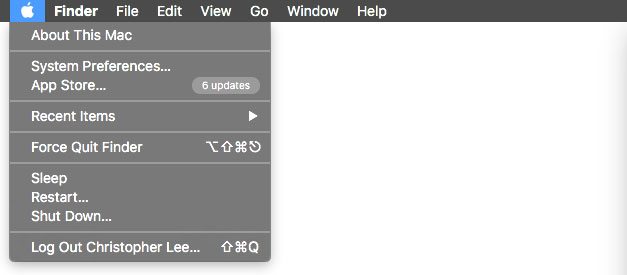
To check whether an update is available, click the ‘Apple’ logo in the menu bar and select ‘App Store.’ Select the ‘Updates’ tab and check for any system updates – if an update is available, then make sure you install it!
You can also get your Mac to check for updates automatically. To enable this feature, open your ‘System preferences…’ and select ‘App Store,’ then ensure ‘Automatically Check for Updates’ is selected.
3. You have too many applications running
The more applications you have running, the more memory these applications are going to consume, and the slower your Mac is going to run as a result. This may seem obvious, but we’re all guilty of leaving applications running in the background, so try to get into the habit of taking stock of what apps you have running on your Mac, and closing any you aren’t currently using.
Since the number of open apps has such a huge impact on your Mac’s performance, here’s a few additional tips on how to keep that number under control:
- Audit what’s currently running on your Mac. It’s far too easy to minimise applications and then forget all about them. To see a complete list of every app and process that’s currently running on your Mac, open the Activity Monitor app and take a look at the ‘Process Name’ column.
- Identify resource-hogging apps. If you select Activity Monitor’s ‘Memory’ tab, you can see exactly how much memory each app and process is consuming. Closing the applications that are putting the biggest demands on memory, is more likely to have a noticeable impact on your Mac’s performance. While you have Activity Monitor open, you may also want to take a quick look at the other tabs, to see whether any apps are making large demands on your Mac’s CPU, Energy, Disk or Network, as this can all contribute to your Mac running more slowly than it should.
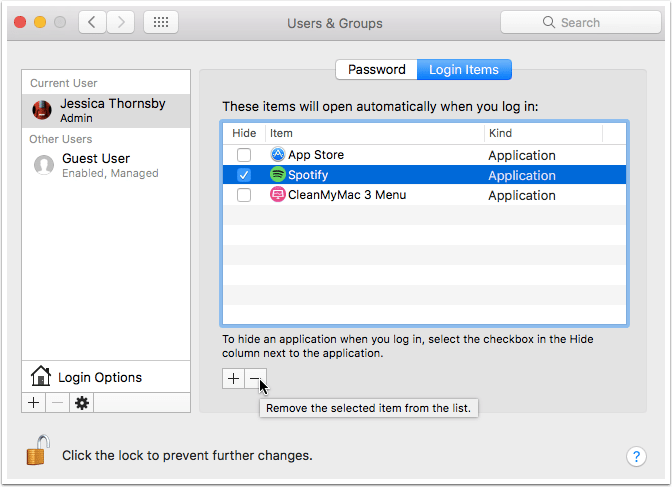
- Prevent apps from launching automatically. Keeping the number of open apps under control can be difficult at the best of times, but it becomes much harder if multiple applications launch automatically as soon as you log into your account. To see which apps are set to launch automatically, open your Mac’s ‘System preferences….’ and select ‘Users and groups.’ Select your user account from the left-hand menu, then click ‘Login items.’ At this point you’ll see a list of every application that’s set to launch automatically at login. To remove an app, select its checkbox and then give the ‘-’ icon a click. Ideally, you should try to remove as many items from this list as possible.
- Don’t re-launch apps at login. If you’re in the bad habit of logging out of your account without closing any applications first, then you may want to tell your Mac not to bother restoring apps when you log back in. To start with a clean slate everytime, click the ‘Apple’ icon in the menu bar and select ‘Log out…’ In the dialogue box that appears, deselect the ‘Reopen windows when logging back in’ checkbox.
4. You need to clear your cache
Your Mac’s cache is a place where the system stores data temporarily, just in case it’s ever needed again. While the cache can speed up data access and loading times, a large cache can actually have the exact opposite effect, and cause your Mac to run more slowly. If a particular application has started to lag, or your Mac seems to be struggling in general, then it may be time to clean out the cache.
There are two ways of emptying your Mac’s cache: manually, or by using an app.
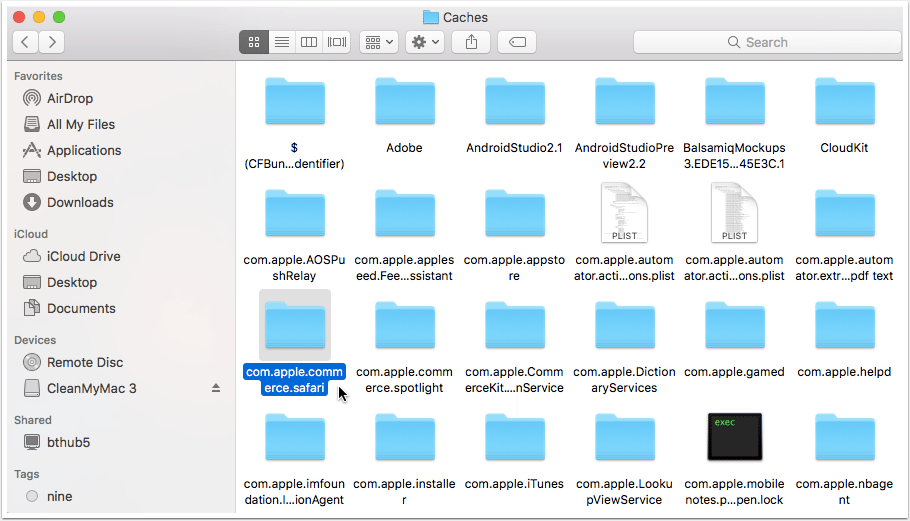
If you want to control exactly which files get deleted, launch your Mac’s ‘Finder’ and navigate to Home/Library/Caches. At this point you’ll have access to a tonne of folders containing the cached files for different applications.
Rather than deleting entire folders, you should open each folder in turn and remove their contents, for example if you want to delete the Safari cache then you should open the com.apple.commerce.safari folder and drag its contents to the Trash.
Once you’ve finished cleaning the cache, make sure you empty your Mac’s Trash as this will ensure you receive the full, performance-boosting benefits of deleting all those files.
Alternatively, you may want to use an application that’s designed specifically for identifying and removing cached files. Using an app is quicker and easier than working your way through folders manually, plus many cache-cleaning apps come with additional features that can help you boost your Mac’s performance in other ways.
One cache-cleaning app that you can download for free, is CleanMyMac 3. After downloading and installing this app, launch it and select ‘System junk’ from the left-hand menu, followed by ‘Scan.’
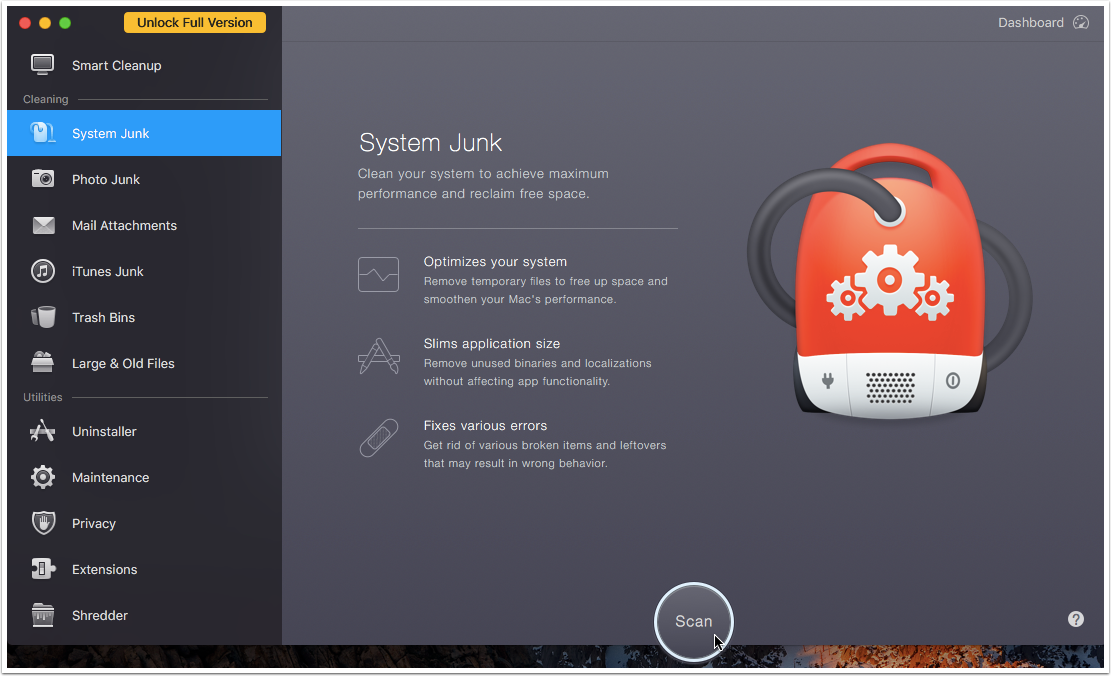
This feature doesn’t just clean your cache, it also tries to reduce the size of your applications by removing unused binaries and localisations, and looking for any leftover or broken files.
After running a ‘System Junk’ scan, it’s recommended that you use CleanMyMac 3 to empty all the Trash cans across your Mac – just to ensure those cached files are really, truly gone. Select ‘Trash Bins’ from CleanMyMac 3’s left-hand menu, followed by ‘Scan.’
5. You need to clear your web browser’s cache
While we’re on the subject of caches, web browsers have a cache all their own. While this can help your browser load webpages more quickly, if that cache balloons out of control then it may have a negative impact on your browser’s performance.
If it feels like your browser is starting to slow down, then it may be time to give it a bit of a spring clean!
Here’s a quick run-through of how to empty the cache for the three major web browsers:
- Safari. Launch the browser and select ‘Safari’ from the menu bar, followed by ‘Preferences…’ In the window that appears, click the ‘Privacy’ tab and give the ‘Manage Website Data…’ button a click. Select ‘Remove All.’
- Chrome. Launch Chrome and select ‘History’ from the menu bar, followed by ‘Show full history.’ Click the ‘Clear browsing data…’ button.
- Firefox. Launch Firefox and click the menu button. Select the ‘Advanced’ panel, followed by the ‘Network’ tab. In the ‘Cached Web Content’ section, click ‘Clear Now.’
6. Your browser is packed with extensions
With so many browser extensions, plugins and general add-ons out there, it’s easy to get carried away and overload your browser. While it’s great to customise your Internet experience, going overboard can bring even the best browser to a halt.
Here’s how to take stock of exactly what added extras you’ve installed, and how to remove any you no longer need:
- Safari. Open the web browser, select ‘Safari’ from the menu bar and click ‘Preferences…’ Select the ‘Extensions’ tab to see a list of all the browser extensions you’ve installed. Select the extension(s) you want to remove, and then click ‘Uninstall.’
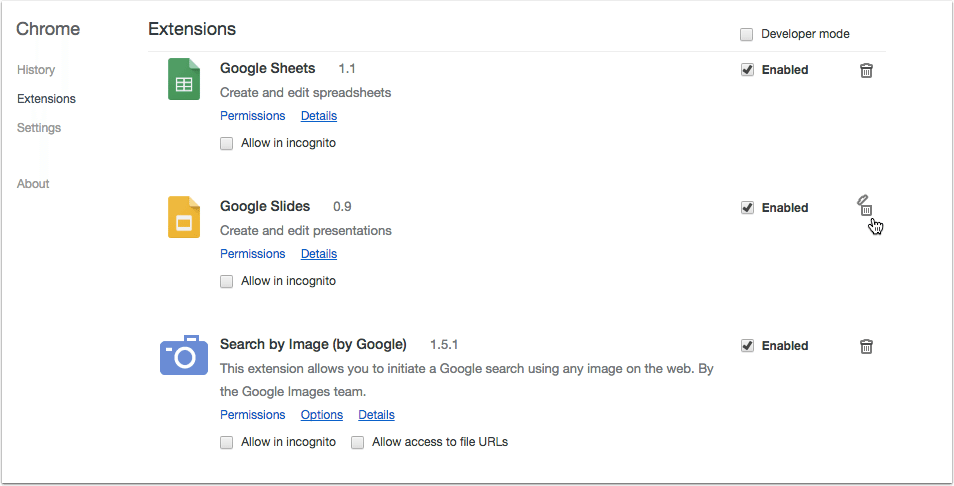
- Chrome. Launch Chrome, then select ‘Chrome’ from the menu bar followed by ‘Preferences…’ Select ‘Extensions’ from the left-hand menu to see a list of all your Chrome extensions. If you spot any you want to remove, hover over its corresponding trashcan icon and then give that icon a click. When prompted, click ‘Remove.’
- Firefox. Launch Firefox and click its menu button. Select ‘Add-ons’ to launch the ‘Add-ons Manager’ tab. To disable extensions and themes, select ‘Extensions or Appearance,’ then select the add-on you want to disable and give the ‘Disable’ button a click. To disable a plugin, navigate back to the ‘Add-on Manager’ tab and select ‘Plugins.’ Select the plugin you want to disable, followed by ‘Never Activate.’
7. Your desktop is a mess!
Admit it: at some point we’ve all let our desktop get out of control. It’s far too easy to stick new files on the desktop, promise yourself “I’ll find a proper home for it later,” and then forget all about it.

The desktop is convenient, but there’s a downside to this convenience, as the icons belonging to these files may be taking up more resources than you realise.
Every file on your desktop is a window with an image in it. This image is stored in RAM so that when you switch to your desktop or use Quick Look to peek inside a file, your Mac can quickly show you what’s inside that window. More files on your desktop means more icons, which means more data stored in RAM – which means bad news for your Mac’s performance!
Sure it’s a boring task, but spending some time bringing an out-of-control desktop back into line can deliver a noticeable performance boost.
And if you really do need easy access to a file, you can always create an alias on the desktop and then store the actual file elsewhere. To create an alias, right-click the file in question and select ‘Make Alias’ from the menu that appears, then drag your newly-created alias to the desktop.
8. You have too many widgets on your Dashboard
While Dashboard widgets can provide quick and easy access to your most frequently-used apps, having a bunch of widgets running in the background can also put your Mac under some serious pressure, which will have a negative impact on its overall performance.
To take stock of the widgets currently installed on your Dashboard, either select the ‘Dashboard’ icon from your Dock, or navigate to your ‘Applications’ folder and then double-click the ‘Dashboard’ icon.
If your Dashboard is looking cluttered, then you can remove widgets by clicking the Remove ‘-’ icon in the lower-left corner of the Dashboard, and then selecting the ‘X’ button that appears next to the widget(s) you want to remove.
You could also choose the ultimate solution if you don’t use dashboard and just disable it via the Terminal.
Disable Dashboard
defaults write com.apple.dashboard mcx-disabled -bool true
Don’t show Dashboard as a Space
defaults write com.apple.dock dashboard-in-overlay -bool true
After running those commands you will need to restart those programs by typing the following in Terminal before they take effect:
killAll Dock
9. An app’s preferences files are corrupt
Most applications offer a certain degree of customisation, usually via a ‘Settings’ or ‘Preferences’ screen. When you customise an app, that app saves your settings to a dedicated preferences file. Then, every subsequent time you launch this application, it’ll check this preference file and load your custom settings.
Preference files tend to be pretty small, so deleting them typically won’t result in any significant performance improvement – unless that file is causing the application to misbehave. It’s possible for preference files to become corrupt, at which point they may cause the app to crash, run more slowly, or exhibit other weird and wonderful behaviour.
If you’ve been experiencing slowdowns or other issues with a particular app, then you may want to try deleting its preference file and starting again from scratch. To delete an application’s preference file, open your Mac’s ‘Finder’ and navigate to Home/Library/Preferences.
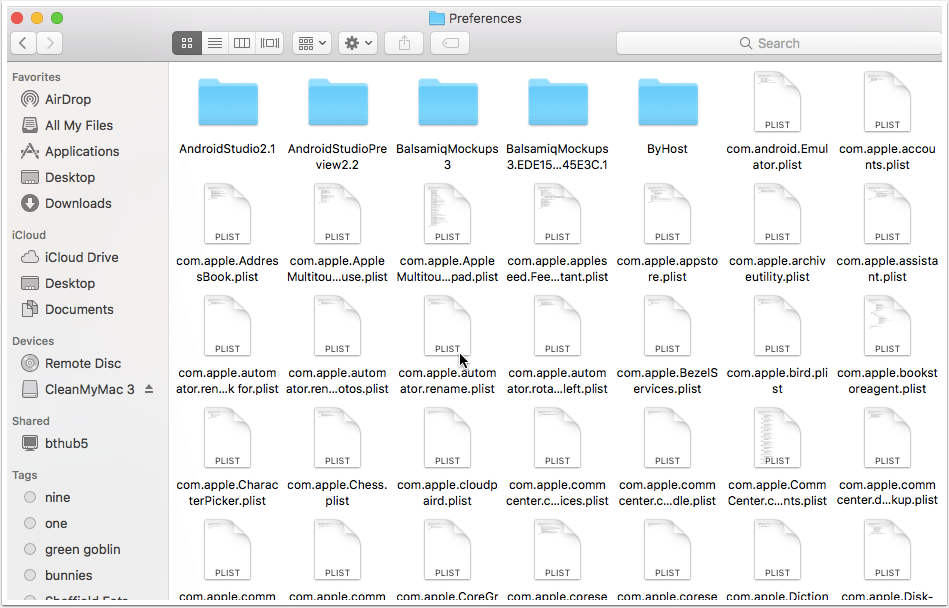
Find the preference file for the app that’s causing you so many problems, and hit ‘Delete.’ Then, the only thing left to do is relaunch the app and check whether it’s now behaving itself.
10. Your System Preferences is full of custom items
Some programs will add custom items to your Mac’s system preferences – potentially without your knowledge! Clearing out these custom items can free up valuable memory, so open your ‘System preferences….’ and take a look at the bottom row, which is where you’ll find any custom preferences that have been created. If you spot a custom item you want to remove, right-click it and select the ‘Remove…’ tooltip that appears.
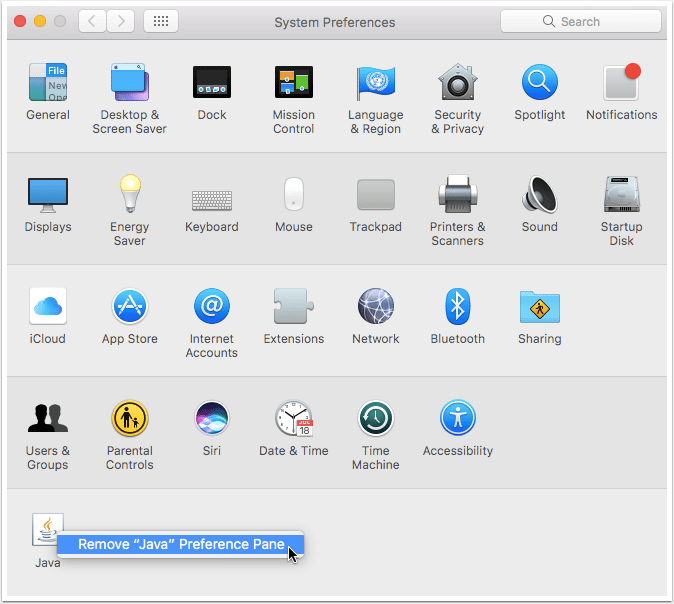
Just be aware that you can only remove custom preferences. If you right-click one of Mac’s default system preferences, this tooltip won’t appear.
11. You’re using an animated wallpaper
Sure, they look pretty but animated or slide show wallpapers take up a lot of system resources. Resist their charms and opt for a simple-but-classic, static wallpaper instead.
12. Your mailbox is out of control
After the desktop, the inbox is the other thing that many Mac users (actually, most computer users) let spiral out of control. If you can’t remember the last time you spent an afternoon deleting old emails (ditto), then it’s possible that everytime you launch your Mail application you’re effectively asking Mail to load years’ worth of emails.
Try to get into the habit of going through your Mailbox from time to time and deleting messages you no longer need – or, alternatively, why not get Mail to do all the hard work for you?
If spending a few hours deleting old emails sounds like a thankless chore (because let’s face it, it is) then you can create rules within the Mail app – including rules about when old messages should be automatically deleted.
To create a rule, open the Mail app and select ‘Mail’ from the menu bar, followed by ‘Preferences…’ Select the ‘Rules’ tab in the window that appears, then click ‘Add Rule,’ and set the criteria for this particular rule – perhaps that all messages should be deleted automatically after a certain number of days has elapsed?

13. You need to reset the NVRAM
Your Mac’s non-volatile random-access memory, NVRAM for short, is a small amount memory that’s dedicated to storing settings in a place where it can be accessed quickly. This has replaced PRAM or Parameter Ram which was found in older Macs and performed a similar function. You don’t need to worry about which one applies to you though as the process of reseting is the same.
NVRAM stores information like:
Speaker volume
Screen resolution
Time zones
Bluetooth controller info
While its unlikely your Mac will become suddenly more responsive after a reset, I have found over the years that it does resolve some issues when a Mac isn’t behaving as it should.
Here’s how:
- Shut down your computer
- Locate the Command, Option, P and R keys. You’ll need to use these in a moment
- Turn on the computer
- Press and hold down the Command, Option, P and R keys before the grey screen appears
- Hold down the keys until the computer restarts and you hear the startup chime for the second time
- Release the keys
The PRAM should now be reset to the default values.
You can reset the NVRAM via Terminal (although you will still need to restart) just bring up a terminal window and type:
nvram -c
14. You need to reset the SMC
If after investigating all the other reason your Mac may be running slow you could try resetting the SMC (System Management Controller), which may resolve issues related to fans, lights, video, power and can improve performance in certain circumstances. If you’ve tried everything else and you still feel your Mac is sluggish its worth a try as there aren’t any negative consequences of doing so.
Here’s how:
- Shut down the computer
- Plug in the power adaptor
- Press the Shift + Control + Option keys and the power button at the same time
- Release all the keys and the power button simultaneously
- Press the power button to turn on your Mac
15. Your internet connection is slow
As iCloud becomes more and more an integral part of macOS machines operating with slower internet connections may struggle to stay fully synced and run smoothly. If you think your internet connection is holding you back have a look at our post here
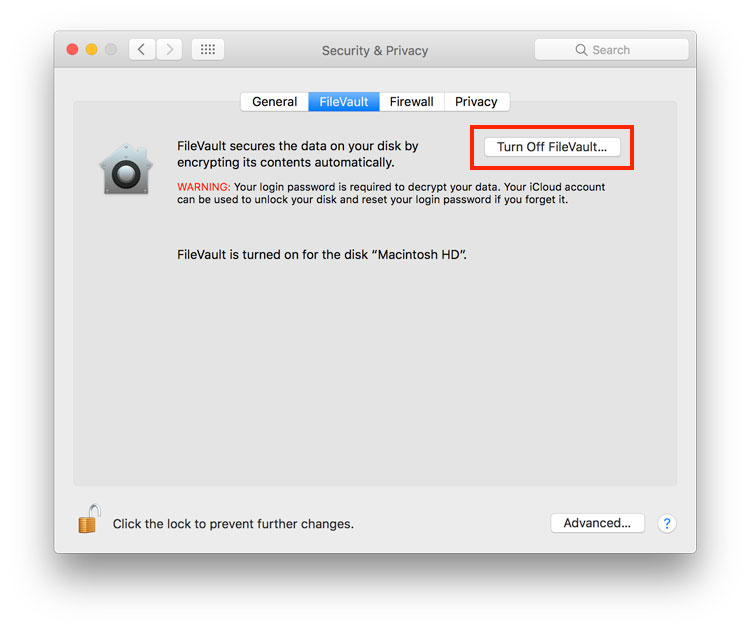
16. You have FileVault Disk Encryption enabled
Again this is less of an issue on newer Macs with SSDs, however Filevault encrypts/decrypt all data on your drive. Anytime you add a extra function/process it will show your machine down. To disable FileVault go to System Preferences then choose the Security & Privacy pane and then the FileVault tab.
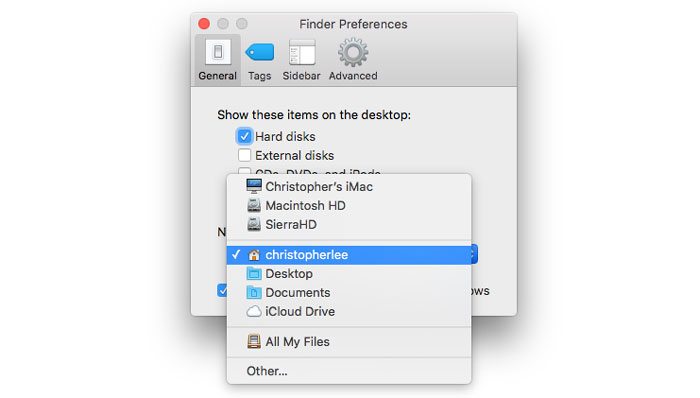
17. Finder Preferences
By default new Finder windows are set to display “All Files”, this is a pretty labour intensive query and in my opinion not all that useful. To change the default folder in all new Finder windows, in the Finder menu click preferences and choose a new folder under in the drop down menu.
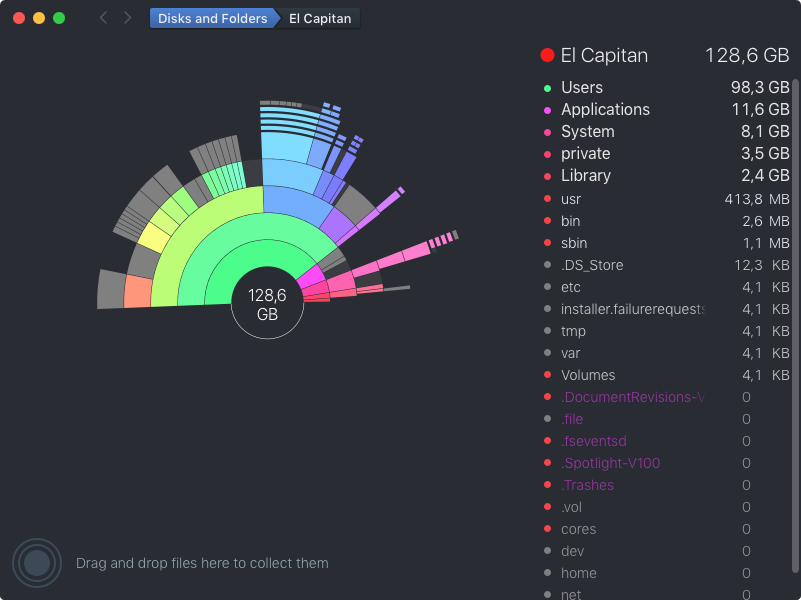
18. You need more free Disk Space
You Mac should have at the very least 5% of free disk space to function properly. Sufficient disk space is essential for apps, music and media content, as well as being used for virtual memory should your physical memory be insufficient. Daisy Disk (£7.99 from the App Store) is a great app that lets you immediately see the size and distribution of files on your disk, so you can quickly identify any particularly large ones that you might wish to delete.
19. You have Permission conflicts
Some problems with applications launching slowly or just generally acting weird may be remedied by repairing permissions. All files on the Mac have a set of permissions which control which users or applications can access them. Sometimes permissions are incorrect and need to be repaired. This is really just a problem for Mac’s running OS X versions prior to El Capitan. El Capitan and Sierra automatically update permissions so this option has now been removed from Disk Utility.
Here’s how to repair permissions on Macs running Yosemite and earlier versions of OSX:
- Open Disk Utility (located in Applications/Utilities)
- Select your startup disk
- Click the First Aid button/tab
- Then click Repair Disk Permissions.
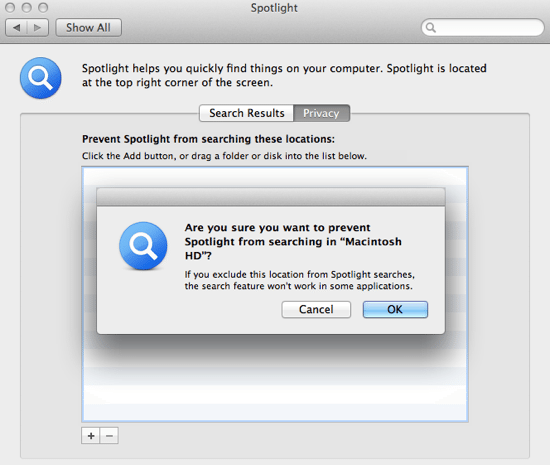
20. Spotlight is indexing
Spotlight tracks any changes made to your hard drive so that you can search for documents, applications, images, movies and other files very quickly. Periodically Spotlight indexes all the files on your Mac, this can take quite a long time and while this is happening your Macs performance will suffer. However, Spotlight can safely be temporarily disabled especially if you don’t use it much or are content with not being able to search for a while.
To disable Spotlight indexing go to System Preferences -> Spotlight and select the Privacy button. Next, just drag your entire hard drive icon from Finder or the desktop into the area labelled Prevent Spotlight from searching these locations (or press the little + button), and choose OK when prompted. To turn indexing back on, just remove your hard drive from the list of locations with the – button.
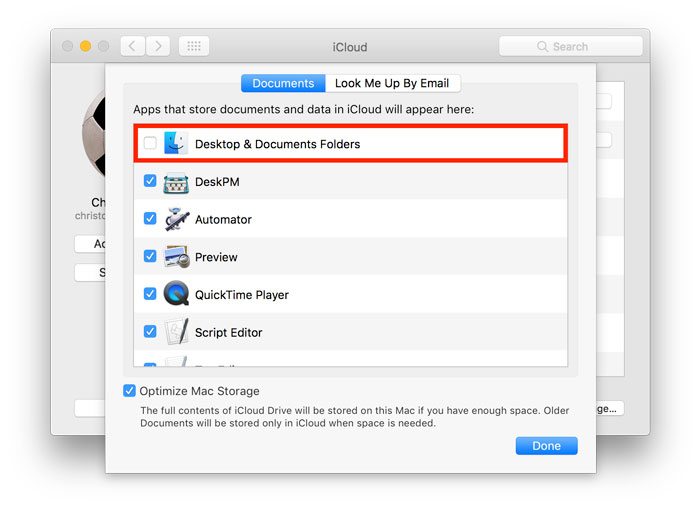
21. Your iCloud settings are causing slow downs
In conjunction with a slow internet connection its possible that your iCloud options may be slowing down your machine. If you use more than one Mac and have a habit of keeping lots of files on your Documents folder and on the desktop you Mac could be struggling to keep these folders synced. In macOS Sierra, iCloud Drive attempts to keep these folders synchronised which means extra processes, which means the potential for slow downs. To disable this head to System Preferences / iCloud then open the iCloud Drive options and deselect Desktop & Documents.
22. You should turn off visual effects
Removing visual effects not only potentially reduces strain on the GPU, removing the animations can certainly make you Mac feel more responsive. These commands have been tested in macOS Sierra.
Stop opening “bouncing” applications in the Dock.
defaults write com.apple.dock launchanim -bool false
Make Mission Control animations faster.
defaults write com.apple.dock expose-animation-duration -float 0.1
Remove the delay when the Dock automatically hides.
defaults write com.apple.dock autohide-time-modifier - float 0
After running those commands you will need to restart those programs by typing the following in Terminal before they take effect:
killAll Finder && killAll Dock
Before you go
After spending over 20 years working with Macs, both old and new, theres a tool I think would be useful to every Mac owner who is experiencing performance issues.
CleanMyMac is highest rated all-round cleaning app for the Mac, it can quickly diagnose and solve a whole plethora of common (but sometimes tedious to fix) issues at the click of a button. It also just happens to resolve many of the issues covered in the speed up section of this site, so Download CleanMyMac to get your Mac back up to speed today.


